Introduction:
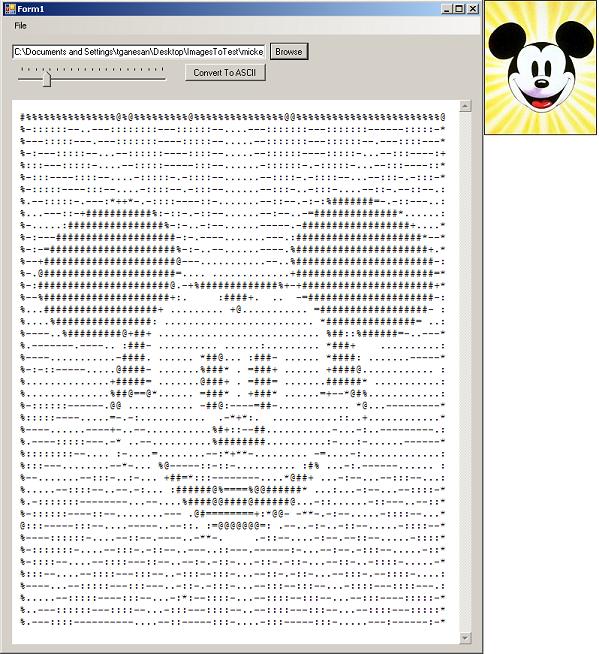
I always liked ASCII Art and my passion to generate one urged me to explore the GDI+ in .NET framework. In this article I'll show you how to generate ASCII art from a JPEG/Bitmap image in quick three simple steps.
-
Load and Resize the Image.
-
Read each pixel, get its color and convert them to its equivalent grayscale.
-
Assign appropriate characters to each pixel based on the computed grayscale value.
Let's get down to Code:
Start by initializing the System.Drawing.Bitmap class with the image path. This class is used to work with images defined by pixel data. Resize the image to a lower resolution while maintaining its aspect ratio. This step is crucial because each pixel of an image represents a character in the final ASCII output. For example, if the resolution of a JPEG image that you want to convert is 2592x1944, the resulting text would have 1944 lines of 2592 characters each and definitely you don't want one that big. Next, define a width for the ASCII image and determine the height by proportionately scaling it down.
scalingFactor = asciiWidth / imageWidth
asciiHeight = imageHeight * scalingFactor
private void btnConvertToAscii_Click(object sender, EventArgs e)
{
btnConvertToAscii.Enabled = false;
//Load the Image from the specified path
Bitmap image = new Bitmap(txtPath.Text, true);
//Resize the image...
//I've used a trackBar to emulate Zoom In / Zoom Out feature
//This value sets the WIDTH, number of characters, of the text image
image = GetReSizedImage(image,this.trackBar.Value);
//Convert the resized image into ASCII
_Content = ConvertToAscii(image);
//Enclose the final string between <pre> tags to preserve its formatting
//and load it in the browser control
browserMain.DocumentText = "<pre>" + _Content + "</pre>";
btnConvertToAscii.Enabled = true;
}
Initialize a Bitmap image object by specifying the new Width and Height. Create a graphics object from the new image object. Set the interpolation mode associated with the graphics object to HighQualityBicubic. This mode produces the highest quality transformed images (refer MSDN). You can also try changing the interpolation modes to either HighQualityBilinear or NearestNeighbor within the code and check your output.
private Bitmap GetReSizedImage(Bitmap inputBitmap, int asciiWidth )
{
int asciiHeight=0;
//Calculate the new Height of the image from its width
asciiHeight = (int)Math.Ceiling((double)inputBitmap.Height * asciiWidth / inputBitmap.Width);
//Create a new Bitmap and define its resolution
Bitmap result = new Bitmap(asciiWidth, asciiHeight);
Graphics g = Graphics.FromImage((Image)result);
//The interpolation mode produces high quality images
g.InterpolationMode = System.Drawing.Drawing2D.InterpolationMode.HighQualityBicubic;
g.DrawImage(inputBitmap, 0, 0, asciiWidth, asciiHeight);
g.Dispose();
return result;
}
The ConvertToAscii() method which accepts resized image as its input does the real conversion process. Read each pixel from the bitmap object, normalize its color to find the equivalent grayscale and assign a character based on its gray factor. This can also be realized as the brightness of the image. The average of Red, Blue and Green components of a color gives its gray factor. Black has an (R, G, B) value of (0, 0, 0), white (255,255,255), while Sliver has (192,192,192).
private string ConvertToAscii(Bitmap image)
{
Boolean toggle = false;
StringBuilder sb = new StringBuilder();
for (int h = 0; h < image.Height; h++)
{
for (int w = 0; w < image.Width; w++)
{
Color pixelColor = image.GetPixel(w, h);
//Average out the RGB components to find the Gray Color
int red = (pixelColor.R + pixelColor.G + pixelColor.B) / 3;
int green = (pixelColor.R + pixelColor.G + pixelColor.B) / 3;
int blue = (pixelColor.R + pixelColor.G + pixelColor.B) / 3;
Color grayColor = Color.FromArgb(red,green,blue);
//Use the toggle flag to minimize height-wise stretch
if (!toggle)
{
int index = (grayColor.R * 10) / 255;
sb.Append(_AsciiChars[index]);
}
}
if (!toggle)
{
sb.Append("<BR>");
toggle = true;
}
else
{
toggle = false;
}
}
return sb.ToString();
}
The character array holds a pre-determined list of ASCII characters sorted based on their brightness and weight.
private string[] _AsciiChars = { "#", "#", "@", "%", "=", "+", "*", ":", "-", ".", " " };
A cluster of "#" characters appears to be darker and prominent than a cluster of "+" or "*". Moreover, these characters are Font-dependant and the ASCII art generated by this application looks good only if the Font type is set to "Courier New". Also, the relative spacing of two adjacent lines is obviously greater than two adjacent characters. This causes the ASCII image to stretch height-wise. To eliminate this, I've sampled out lines from the image's height and inserted line-breaks by alternately setting the toggle flag. Finally the string, enclosed in <pre></pre> tag to preserve formatting, is loaded in a browser control. If the user wants to save it as a flat text file, all occurrences of are replaced by spaces and all linebreaks, "<BR>", are replaced by "\n".
private void saveAsToolStripMenuItem_Click(object sender, EventArgs e)
{
saveFileDialog1.Filter = "Text File (*.txt)|.txt|HTML (*.htm)|.htm";
DialogResult diag = saveFileDialog1.ShowDialog();
if (diag == DialogResult.OK)
{
if (saveFileDialog1.FilterIndex == 1)
{
_Content = _Content.Replace(" ", " ").Replace("<BR>","\n");
}
else
{
_Content = "<pre>" + _Content + "</pre>";
}
StreamWriter sw = new StreamWriter(saveFileDialog1.FileName);
sw.Write(_Content);
sw.Flush();
sw.Close();
}
}
Conclusion
This is one of many fascinating things that can be done with GDI+ in .NET. The code can be further enhanced to generate colored or animated ASCII arts. I've tried to keep it simple and straightforward for easy understanding. Coding really is fun, so have fun!!