|
|
|
|
|
Similar ArticlesMost ReadTop RatedLatest
|
|
|
|
|
|

|
|
|

|
|
|
|
|
|
|
|
|
|
|

|
|
|

|
|
In this
tutorial, I will show you:
-
How to
use inline HTML helper inside the view itself
-
How to
use HTML helper with an extension method and call the method in side view.
OK, here we
go:
Create your MVC project first
 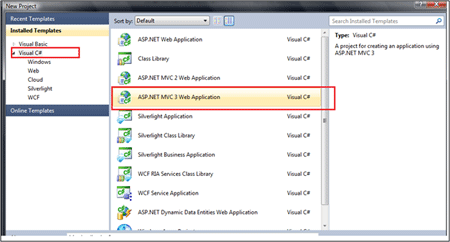
 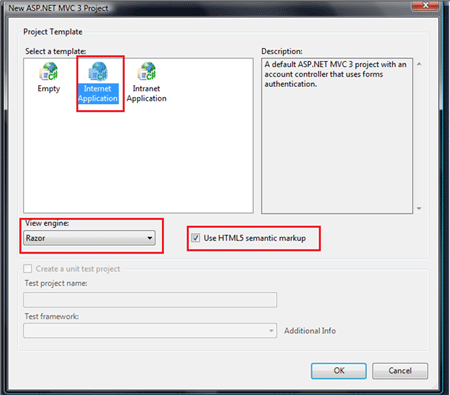
Use HTML helpers as a declarative incline content
In this simple example I am creating a radio button using HTML helper
by declaring the logic inside the
  view
file itself. Open the index.cshtml file. The Cshtml file is meant to handle HTML
related functionality in a razor view implementation view
file itself. Open the index.cshtml file. The Cshtml file is meant to handle HTML
related functionality in a razor view implementation
Use HTML
helpers as a declarative incline content
In this simple example I am creating a radio button using HTML helper
by declaring the logic inside the view file itself. Open the index.cshtml file.
The Cshtml file is meant to handle HTML related functionality in a razor view
implementation
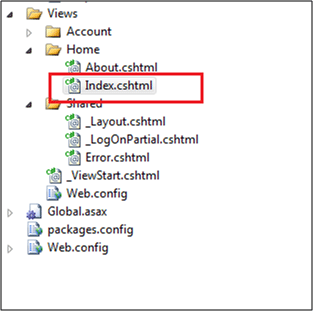
The code inside is:
@helper CustomRadioButton()
{
@Html.RadioButton("Custom",
"Y",
true)
@Html.RadioButton("Custom",
"N",
false)
}
<h2>
Radiobutton from inline MVC HTML helper
@CustomRadioButton()</h2>
@helper is the key and you should use the same name. Then comes
your method name and it's your own choice. I chose CustomRadioButton() even
though it's returning normal radio buttons. Now the method body; @Html will give
you a Ref. to HTML helper and you can access built-in control classes. Here I
used RadioButton. Our logic is finished and now we need to call the method named
CustomRadioButton(). You call it from anywhere using @<<method name>> i.e. @CustomRadioButton().
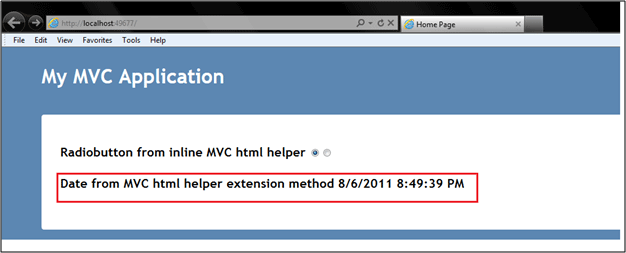
Now run the application and its output will be as below.

Use HTML helpers using extension methods
Create a new class named Helpers (like the following) in a new folder:
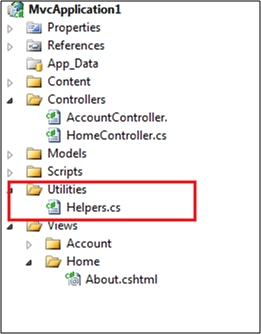
The inner code is like below
and you may already be aware that extension methods are not new and it needs a
static class. I will not explain in depth about extension methods, but here we
are adding one extension method to the built-in HtmlHelper class.
namespace
MvcApplication1.Utilities
{
public static
class
HtmlHelpers
{
public
static DateTime
GetTodayDate(this
HtmlHelper helper)
{
return
DateTime.Now;
}
}
}
The method merely returns the
current date time.
The "this" keyword is determining which class is being extended. Here it's
HtmlHelper like GetTodayDate(this HtmlHelper helper).
Now need to build the solution and use this new extension method inside the view
file. Again open the same index.cshtml and the code will be like below:
@using
MvcApplication1.Utilities;
Date from MVC html helper extension method @Html.GetTodayDate()</h2>
The 1st statement is understandable as it's importing the required namespace.
Once you imported the namespace, now you can use the extension method declared
inside that namespace like @Html.GetTodayDate(). Just look at the method you
defined can access with the built-in class, @Html i.e. HtmlHelper. This is the
basic behavior of extension methods. Now run the application and see the output
like below.
Last one more point. The configuration settings here are more flexible. Using
this you can avoid the using statement of @using MvcApplication1.Utilities. This
can be achieved by putting the same namespace inside config file under the views
folder. See the following screen shot.
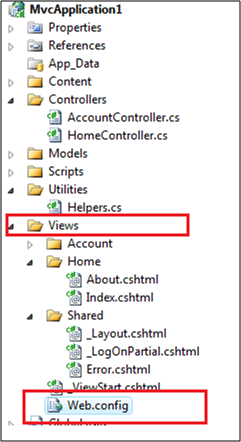
Note that it's not application web.config, but specific to views. The section
will be like this.
<system.web.webPages.razor>
<host factoryType="System.Web.Mvc.MvcWebRazorHostFactory, System.Web.Mvc,
Version=3.0.0.0, Culture=neutral, PublicKeyToken=31BF3856AD364E35" />
<pages pageBaseType="System.Web.Mvc.WebViewPage">
<namespaces>
<add namespace="System.Web.Mvc" />
<add namespace="System.Web.Mvc.Ajax" />
<add namespace="System.Web.Mvc.Html" />
<add namespace="System.Web.Routing" />
<add namespace="MvcApplication1.Utilities"/>
</namespaces>
</pages>
</system.web.webPages.razor>
Enjoy the post....
|