Introduction
This article describes how to create a web service in ASP.NET and use it in a client application.
What is Web Service?
A Web Service is a reusable piece of code used to communicate among Heterogeneous Applications.
Once a web service is created and hosted on the server in the internet it can be consumed by any kind of application developed in any technology.
How to create a Web Service?
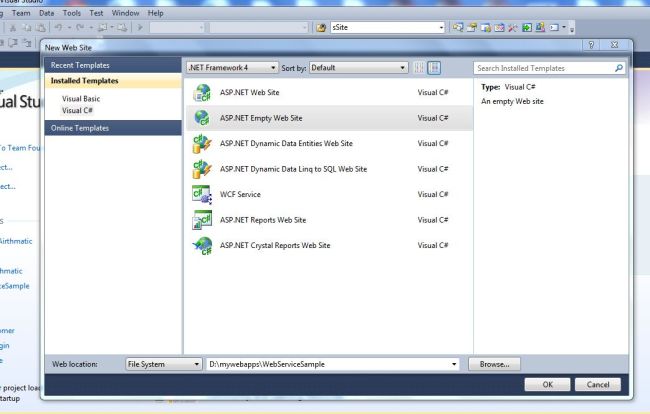
Step 1. Go to Visual Studio then click on "File" -> "Website" -> "ASP.NET empty website template".
Then provide the website name (for example: WebServiceSample).
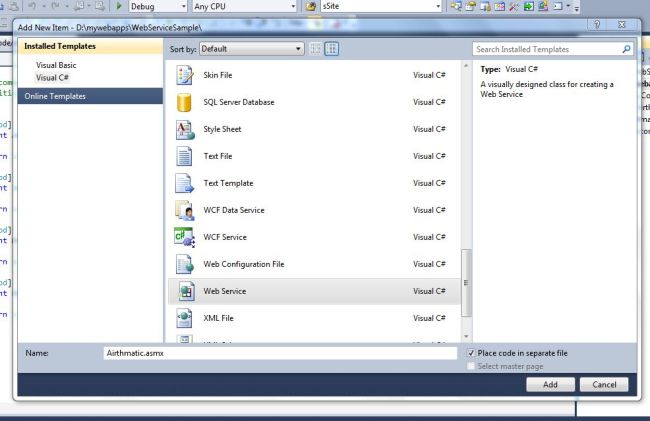
Step 2. Add a Web Service File.
Go to Solution Explorer, then select the solution then click on "Add new item".
Choose the Web Service template.
Enter the name (for example: Airthmatic.cs) then click on "Add".
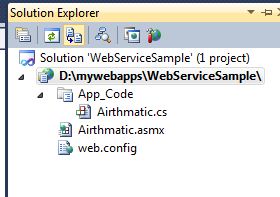
This will create the following two files.
- Airthmatic.asmx (the service file).
- Airthmatic.cs (the code file for the service; it will be in the "App_code" folder).
Open the file Airthmatic.cs and write the following code.
using System;
using System.Collections.Generic;
using System.Linq;
using System.Web;
using System.Web.Services;

/// <summary>
/// used for Airthmatic calculation
/// </summary>
[WebService(Namespace = "http://tempuri.org/")]
[WebServiceBinding(ConformsTo = WsiProfiles.BasicProfile1_1)]
// To allow this Web Service to be called from script, using ASP.NET AJAX, uncomment the following line.
// [System.Web.Script.Services.ScriptService]
public class Airthmatic : System.Web.Services.WebService
{
    public Airthmatic()
    {
        // Uncomment the following line if using designed components
        // InitializeComponent();
    }

    [WebMethod]
    public int Add(int x, int y)
    {
        return x + y;
    }

    [WebMethod]
    public int Sub(int x, int y)
    {
        return x - y;
    }

    [WebMethod]
    public int Mul(int x, int y)
    {
        return x * y;
    }

    [WebMethod]
    public int Div(int x, int y)
    {
        return x / y;
    }
}
Attaching the WebMethod attribute to a Public method indicates that you want the method exposed as part of the XML Web service. You can also use the properties of this attribute to further configure the behavior of the XML Web service method. The WebMethod attribute provides the following properties.
- BufferResponse
- CacheDuration
- Description
- EnableSession
- MessageName
- TransactionOption
For more details of web methods click here.
Step 3. To see whether the service is running correctly go to the Solution Explorer then open "Airthmatic.asmx" and run your application.
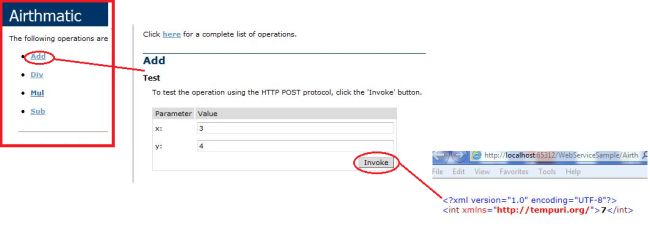
Now you will find all the method names in the browser.

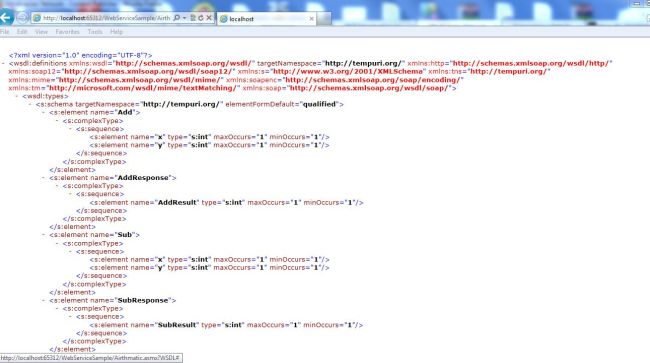
To see the WSDL format click on the service description link or add "?WSDL" to the URL.
Example. http://localhost:65312/WebServiceSample/LAirthmatic.asmx?WSD
It will show the WSDL.
To determine whether the functions are working, click on one of the functions (for example: "Add").
Now you will see two TextBoxes for checking. Enter the value for x and y and click on the "Invoke" button.
Now you will see the result in an open standard form (XML).
Now your service is ready for use.
Step 4. Creating the client application.
Now create a website and design your form as in the following screen.
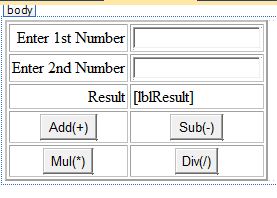
Or you can copy the following source code.
<body>
    <form id="form1" runat="server">
        <div>
            <table border="2" cellpadding="2" cellspacing="2">
                <tr>
                    <td align="right">
                        <asp:Label ID="Label1" runat="server" Text="Enter 1st Number"></asp:Label>
                    </td>
                    <td align="left">
                        <asp:TextBox ID="txtFno" runat="server"></asp:TextBox>
                    </td>
                </tr>
                <tr>
                    <td align="right">
                        <asp:Label ID="Label2" runat="server" Text="Enter 2nd Number"></asp:Label>
                    </td>
                    <td align="left">
                        <asp:TextBox ID="txtSno" runat="server"></asp:TextBox>
                    </td>
                </tr>
                <tr>
                    <td align="right">
                        <asp:Label ID="Label3" runat="server" Text="Result"></asp:Label>
                    </td>
                    <td align="left">
                        <asp:Label ID="lblResult" runat="server"></asp:Label>
                    </td>
                </tr>
                <tr>
                    <td align="center">
                        <asp:Button ID="btnAdd" runat="server" Text="Add(+)" OnClick="btnAdd_Click" />
                    </td>
                    <td align="center">
                        <asp:Button ID="btnSub" runat="server" Text="Sub(-)" OnClick="btnSub_Click" />
                    </td>
                </tr>
                <tr>
                    <td align="center">
                        <asp:Button ID="BtnMul" runat="server" Text="Mul(*)" OnClick="BtnMul_Click" />
                    </td>
                    <td align="center">
                        <asp:Button ID="btnDiv" runat="server" Text="Div(/)" OnClick="btnDiv_Click" />
                    </td>
                </tr>
            </table>
        </div>
    </form>
</body>
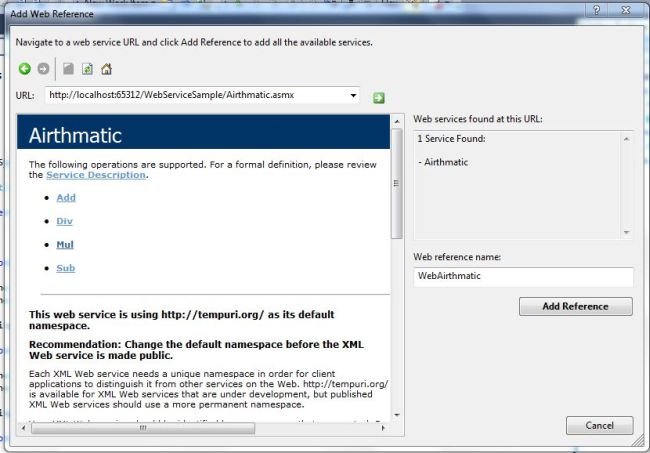
Step 5. Add a web reference to the Website.
Go to Solution Explorer then select the solution then click on "AddWeb Reference" then within the URL type the service reference path.
(For example: http://localhost:65312/WebServiceSample/Airthmatic.asmx) then click on the "Go" button.
Now you will see your service methods. Change the web reference name from "localhost" to any other name as you like (for example: WebAirthmatic).
Click on the "Add Reference" button. It will create a Proxy at the client side.
Now go to the cs code and add a reference for the Service.
Example
using WebAirthmatic;
Write the following code.
using System;
using System.Collections.Generic;
using System.Linq;
using System.Web;
using System.Web.UI;
using System.Web.UI.WebControls;
using WebAirthmatic;

public partial class _Default : System.Web.UI.Page
{
    Airthmatic obj = new Airthmatic();
    int a, b, c;

    protected void Page_Load(object sender, EventArgs e)
    {
    }

    protected void btnAdd_Click(object sender, EventArgs e)
    {
        a = Convert.ToInt32(txtFno.Text);
        b = Convert.ToInt32(txtSno.Text);
        c = obj.Add(a, b);
        lblResult.Text = c.ToString();
    }

    protected void btnSub_Click(object sender, EventArgs e)
    {
        a = Convert.ToInt32(txtFno.Text);
        b = Convert.ToInt32(txtSno.Text);
        c = obj.Sub(a, b);
        lblResult.Text = c.ToString();
    }

    protected void BtnMul_Click(object sender, EventArgs e)
    {
        a = Convert.ToInt32(txtFno.Text);
        b = Convert.ToInt32(txtSno.Text);
        c = obj.Mul(a, b);
        lblResult.Text = c.ToString();
    }

    protected void btnDiv_Click(object sender, EventArgs e)
    {
        a = Convert.ToInt32(txtFno.Text);
        b = Convert.ToInt32(txtSno.Text);
        c = obj.Div(a, b);
        lblResult.Text = c.ToString();
    }
}
Now first run the Web service then the application.
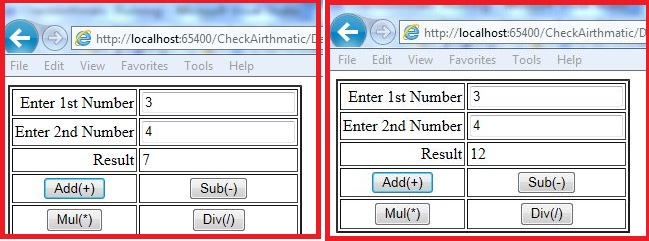
Now you will be able to communicate with the web service.