|
|
|
|
|
Similar ArticlesMost ReadTop RatedLatest
|
|
|
|
|
|

|
|
|

|
|
|
|
|
|
|
|
|
|
|

|
|
|

|
|
Creating an uninstall shortcut for your MSI package
Microsoft, as a general rule, expect every user to uninstall applications from the Add/Remove Programs tool in the Control Panel. However, there might be cases where one might want to add an 'Uninstall Program' shortcut to the Start->Programs Menu. The steps below are a walkthrough for creating a simple MSI package using Visual Studio 2008 and adding an 'Uninstall Program' shortcut to the Programs Menu as well.
Basic Walkthrough for creating an MSI Installation package in Visual Studio 2005 or 2008.
- Open the project for which an MSI Installation package is to be added in Visual Studio 2005.
- Right click the Solution of the Project in the Solution Explorer and select Add->New Project from the context menu.
- Expand the 'Other Project Types' category and choose 'Setup Project' from the 'Setup and Deployment category'. Enter a name and location for the MSI package to be created and click OK.
- A Setup project will be added to the project solution. Right Click the Setup Project in the Solution Explorer and select View->File System from the context menu.
- Right click 'Application Folder' in the new window and select Add->Project Output. Now, select 'Primary Output' from the dialog box that pops up and click OK. A 'Primary Output from xxx' entry should appear in the Application Folder. This is the main executable of the project.
- Right click the 'Primary Output from xxx' entry and select 'Create Shortcut to Primary Output from xxx'. Repeat this step one more time to create two shortcuts.
- Cut one of the shortcuts and paste it in the User's Desktop folder. Similarly cut the other shortcut and paste it in the User's Program Menu folder. Rename each of these shortcuts to something more appropriate (such as the application name).
Creating an Uninstall Program shortcut.
- Right click on Desktop or in any where in your hard Drive to add a shortcut for having Uninstall option for Setup(.msi).

9. A pop-up window will appear as follows
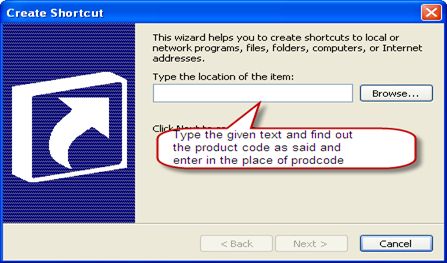
Type %windir%\system32\msiexec.exe -x {prodCode} This Product Code can be identified from the Project Properties of the MSI Project in Visual Studio.

Enter the ProductCode along with %windir%\system32\msiexec.exe -x {8544B23A-CCCD-4506-AD58-7509AE47C3B6}

Click on Next and give a desired name you like

Click on Finish.
- The next step involves adding this shortcut to the User's Programs Menu folder of the MSI project in Visual Studio. The problem is that files with extension .lnk (extension of the shortcut) cannot be added to the Project. So, first we need to rename the shortcut extension from .lnk to .txt. Open up a DOS command window and browse to the location of the shortcut using the 'cd' command. Now type 'ren xxx.lnk xxx.txt' where xxx is the name of the shortcut item that you have given to the Shortcut.
- Now, simply drag the renamed shortcut into the User's Programs Menu folder of the MSI project.
- Rename the shortcut from .txt back to .lnk.
- Build the MSI project and the necessary setup files will be created in the bin folder of the project.
|