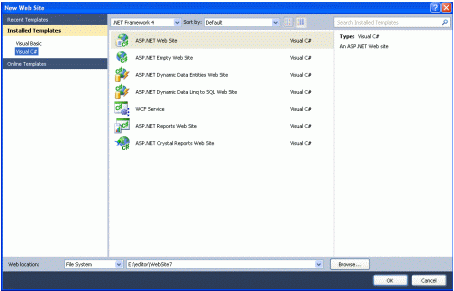
Today, I have provided an article showing you how to create a login with lightbox using jQuery. In this article we create a link and apply some CSS and jQuery code to display a login with lightbox. Today we give away a simple jQuery login form; it's easy to implement. All you have to do is implement and hook it up to your website. First of all start Visual Studio .NET and make a new ASP.NET web site using Visual Studio 2010.
Now you have to create a web site.
- Go to Visual Studio 2010
- New-> Select a website application
- Click OK
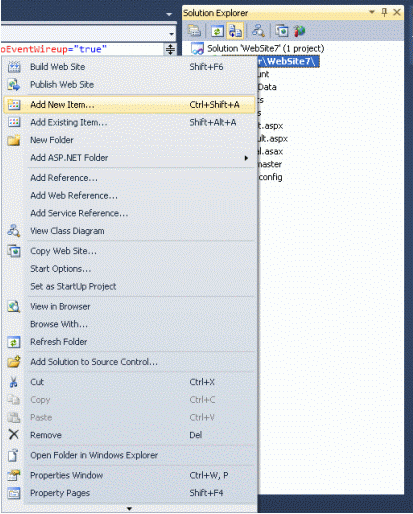
Now add a new page to the website.
- Go to the Solution Explorer
- Right-click on the Project name
- Select add new item
- Add new web page and give it a name
- Click OK
Now add CSS code in the head section of the application containing some style code.
.label
{
font-family: Verdana;
font-size: medium;
font-weight: bold;
color: #000000;
}
.click
{
font-family: Verdana;
font-size: medium;
font-weight: bold;
color: Orange;
padding: 300px;
}
.Title
{
font-family: Verdana;
font-size: large;
font-weight: bold;
color: #FF9900;
}
#Button1
{
width: 64px;
font-family: Verdana;
font-size: medium;
font-weight: bold;
background-color: Teal;
color: #FFF;
}
.black_overlay
{
display: none;
position: absolute;
top: 0%;
left: 0%;
width: 100%;
height: 100%;
background-color: black;
z-index: 1001;
-moz-opacity: 0.8;
opacity: .80;
filter: alpha(opacity=80);
}
.white_content
{
display: none;
position: absolute;
top: 25%;
left: 25%;
width: 50%;
height: 50%;
padding: 16px;
border: 16px solid #33ccff;
background-color: white;
z-index: 1002;
overflow: auto;
}
Now create a script tag inside the Head section and write the following code.
<script type="text/javascript" language="javascript">
function createlightbox() {
document.getElementById('light').style.display = 'block';
document.getElementById('fade').style.display = 'block'
}
function closelightbox() {
document.getElementById('light').style.display = 'none';
document.getElementById('fade').style.display = 'none'
}
</script>
Now write the following code in the body section to create a login form controls. The .aspx code will be as shown below.
<%@ Page Language="C#" AutoEventWireup="true" CodeFile="Default3.aspx.cs" Inherits="Default3" %>
<html xmlns="http://www.w3.org/1999/xhtml">
<head>
<title>Login LighBox Effect Example from Developer code</title>
<script src="Scripts/jquery-1.4.1.min.js" type="text/javascript"></script>
<style type="text/css">
.label
{
font-family: Verdana;
font-size: medium;
font-weight: bold;
color: #000000;
}
.click
{
font-family: Verdana;
font-size: medium;
font-weight: bold;
color: Orange;
padding: 300px;
}
.Title
{
font-family: Verdana;
font-size: large;
font-weight: bold;
color: #FF9900;
}
#Button1
{
width: 64px;
font-family: Verdana;
font-size: medium;
font-weight: bold;
background-color: Teal;
color: #FFF;
}
.black_overlay
{
display: none;
position: absolute;
top: 0%;
left: 0%;
width: 100%;
height: 100%;
background-color: black;
z-index: 1001;
-moz-opacity: 0.8;
opacity: .80;
filter: alpha(opacity=80);
}
.white_content
{
display: none;
position: absolute;
top: 25%;
left: 25%;
width: 50%;
height: 50%;
padding: 16px;
border: 16px solid #33ccff;
background-color: white;
z-index: 1002;
overflow: auto;
}
</style>
<script type="text/javascript" language="javascript">
function createlightbox() {
document.getElementById('light').style.display = 'block';
document.getElementById('fade').style.display = 'block'
}
function closelightbox() {
document.getElementById('light').style.display = 'none';
document.getElementById('fade').style.display = 'none'
}
</script>
</head>
<body>
<table width="100%" align="left">
<tr>
<td colspan="2">
<p class="click">
<a href="javascript:void(0)" onclick="createlightbox()">click here to display Login Form
in LightBox</a></p>
<div id="light" class="white_content">
<a href="javascript:void(0)" onclick="closelightbox()" style="float: right">
<img src="http://2.bp.blogspot.com/-aXHXnOQPBJM/Tx_p1qqNI4I/AAAAAAAAAeU/bH0tlsikADQ/s1600/icon_cancel.gif"
alt="" /></a>
<table align="center" cellpadding="5" cellspacing="5">
<tr>
<td colspan="2" class="Title" align="center">
Login Form
</td>
</tr>
<tr>
<td class="label">
UserName:
</td>
<td align="center">
<input id="Text1" type="text" />
</td>
</tr>
<tr>
<td class="label">
Password:
</td>
<td align="center">
<input id="Text2" type="text" />
</td>
</tr>
<tr>
<td>
<td>
<input id="Button1" type="button" value="Login" />
</td>
</td>
</tr>
</table>
</div>
</td>
</table>
<div id="fade" class="black_overlay">
</div>
</body>
</html>
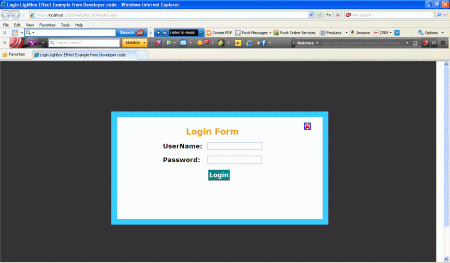
Now save the file and run the application and test it.
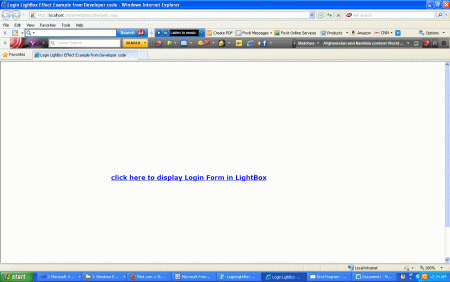
Now click on the link to show a login with lightbox.
Some Helpful Resources