authors = db.GetTable<Author>();
int age = 32;
var auth = authors.Single(a => a.Age == age);
authors.Remove(auth);
db.SubmitChanges();
Listing 3.
The Application
Now let's create a full-fledged application. In this application, I will load data from the database, display data in a DataGridView control, and will add and delete data.
The main application looks like Figure 1. This application shows authors data including authors' photo. name, age, male or female, joined date, and bio. So this grid shows how to display and manipulate images, text, boolean, and date types using DLINQ.
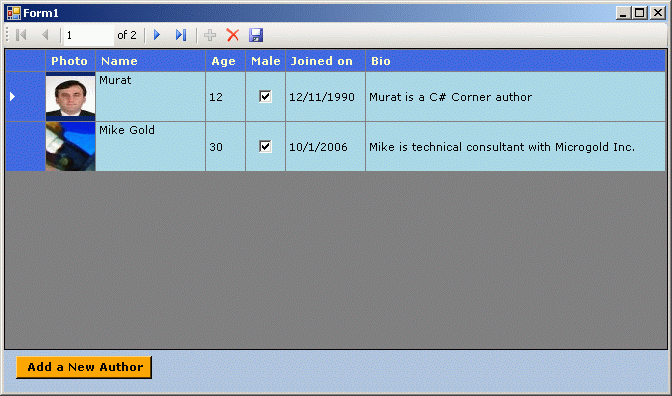
Figure 1.
Add a new Author button is used to add a new author to the authors list. Clicking on this button opens a new sub form called AuthorInfo that is used to enter the author data. Listing 4 shows the code looks like on AddNew button click event handler.
private void AddNewButton_Click(object sender, EventArgs e)
{
AuthorInfo ainfo = new AuthorInfo();
ainfo.Show();
}
Listing 4.
As you can see in Figure 2. The Form also provides options to browse and display author photo.
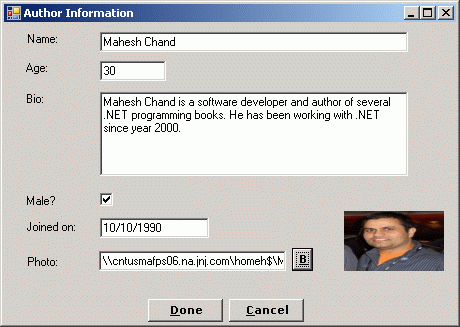
Figure 2.
Clicking Done button adds the author data to the database and displays on the main form. The Done button click event handler looks like Listing 5.
private void DoneButtonClick(object sender, EventArgs e)
{
byte[] imgBytes;
Int32 age;
// Create an Author object
Author newAuth = new Author();
// Generate and set a GUID
newAuth.ID = Guid.NewGuid();
// Make sure age is valid
if (AgeTextBox.Text.Length <= 0 )
{
MessageBox.Show("Enter a valid age!");
AgeTextBox.Select();
return;
}
try
{
age = Int32.Parse(AgeTextBox.Text);
}
catch (Exception exp)
{
MessageBox.Show("Enter a valid age!");
AgeTextBox.Select();
return;
}
// Set Age property
newAuth.Age = age;
// Make sure name is enered
if (NameTextBox.Text.Length <= 0)
{
MessageBox.Show("Enter a valid name!");
NameTextBox.Select();
return;
}
// Set Name property
newAuth.Name = NameTextBox.Text;
// Set Male property
newAuth.Male = MaleCheckBox.Checked;
// Set Bio property
newAuth.Bio = BioTextBox.Text;
// Make sure joined date is valid
if (JoinedTextBox.Text.Length > 0)
{
try
{
// Set JoinDate property
newAuth.JoinDate = DateTime.Parse(JoinedTextBox.Text);
}
catch(Exception exp)
{
MessageBox.Show("Enter a valid joined date!");
JoinedTextBox.Select();
return;
}
}
if (PhotoTextBox.Text.Length <= 0)
{
MessageBox.Show("Select a valid photo!" );
PhotoTextBox.Select();
return;
}
try
{
// Create an Image object from a file.
// PhotoTextBox.Text is the full path of your image
using (Image photoImg = Image.FromFile(PhotoTextBox.Text))
{
// Create a Thumbnail from image with size 50x40.
// Change 50 and 40 with whatever size you want
using (Image thumbPhoto = photoImg.GetThumbnailImage(50, 40, null, new System.IntPtr()))
{
// The below code converts an Image object to a byte array
using (MemoryStream ms = new MemoryStream())
{
thumbPhoto.Save(ms, System.Drawing.Imaging.ImageFormat.Jpeg);
imgBytes = ms.ToArray();
}
}
}
}
catch (Exception exp)
{
MessageBox.Show("Select a valid photo!");
PhotoTextBox.Select();
return;
}
// Set Photo property
newAuth.Photo = imgBytes;
Form1 mainForm = new Form1();
mainForm.AddNewRecord(newAuth);
this.Close();
}
Listing 5.
As you can see from Listing, it creates an Author object and set its properties with the values entered on the sub form and calls AddNewRecord method of main form. The AddNewRecord method looks like Listing 6.
public void AddNewRecord(Author author)
{
// Create database connection. Change this path to your database path
db = new DataContext(Application.StartupPath + @"\Authors.mdf");
// Get a typed table
Table<Author> authors = db.GetTable<Author>();
authors.Add(author);
db.SubmitChanges();
}
Listing 6.
Figure 3 shows the recently added author on the main form.
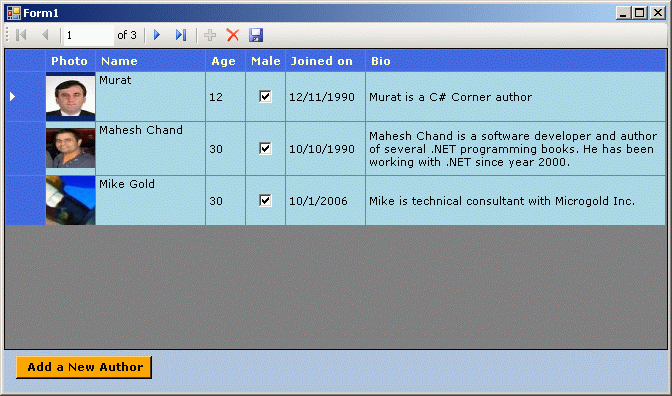
Figure 3.
Clicking on the Delete symbol (X in red) on the navigator deletes the currently selected row from the DataGridView as well as from the database. Listing 7 shows the code for the Delete button mouse down event handler.
private void bindingNavigatorDeleteItem_MouseDown(object sender, MouseEventArgs e)
{
if (authorDataGridView.SelectedRows.Count > 0)
{
Guid guid = new Guid(authorDataGridView.SelectedRows[0].Cells["ID"].Value.ToString());
db = new DataContext(Application.StartupPath + @"\Authors.mdf");
// Get a typed table
Table<Author> authors = db.GetTable<Author>();
// Get maching record
var auth = authors.Single(a => a.ID == guid);
authors.Remove(auth);
db.SubmitChanges();
}
}
Listing 7.
Summary
In this article, you saw, how to display data in a DataGridView control from a SQL Server 2005 database using DLINQ. Article also discussed how to add and delete data using Add and Remove methods available in DLINQ.
Known Issues and Enhancements
Here is a list of some known issues, which I will fix in next update.
-
Add new author does not refresh the DataGridView until you restart the application
-
Direct DataGridView adding, and updating feature