Description
This article explains how you can map database tables to C# objects. In other words, The application generates C# Class files for each table in a relational database. I have used Mysql and ODBC.NET for this project. The application only supports MySQL right now. However, it is easy to port to other databases. I will do it for the second version of this application. How you can download MySQL and MySQL ODBC driver. if you browse the web page http://www.mysql.com, you will see that MyODBC 2.50.39 link on the right side of the screen. After that you have download ODBC driver, you should download MySQL 3.23.43 server, and install it in your Windows if you have Windows running on your computer.
MySQL can be downloaded from www.mysql.com.
After downloading and installation, you should configure ODBC driver. Here is it how you can do it. goto Control Panel, run DataSources(ODBC). While you are at USER DSN, click on Add button, Then choose MySQL from the list click on Finish button
then you will see
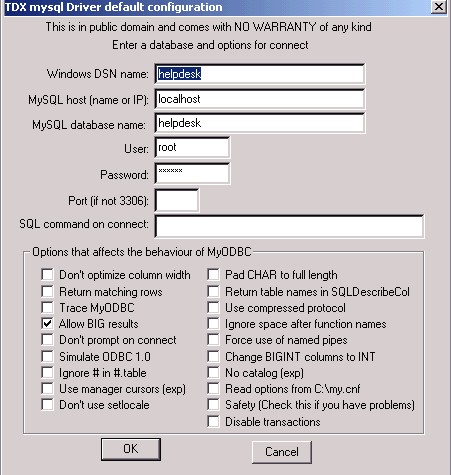
Enter, Windows DSN Name as you wish.
MySQL Host is either remote computer or local computer, If you have installed MySQL server to your computer, then choose localhost.
MySQL DataBase Name: Before entering name here, you should create database in MySQL server and tables. I can recommend a software you can download from http://dbtools.vila.bol.com.br/
with this tool, you can create databases, tables and so on. When you try to connect to MySQL server, you can use the user name as root and password as just empty.
User: root
Password:
then click on OK button, You are all set. if you have problems with the settings, just let me know.
This application supports
Mapping attributes to columns: a class attribute will map to one column in a relational database.
Mapping classes to tables: Classes map to tables.
So, how you can use this application. First of all, as I said before, It supports Odbc connection, so you have to setup ODBC. You can name it as you want. Then click on Get Tables button to receive tables from Database and you can see them in the treeview at the left. After that, Just Enter the Namespace that you want to put in the C# class files.
the Last thing is that you should enter the folder name that will have these C# class files.
When you click on Generate C# Class Files, it will create all C# files in a given folder.

You can add any datatype you want. therfore, it is going to be easy to port the application to other databases.
private
String FindDataType(String Type)
{
if (Type.IndexOf("varchar")!=-1)
{
return "String";
}
else if(Type.IndexOf("datetime")!=-1)
{
return "DateTime";
}
else if(Type.IndexOf("date")!=-1)
{
return "DateTime";
}
else if(Type.IndexOf("decimal")!=-1)
{
return "Decimal";
}
else if(Type.IndexOf("tinyint(4)")!=-1)
{
return "boolean";
}
else if(Type.IndexOf("int")!=-1)
{
return "int";
}
else if(Type.IndexOf("mediumint")!=-1)
{
return "int";
}
else if(Type.IndexOf("timestamp")!=-1)
{
return "DateTime";
}
else if(Type.IndexOf("bigint")!=-1)
{
return "Int64";
}
else if(Type.IndexOf("float")!=-1)
{
return "float";
}
else if(Type.IndexOf("tinyblob")!=-1)
{
return "String";
}
else if(Type.IndexOf("tinytext")!=-1)
{
return "String";
}
else if(Type.IndexOf("text")!=-1)
{
return "String";
}
else if(Type.IndexOf("mediumblob")!=-1)
{
return "String";
}
else if(Type.IndexOf("mediumtext")!=-1)
{
return "String";
}
else if(Type.IndexOf("longblob")!=-1)
{
return "String";
}
else if(Type.IndexOf("longtext")!=-1)
{
return "String";
}
// Source Code End