Note: This article is based on a Beta version of Windows Phone 7.1. In the release version some portions of this article are subject to change.
The RichTextBox control is one of the most welcome controls in the Beta release of Windows Phone 7.1 or Mango phone.
The Beta version of the RichTextBox control has many limitations:
- It is Read Only
- Control does not appear in tool box
- There is no default style.
- There is no design view support
There are two usual ways to add a RichTextBox; one way is to directly add onto XAML as below:
Another way is in code as below:

If you just add a RichTextBox in XAML and run the application, surprisingly you will not get a rendered RichTextBox on the page. This is due to the absence of a Default Style for the RichTextBox.
So to work with a RichTextBox we need to add a default style for it.
In the following App.Xaml, I have added a default style for the RichTextBox.
App.Xaml
<Application
x:Class="RichTextBox.App"
xmlns="http://schemas.microsoft.com/winfx/2006/xaml/presentation"
xmlns:x="http://schemas.microsoft.com/winfx/2006/xaml"
xmlns:phone="clr-namespace:Microsoft.Phone.Controls;assembly=Microsoft.Phone"
xmlns:shell="clr-namespace:Microsoft.Phone.Shell;assembly=Microsoft.Phone">
<!--Application Resources-->
<Application.Resources>
<Style TargetType="RichTextBox">
<Setter Property="FontSize" Value="{StaticResource PhoneFontSizeNormal}" />
<Setter Property="Foreground" Value="{StaticResource PhoneForegroundBrush}" />
<Setter Property="Background" Value="Transparent" />
<Setter Property="BorderBrush" Value="Transparent" />
<Setter Property="BorderThickness" Value="0"/>
<Setter Property="HorizontalContentAlignment" Value="Stretch" />
<Setter Property="VerticalContentAlignment" Value="Center" />
<Setter Property="Padding" Value="0" />
<Setter Property="Template">
<Setter.Value>
<ControlTemplate TargetType="RichTextBox">
<Grid Background="Transparent">
<Border Background="{TemplateBinding Background}" BorderBrush="{TemplateBinding BorderBrush}" BorderThickness="{TemplateBinding BorderThickness}" Margin="{StaticResource PhoneHorizontalMargin}">
<ContentControl x:Name="ContentElement" HorizontalContentAlignment="{TemplateBinding HorizontalContentAlignment}" VerticalContentAlignment="{TemplateBinding VerticalContentAlignment}" Padding="{TemplateBinding Padding}"/>
</Border>
</Grid>
</ControlTemplate>
</Setter.Value>
</Setter>
</Style>
</Application.Resources>
<Application.ApplicationLifetimeObjects>
<!--Required object that handles lifetime events for the application-->
<shell:PhoneApplicationService
Launching="Application_Launching" Closing="Application_Closing"
Activated="Application_Activated" Deactivated="Application_Deactivated"/>
</Application.ApplicationLifetimeObjects>
</Application>
After adding the style for a RichTextBox, upon running you will get a RichTextBox on the phone.
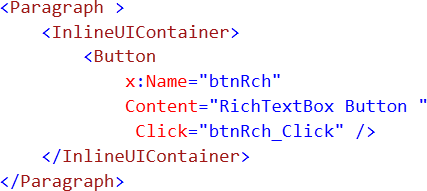
To add a button in a RichTextBox, we need to put a Button control inside InlineUIContainer like below:
To add undelined text we need to put text in an Underline tag:

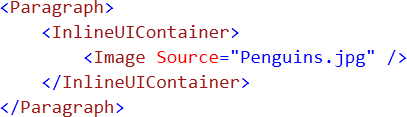
To add an image to a RichTextBox we need to use an Image tag in an InlineUIContainer:
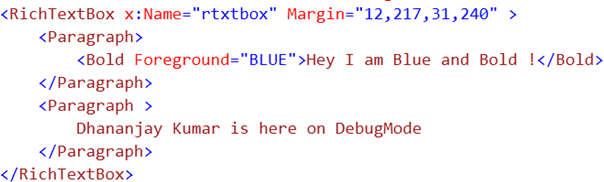
After adding a RichTextBox with multiple paragraphs containing buttons, images, bold text and underlined text the XAML could be as below:
MainPage.xaml
<phone:PhoneApplicationPage
x:Class="RichTextBox.MainPage"
xmlns="http://schemas.microsoft.com/winfx/2006/xaml/presentation"
xmlns:x="http://schemas.microsoft.com/winfx/2006/xaml"
xmlns:phone="clr-namespace:Microsoft.Phone.Controls;assembly=Microsoft.Phone"
xmlns:shell="clr-namespace:Microsoft.Phone.Shell;assembly=Microsoft.Phone"
xmlns:d="http://schemas.microsoft.com/expression/blend/2008"
xmlns:mc="http://schemas.openxmlformats.org/markup-compatibility/2006"
mc:Ignorable="d" d:DesignWidth="480" d:DesignHeight="768"
FontFamily="{StaticResource PhoneFontFamilyNormal}"
FontSize="{StaticResource PhoneFontSizeNormal}"
Foreground="{StaticResource PhoneForegroundBrush}"
SupportedOrientations="Portrait" Orientation="Portrait"
shell:SystemTray.IsVisible="True">
<!--LayoutRoot is the root grid where all page content is placed-->
<Grid x:Name="LayoutRoot" Background="Transparent">
<Grid.RowDefinitions>
<RowDefinition Height="Auto"/>
<RowDefinition Height="*"/>
</Grid.RowDefinitions>
<!--TitlePanel contains the name of the application and page title-->
<StackPanel x:Name="TitlePanel" Grid.Row="0" Margin="12,17,0,28">
<TextBlock x:Name="ApplicationTitle" Text="MY APPLICATION" Style="{StaticResource PhoneTextNormalStyle}"/>
<TextBlock x:Name="PageTitle" Text="page name" Margin="9,-7,0,0" Style="{StaticResource PhoneTextTitle1Style}"/>
</StackPanel>
<!--ContentPanel - place additional content here-->
<Grid x:Name="ContentPanel" Grid.Row="1" Margin="12,0,12,0">
<RichTextBox x:Name="rtxtbox" Margin="0,-84,0,0">
<Paragraph>
<Bold Foreground="BLUE">Hey I am Blue and Bold !</Bold>
</Paragraph>
<Paragraph>
<InlineUIContainer>
<Image Source="Penguins.jpg" />
</InlineUIContainer>
</Paragraph>
<Paragraph >
Dhananjay Kumar is here on DebugMode
</Paragraph>
<Paragraph >
<InlineUIContainer>
<Button
x:Name="btnRch"
Content="RichTextBox Button "
Click="btnRch_Click" />
</InlineUIContainer>
</Paragraph>
<Paragraph>
<InlineUIContainer>
<Image Source="Penguins.jpg" Height="20" Width="30"/>
</InlineUIContainer>
</Paragraph>
<Paragraph>
<Underline>I am UnderLined</Underline>
</Paragraph>
</RichTextBox>
</Grid>
</Grid>
</phone:PhoneApplicationPage>
When you run a phone application, you should get output as below.
Note: In XAML you will notice there are two paragraphs one for Button and one for Image. But in the output the Image and Button are not displayed. In the next article I would discuss the same. If however you get a solution for this problem before me then please write to me about your investigation.