This chapter is taken from book "Pro ASP.NET 3.5 Server Controls and AJAX Components" by Rob Cameron, Dale Michalk published by Apress.
Introduction
To create server controls, you need to understand how they work. This chapter provides a very high-level run-through of the various server control namespaces to set the scene for the rest of this book. To begin our journey, we'll start by reviewing what a server control provides to clients and taking a look at some of the prebuilt controls supplied by ASP.NET. We'll study the controls inheritance bloodlines for the HTML and web controls, examining how the namespaces are organized, so that you become familiar with what is available for immediate use in ASP.NET. Because inheritance and composition of existing server controls are important timesaving control-building techniques available in ASP.NET, this rapid journey through the object model is well worth the effort.
To begin this chapter, we start out with a "Hello, World" form to demonstrate master pages. The MasterPage class can trace its inheritance back to the user control functionality introduced in ASP.NET 1.0. We next discuss the basic server control construction, as well as how server controls are organized in an ASP.NET web form. Finally, we cover the root server control namespaces with an example of the types of server controls found in the different namespaces.
Source Code
The source code for this book is available for download from the Apress web site for those who want to follow along by running the code in Visual Studio 2008. The web site project is file based, so having IIS installed and configured isn't required. There is a main solution file titled ControlsBook2Solution.sln that, when opened, will load all of the projects. Please refer to the read-me file included with the source code download for detailed instructions on how to get the code running. The full source code is also printed in this book, so those who want to read while not in front of a computer can still enjoy reading the source code.
The Heart and Soul of ASP.NET
Each piece of HTML delivered by an ASP.NET page, whether a <span> tag without server-side interactivity, a complex list control such as the DataGrid that supports templates, or the web form itself that hosts the HTML tags, is generated by an object that inherits from the System. Web.UI.Control base class. These objects, or server controls, are the engine that drives the ASP.NET page-rendering process. The fact that every snippet of rendered HTML exists as a server control allows for a consistent page parsing process that permits easy control configuration and manipulation to create dynamic and powerful content. The clean, consistent object model provided by ASP.NET also facilitates extension through custom server controls that share a common object model.
A .NET Framework "Hello, World" Web Form
The first stop on our journey through the ASP.NET server controls is construction of a "Hello, World" web form. Before actually creating the "Hello, World" web form, we need to create a master page to provide a consistent UI for the book web site. A master page, one of the many new features in ASP.NET 2.0 and later versions, has a @Master directive at the top of the code instead of the @Page directive on a standard web form.
Note: ASP.NET 3.5 includes additional master page item templates to support AJAX functionality and nested master pages called AJAX Master Page and Nested Master Page respectively.
The @Master directive takes most of the same options as the @Control directive. If you have not migrated to ASP.NET 2.0 or later, master pages are a welcome addition in ASP.NET and should often be used for page layout and template purposes in situations where ASP.NET user controls were in ASP.NET 1.1 but came up short. Figure 1-1 shows the master page used in this book's sample web site.
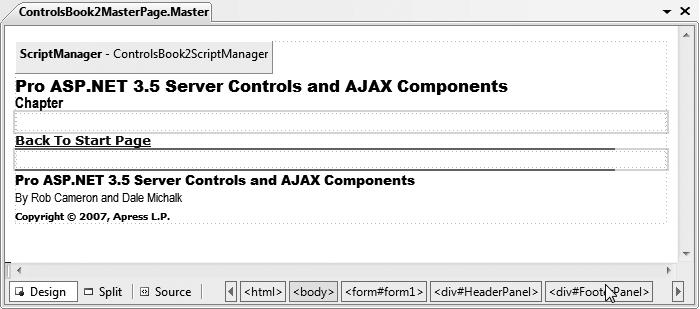
Figure 1-1. The Controls Book 2 web site's master page
Web forms added to the project can be configured to use the master page rendering at design time, like Figure 1-2.
Notice in Figure 1-2 that the master page area is grayed out (and cannot be edited) at design time in a web content form. The design-time view displays the master page HTML and the web content form HTML, providing a more accurate view of the rendered web form. Listings 1-1 and 1-2 show the master page source page and code-behind file.
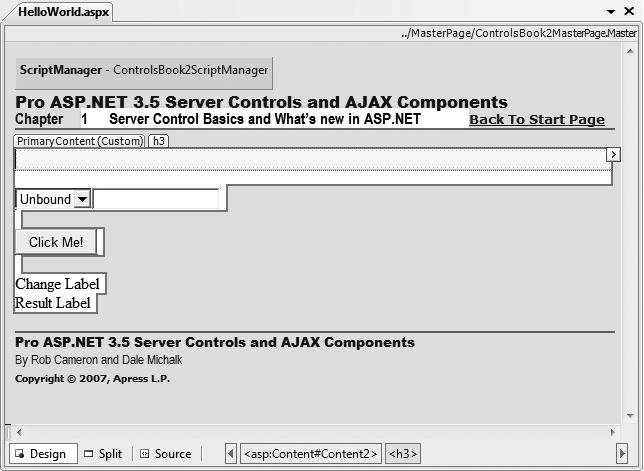
Figure 1-2. The Controls Book 2 web site's master page displayed in a web content form
Listing 1-1. The ControlsBook2 Master Page File
<%@ Master Language="C#" AutoEventWireup="true" CodeBehind="ControlsBook2MasterPage.master.cs" Inherits="ControlsBook2Web.MasterPage.ControlsBook2MasterPage" %><?xml:namespace prefix = o ns = "urn:schemas-microsoft-com:office:office" />
<!DOCTYPE html PUBLIC "-//W3C//DTD XHTML 1.0 Transitional//EN" "http://www.w3.org/TR/xhtml1/DTD/xhtml1-transitional.dtd">
<html xmlns="http://www.w3.org/1999/xhtml">
<head id="Head1" runat="server">
<title>Master Page</title>
<link href="../css/ControlsBook2Master.css" rel="stylesheet" type="text/css" />
<link href="../css/SkinnedControl.css" rel="stylesheet" type="text/css" />
<asp:ContentPlaceHolder ID="HeadSection" runat="server">
</asp:ContentPlaceHolder>
</head>
<body>
<form id="form1" runat="server">
<div id="HeaderPanel">
<asp:ScriptManager ID="ControlsBook2ScriptManager" runat="server">
<Scripts>
<asp:ScriptReference Path="../ch09/hoverbutton.js" />
</Scripts>
</asp:ScriptManager>
<asp:Label ID="Label2" CssClass="TitleHeader" runat="server" Height="18px"
Width="604px">Pro ASP.NET 3.5 Server Controls and AJAX Components</asp:Label>
<br />
<div id="ChapterInfo" class="Chapter">
<asp:Label ID="label1" runat="server">Chapter</asp:Label>
<asp:ContentPlaceHolder ID="ChapterNumAndTitle" runat="server">
</asp:ContentPlaceHolder>
<asp:HyperLink ID="DefaultPage" runat="server" NavigateUrl="~/Default.aspx">
Back To Start Page
</asp:HyperLink><br />
<asp:Image ID="Image1" runat="server" ImageUrl="~/img/blueline.jpg" /><br />
</div>
<asp:ContentPlaceHolder ID="PrimaryContent" runat="server">
</asp:ContentPlaceHolder>
<div id="FooterPanel">
<asp:Image ID="Image2" runat="server" ImageUrl="~/img/blueline.jpg" /><br />
<asp:Label CssClass="TitleFooter" ID="Label5" runat="server">
Pro ASP.NET 3.5 Server Controls and AJAX Components</asp:Label><br />
<asp:Label CssClass="Author" ID="Label6" runat="server">
By Rob Cameron and Dale Michalk</asp:Label><br />
<asp:Label CssClass="Copyright" ID="Label7" runat="server">
Copyright 2007, Apress L.P.</asp:Label>
</div>
</div>
</form>
</body>
</html>
Listing 1-2. The ControlsBook2MasterPage Master Page Code-Behind Class File
using System;
namespace ControlsBook2Web.MasterPage
{
public partial class ControlsBook2MasterPage : System.Web.UI.MasterPage
{
protected void Page_Load(object sender, EventArgs e)
{
}
}
}
In the master page for the Controls Book 2 web site, the chapter number and chapter title have ContentPlaceHolder placeholder tags to allow content pages to update the chapter number and title.
Each web form sets values for the chapter title and number by simply placing the value in the corresponding Content tag in the content page. This is a simple example of providing a consistent user interface in a web site, but still allowing customization.
Tip ASP.NET User Controls are still present in ASP.NET 3.5. In fact the MasterPage class inherits from the UserControl class.
The resulting arrangement is shown in Figure 1-3 with a DropDownList control, a TextBox control, two Label controls, and a Button control. The resulting source code generated by Visual Studio 2008 is shown in Listings 1-3 and 1-4.
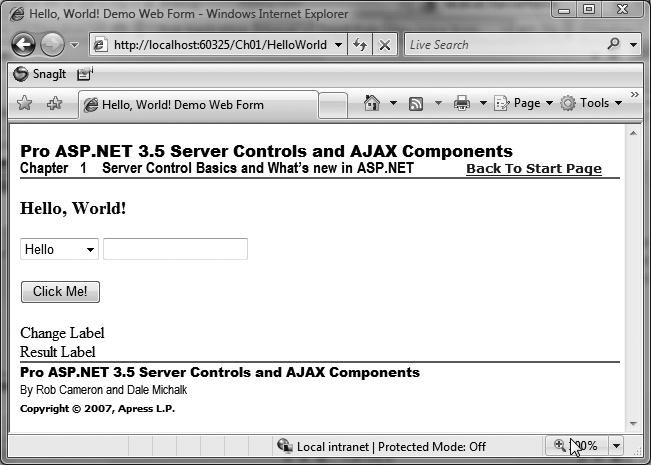
Figure 1-3. The HelloWorld server control web form
Listing 1-3. The HelloWorld Demo Web Form .aspx File
<%@ Page Language="C#" MasterPageFile="~/MasterPage/ControlsBook2MasterPage.Master" AutoEventWireup="true" CodeBehind="HelloWorld.aspx.cs" Inherits="ControlsBook2Web.Ch01.HelloWorld"
Title="Hello, World! Demo Web Form" %>
<asp:Content ID="Content1" ContentPlaceHolderID="ChapterNumAndTitle" runat="server">
<asp:Label ID="ChapterNumberLabel" runat="server"
Width="14px">1</asp:Label> <asp:Label
ID="ChapterTitleLabel" runat="server" Width="360px">
Server Control Basics and What's new in ASP.NET</asp:Label>
</asp:Content>
<asp:Content ID="Content2" ContentPlaceHolderID="PrimaryContent" runat="server">
<h3><asp:Label ID="Label1" runat="server" Text= "Hello, World!"></asp:Label></h3>
<asp:DropDownList ID="Greeting" runat="server" ToolTip="Select a greeting">
</asp:DropDownList>
<asp:TextBox ID="Name" runat="server" Font-Italic="True" ToolTip="Enter your name"
OnTextChanged="Name_TextChanged"></asp:TextBox><br />
<br />
<asp:Button ID="ClickMe" runat="server" Text="Click Me!"
OnClick="ClickMe_Click"></asp:Button><br />
<br />
<asp:Label ID="ChangeLabel" runat="server">Change Label</asp:Label><br />
<asp:Label ID="Resultlabel" runat="server">Result Label</asp:Label>
<br />
</asp:Content>
Listing 1-4. The HelloWorld Server Control Demo Code-Behind Class File
using System;
using System.Collections;
namespace ControlsBook2Web.Ch01
{
public partial class HelloWorld : System.Web.UI.Page
{
protected void Page_Load(object sender, EventArgs e)
{
ArrayList list = new ArrayList();
list.Add("Hello");
list.Add("Goodbye");
Greeting.DataSource = list;
Greeting.DataBind();
}
protected void ClickMe_Click(object sender, EventArgs e)
{
Resultlabel.Text = "Your new message: " + Greeting.SelectedItem.Value +
" " + Name.Text + "!";
}
protected void Name_TextChanged(object sender, EventArgs e)
{
ChangeLabel.Text = "Textbox changed to " + Name.Text;
}
}
}
The server controls on our "Hello, World" web form (specifically, the Label, TextBox, and DropDownList objects) render as HTML and, for the TextBox control, remember what is typed in the control between postback cycles. The HTML rendered to the browser is backed by powerful objects that can be wired up to programming logic to perform useful work on the web server. During server-side processing, the object-oriented nature of server controls provides us with three main constructs to interact with controls as objects: properties, methods, and events. We discuss these constructs in the sections that follow.
Control Properties
The most common means of working with a server control is through the properties it exposes. Properties allow the control to take information from the web form to configure its output or modify its behavior in the HTML-generation process.
Note: Properties are different and more powerful than public data members. Properties provide an additional layer of abstraction through the use of get and set methods; get and set methods or function calls provide a convenient location for programming logic, such as displaying an error if a value is out of range or otherwise invalid, enforcing read-only access (implementing a get method only), and so on. Properties can be declared as public, protected, or private.
Properties are easily viewable in the Properties window available when you select a control in the Visual Studio Design view of the .aspx page. Figure 1-4 shows the Properties window when the Name TextBox is selected. Notice that the Font property has been configured to show the TextBox's Text property text in italics.
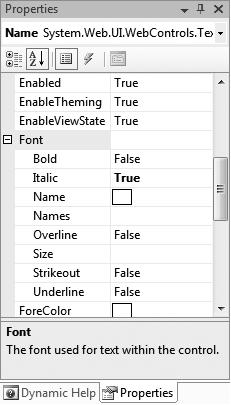
Figure 1-4. The Properties window for the TextBox control
The Visual Studio Designer translates the entries in the Properties window into attribute values on the HTML view of the .aspx page. To see this, set a property for a control in the Properties tool window and then switch to HTML view. Likewise, if you modify attribute values in the HTML view of the .aspx page, these changes will be reflected in the Designer, assuming you typed in the values correctly. This behavior can be very handy for quickly duplicating attributes between controls. Simply copy the HTML version of the attributes and then paste the HTML into the target control that you want to match the original. You can think of the Designer as a code generator that allows you to declaratively work with the look and feel of the ASP.NET application without having to write the code. As an example, the Font settings set in the Properties window for the TextBox control described previously map directly to Font attributes:
<asp:TextBox id="Name" runat="server" Font-Italic="True" ToolTip="Enter your name" OnTextChanged="Name_TextChanged">
</asp:TextBox>
The Label and TextBox controls work a little differently than most, in that the content between the opening and closing tags is controlled by the Text property:
<asp:Label id="Resultlabel" runat="server">Result Label</asp:Label>
You can also set a control's properties programmatically in the code-behind class file. The "Hello, World" demonstration sets the Text property for Label1 to a blank string each time the web form is loaded, to overwrite the Label value that is declaratively set in the .aspx page. The activity happens in a method named Page_Load that is mapped to the Page object's Load event:
protected void Page_Load(object sender, EventArgs e)
{
Resultlabel.Text = "";
ChangeLabel.Text = "";
if (!Page.IsPostBack)
{
UpdateMaster();
LoadDropDownList();
}
DataBind();
}
You can also use the properties exposed by the control to read input from the client browser during postback on the server side. The Button click event handling routine in the "Hello, World" web form reads the Text property of the TextBox control and the Value property of the SelectedItem property on the DropDownList control to display the greeting to the client of the web browser:
protected void ClickMe_Click(object sender, EventArgs e)
{
Resultlabel.Text = "Your new message: " + Greeting.SelectedItem.Value + " " + Name.Text + "!";
}
Control Methods
The second feature exposed by a server control is a collection of object methods. Functionality implemented using methods typically goes beyond the features of a property's set or get method; they usually perform a more complex action against the control. One of the best examples in ASP.NET of using methods for a server control is the data-binding process that links a control with a data source.
In the "Hello, World" web form example, the Page_Load event checks to see if the page is requested via a form postback or if it was called for the first time using HTTP GET so that the page can generate the initial HTML for the browser, creating the option list. In the postback scenario, the code to create the option list is not necessary for the DropDownList control via the LoadDropDownList() method, because the server control DropDownList1 maintains its internal option list via the web form ViewState mechanism for subsequent postback operations to the server. We cover ViewState extensively in Chapter 3.
The page's LoadDropDownList() method's first task is to create an ArrayList collection and load it with the string values "Hello" and "Goodbye". It also links the ArrayList to the DropDownList by setting the DataSource property to the ArrayList:
private void LoadDropDownList()
{
ArrayList list = new ArrayList();
list.Add("Hello");
list.Add("Goodbye");
Greeting.DataSource = list;
}
Note that we do not call the DataBind() method directly for DropDownList. Instead, we call the DataBind() method on the Page_Load handler itself. The DataBind() method of the Page class recursively calls the DataBind() methods for all its child controls that have references to a data source. In this case, when the Page class's DataBind() method is invoked, the DropDownList control data binds to the ArrayList object as shown previously.
Control Events
Events are the final constructs used for interacting with controls that we discuss in this chapter. Events provide a mechanism to notify clients of state changes inside the control. In ASP.NET, events always coincide with an HTTP POST submission back to the web server. Through the automatic postback mechanism, events in ASP.NET appear to behave very much like their counterparts in a Windows Forms application.
Note: Events provide an object-oriented mechanism for a control to communicate with other controls that care to know about state changes within that control. If events did not exist, objects would have to resort to polling to know about state changes in other objects. The asynchronous nature of events provides an elegant means for communicating between objects. Event handler methods are generally protected to the control class (the event subscriber), as it would not make sense to call event handlers outside the consuming class.
The Page class in the "Hello, World" example consumes the Click event raised by the Button to read values and sets the first Label control. The Button Click event is easy to map in the Designer by simply double-clicking the button. Double-clicking a control in Visual Studio automatically generates the default event handler for the control. In the case of the Button, it is the Click event. In addition, Visual Studio performs other housekeeping tasks, such as wiring up the event delegate exposed by the Button control to the generated method (in this case, Button1_Click) in the Page class.
Note: In the .NET Framework 2.0 and later, the concept of a partial class exists where a class can be split across multiple files. This allows Visual Studio or similar non-Microsoft tools to provide better design-time support.
Events in ASP.NET take advantage of delegates as the infrastructure for this communication among objects. In Chapter 5, we discuss how to work with events in detail.
The Properties window in the Design view of the Visual Studio Designer can help map the events from a control that don't result from double-clicking the control.
Note: Click the yellow lightning bolt icon at the top of the Properties window to filter the view to show only events exposed by a particular control.
Each available event for a control is listed on a separate line, and creating a wired up event handler is as simple as either double-clicking the blank area next to the event name to generate an event with the default naming schem(ControlName_EventName) or typing a name and pressing the Enter key. Figure 1-5 illustrates creating the event handler for the TextBox control.
The end result of using the Properties window to add the protected event handler to the Page class is a method named TextBox_TextChanged that is wired to the TextChanged event of the TextBox control. You can add code to this handling routine to announce the state change of the TextBox control by setting the Text property of the Label2 control on the web form:
protected void Name_TextChanged(object sender, EventArgs e)
{
ChangeLabel.Text = "Textbox changed to " + Name.Text;
}
Visual Studio 2008 provides much cleaner code generation when compared to Visual Studio .NET 2003. There is no longer a code region named "Web Form Designer generated code" present in the code file. Much of the boilerplate code that existed in ASP.NET 1.1 is no longer present, which makes developers' lives a bit simpler.
The result of all the not-so-hard work to this point is the browser view in Figure 1-6, which shows what happens when Rob enters his name and selects a polite greeting.
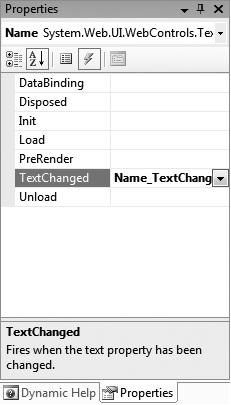
Figure 1-5. Adding an event handler to the TextChanged event of the TextBox control
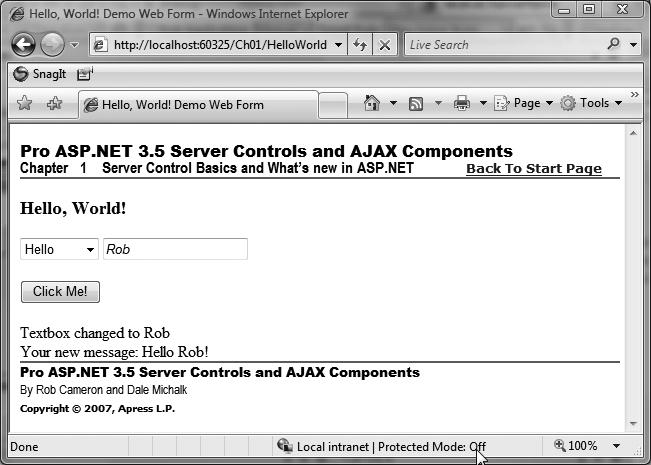
Figure 1-6. The completed "Hello, World" demonstration web form
The Web Page As a Control Tree
ASP.NET provides full programmatic access to the tags on an HTML page in an object-oriented way. The architecture in ASP.NET that provides this capability is the .aspx page control tree. In this section, we discuss the control tree as it relates to the "Hello, World" example.
At first glance, the "Hello, World" web form would seem to contain only a few visible server controls that were explicitly placed on the form. The reality is that the entire display surface of the .aspx page becomes a cornucopia of controls during processing. Any HTML content in the web form that is not part of the server controls laid out in the Visual Studio Designer is packaged into a server control that renders the HTML. The control structure of the web form can be seen by turning on the trace features of ASP.NET through setting the Trace=True attribute on the Page directive:
<%@ Page Language="C#" Trace="true" MasterPageFile="../Master Page/ControlsBook2MasterPage.master" AutoEventWireup="true" CodeFile="HelloWorld.aspx.cs" Inherits="Ch01_HelloWorld" Title="Ch01 Hello World!" %>
You no longer need to make sure that tracing is enabled in the <trace> XML element inside of the web.config configuration file for the web application with .NET Framework 2.0 and later. However, if you wish to enable and customize the trace functionality, you have to paste the element within the <system.web> element of the web.config file for the application:
<trace
enabled="true"
requestLimit="10"
pageOutput="false"
traceMode="SortByTime"
localOnly="true"
/>
Figure 1-7. shows the portion of the trace output that displays the control tree for the web form.
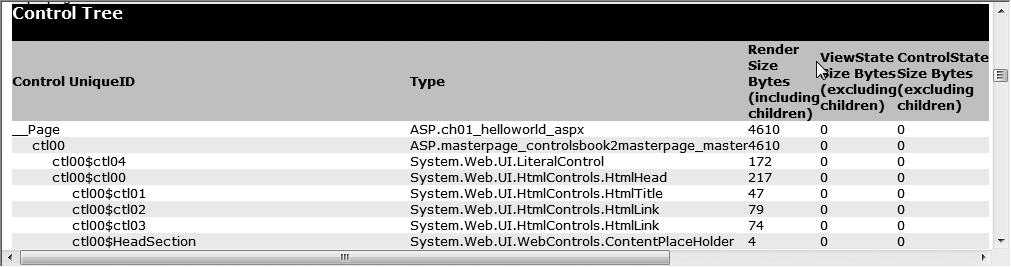
Figure 1-7. Tracing the control tree of the "Hello, World" web form
The X-ray vision into ASP.NET provided by the trace feature dissects the web form in gory detail. At the top is the Page control that represents the web form of type ASP. ch01_helloworld_aspx. Below it are the server controls that you would expect to be there: DropDownList, TextBox, Button, and Label. What you might not expect to see are the HtmlForm, DataBoundLiteralControl, and LiteralControl objects in the control tree trace.
HtmlForm is responsible for representing the <form> tag on the .aspx page and providing the missing method and action properties to ensure the page is always sent back to the original URL via an HTTP POST. The form server control looks like the following in the ControlsBook2MasterPage.master master page at design time:
<form id="form1" runat="server">
There isn't a form server control in HelloWorld.aspx, because it is a content page that renders within a master page, which is where the HTML form exists. At runtime in the browser, the generated HTML has this <form> tag:
<form name="aspnetForm" method="post" action="HelloWorld.aspx" id="aspnetForm">
The HtmlForm server control renders HTML with all the necessary information to post the page back to itself, as shown in the preceding line of code. This allows each control on the page to remember its previous state via the ViewState mechanism and raise the appropriate server control event.
The literal controls have the responsibility for rendering the generic text and HTML tags in the web form without much of a server-side presence. These are the flyweight classes of the ASP.NET server control framework. The literal controls pick up text or tags in the master page or .aspx page that do not have the runat="server" attribute identifying them as a server control.
The LiteralControl class is the simplest of the two shown in the control dump, because it is a pure text-in and text-out operation. Notice how the control tree picks up the <br/> tags between the other server controls as well as the closing <body> and <html> tags as LiteralControl objects. The ResourceBasedLiteralControl that was present in ASP.NET 1.1 was removed in ASP.NET 2.0. That is not a backward compatibility concern, because the class is an internally implemented class in the ASP.NET 1.1 framework that is not creatable or accessible by the programmer.
The DataBoundLiteralControl is the most complex of the literal controls, because it represents a data-binding expression like the one in the document that binds to the GetTitle() method of the Page object. It has a DataBind() method that must be called by the Page class to resolve its value, just like the DropDownList control had to read from the ArrayList data source in its DataBind() operations.
The Root Controls
The previous demonstration highlighted the server-control-centric nature of the ASP.NET web form page execution process. We now shift gears to briefly discuss where the various controls exist inside the .NET Framework and what features they provide in rendering HTML. The controls are factored into three primary namespaces in the .NET Framework: System.Web.UI, System.Web.UI.HtmlControls, and System.Web.UI.WebControls (see Figure 1-8).
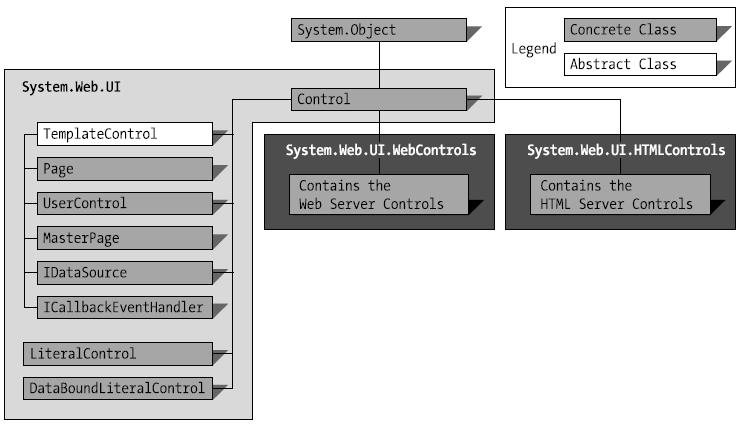
Figure 1-8. The major namespaces of ASP.NET under System.Web.UI
The System.Web.UI Namespace
At the top of the hierarchy is our first destinationthe System.Web.UI namespace and its root controls. It contains the Control class, which is the mandatory parent class for all objects that want to call themselves controls. Directly inheriting from the Control class in this namespace is a set of specialized classes that implement the web form through the Page class, the user control through the UserControl class, and the literal controls. The Page class and the literal controls are discussed in detail in the previous "Hello, World" web form demonstration. We focus in more detail on the UserControl class in the next chapter when we cover control creation.
System.Web.UI.HtmlControls Namespace
The controls under System.Web.UI.HtmlControls have the capability to take existing HTML content and make it available as a server control with the addition of a runat="server" attribute. The canonical example of this type of control is turning an HTML text box into a server control:
<input type="text" id="name" runat="server"/>
The ASP.NET parsing engine is responsible for mapping the HTML tag to the correct control type in System.Web.UI.HtmlControls when it sees this marker attribute. The preceding example adds an instance of the HtmlInputText control to the web form's control collection.
Note If you want to modify or interact with any of the literal controls on the server side, you have two options. One option is to walk the page's control tree collection to find the desired control. The other option is declare the control in the code-behind class file. In the previous input example, the declaration would look like this:
protected System.Web.UI.HtmlControls.HtmlInputText name;
Although they may look like their HTML cousins, these controls set themselves apart by remembering state, raising events, allowing themselves to be programmatically manipulated in server-side code, and providing other value-add services such as file upload when the form post has reached the Web. The full list of HTML controls available in the System.Web.UI.HtmlControls namespace is depicted in Figure 1-9.
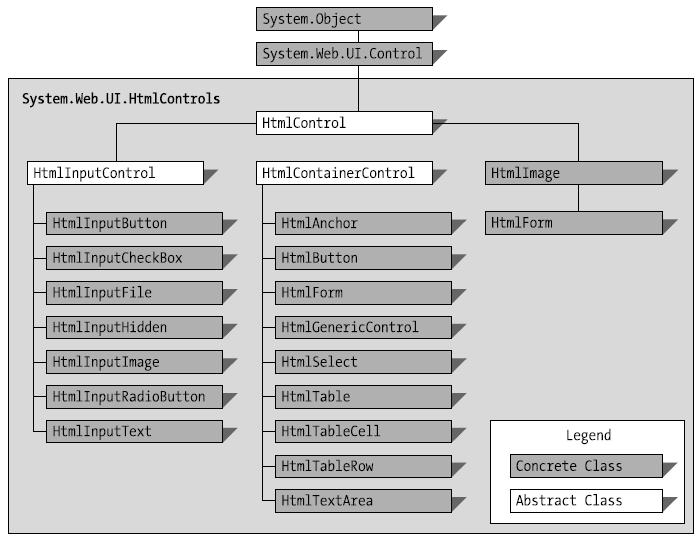
Figure 1-9. Controls in the System.Web.UI.HtmlControls namespace
Table 1-1 is useful for figuring out which of the HTML tags maps to a specific HTML control. Note that some of controls (such as the HtmlInputText control) map to multiple HTML tags on an .aspx page. For tags that do not have a specific control mapping, the HtmlGeneric control is used to represent them as a server-side control object when they have a runat="server" attribute.
Table 1-1. HTML Tags and Their HTML Server Control Counterparts
| HTML Tag |
HTML Server Control |
| <form> |
HtmlForm |
| <input type="text"> |
HtmlInputText |
| <input type="password"> |
HtmlInputText |
| <input type="radio"> |
HtmlInputRadioButton |
| <input type="checkbox"> |
HtmlInputCheckBox |
| <input type="submit"> |
HtmlInputButton |
| <input type="hidden"> |
HtmlInputHidden |
| <input type="button"> |
HtmlInputButton |
| <input type="reset"> |
HtmlInputButton |
| <input type="image"> |
HtmlInputImage |
| <input type="file"> |
HtmlInputFile |
| <button> |
HtmlButton |
| <select> |
HtmlSelect |
| <textarea> |
HtmlTextArea |
| <img> |
HtmlImage |
| <a> |
HtmlAnchor |
| <table> |
HtmlTable |
| <tr> |
HtmlTableRow |
| <td> |
HtmlTableCell |
| All other tags |
HtmlGenericControl |
An HTML Controls Demonstration
To examine the System.Web.UI.HtmlControls namespace, we examine the execution of a demonstration showing the controls in action. This demonstration dynamically constructs an HTML table from X and Y coordinates that are present on the web form using the code shown in Listings 1-5 and 1-6. We discuss this code after the listings.
Listing 1-5. The HTMLControls Web Form .aspx File
<%@ Page Language="C#" MasterPageFile="~/MasterPage/ControlsBook2MasterPage.Master" AutoEventWireup="true" CodeBehind="HtmlControls.aspx.cs" Inherits="ControlsBook2Web.Ch01.HtmlControls"
Title="HTML Controls Demo" %>
<asp:Content ID="Content1" ContentPlaceHolderID="ChapterNumAndTitle" runat="server">
<asp:Label ID="ChapterNumberLabel" runat="server"
Width="14px">1</asp:Label> <asp:Label
ID="ChapterTitleLabel" runat="server" Width="360px">
Server Control Basics and What's new in ASP.NET</asp:Label>
</asp:Content>
<asp:Content ID="Content2" ContentPlaceHolderID="PrimaryContent" runat="server">
<h3>
HTML Controls</h3>
X
<input type="text" id="XTextBox" runat="server" /><br />
<br />
Y
<input type="text" id="YTextBox" runat="server" /><br />
<br />
<input type="submit" id="BuildTableButton" runat="server"
value="Build Table" onserverclick="BuildTableButton_ServerClick" /><br />
<br />
<span id="Span1" runat="server"></span>
</asp:Content>
Listing 1-6. The HTMLControls Code-Behind Class File
using System;
using System.Web;
using System.Web.UI;
using System.Web.UI.WebControls;
using System.Web.UI.HtmlControls;
namespace ControlsBook2Web.Ch01
{
public partial class HtmlControls : System.Web.UI.Page
{
protected void Page_Load(object sender, EventArgs e)
{
}
protected void BuildTableButton_ServerClick(object sender, EventArgs e)
{
int xDim = Convert.ToInt32(XTextBox.Value);
int yDim = Convert.ToInt32(YTextBox.Value);
BuildTable(xDim, yDim);
}
private void BuildTable(int xDim, int yDim)
{
HtmlTable table;
HtmlTableRow row;
HtmlTableCell cell;
HtmlGenericControl content;
table = new HtmlTable();
table.Border = 1;
for (int y = 0; y < yDim; y++)
{
row = new HtmlTableRow();
for (int x = 0; x < xDim; x++)
{
cell = new HtmlTableCell();
cell.Style.Add("font", "16pt verdana bold italic");
cell.Style.Add("background-color", "red");
cell.Style.Add("color", "yellow");
content = new HtmlGenericControl("SPAN");
content.InnerHtml = "X:" + x.ToString() +
"Y:" + y.ToString();
cell.Controls.Add(content);
row.Cells.Add(cell);
}
table.Rows.Add(row);
}
Span1.Controls.Add(table);
}
}
}
Dynamically adding controls to an existing control structure is a common way to implement web forms that vary their content and structure according to the user's input. The BuildTable() method encapsulates this dynamic functionality in this HTML controls demonstration by rendering the table when passed X and Y parameters. The variables passed in to BuildTable() are retrieved using the Value property of the HtmlInputText controls:
int xDim = Convert.ToInt32(XTextBox.Value);
int yDim = Convert.ToInt32(YTextBox.Value);
BuildTable(xDim, yDim);
The bulk of the work in this HTML controls demonstration is located in the BuildTable() method. This method starts by creating an HtmlTable control representing the outer <table> tag and then jumps into nested For loops to add HtmlTableRow controls representing the <tr> tags along with HtmlTableCell controls rendering <td> tags.
One of the more interesting sections of this routine is the cell creation and CSS styling configuration code. Once the HtmlTableCell control is created, the CSS styles are set as strings and then added to the Style property representing the cell's CSS attributes. This is a manual, string-based process that is not helped by any type or enumeration from the System.Web.UI.HtmlControls namespace:
cell = new HtmlTableCell();
cell.Style.Add("font", "16pt verdana bold italic");
cell.Style.Add("background-color", "red");
cell.Style.Add("color", "yellow");
After the styling is set, the cell adds an HtmlGenericControl representing a <span> tag to its control collection. The HtmlGenericControl's InnerHtml, or content, is then set to the X and Y values for the cell. The result is that the <span> tag is nested in the table cell's <td> tag. The final step in the process is to add the cell to its parent row:
content = new HtmlGenericControl("SPAN");
content.InnerHtml = "X:" + x.ToString() + "Y:" + y.ToString();
cell.Controls.Add(content);
row.Cells.Add(cell);
The HTML rendered in the browser client shows the direct insertion of the CSS attributes into the <td> tag and the HtmlGenericControl production of the <span> content:
<td style="font:16pt verdana bold italic; background-color:red;color:yellow;">
<span>X:0Y:0</span>
</td>
Figure 1-10 shows the output of all this work. When the page initially loads, the red and yellow table is not present. Once values are entered for X and Y, in this case 3 and 3, clicking the Build Table button results in the page shown in Figure 1-10.
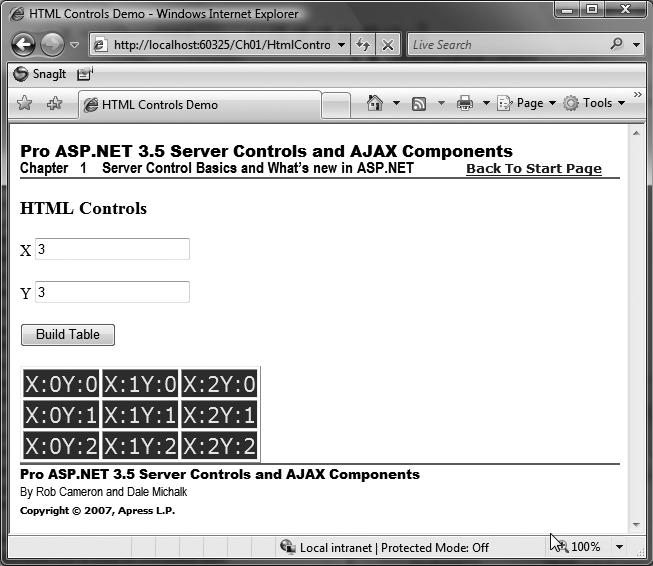
Figure 1-10. Output from the HTML Controls web form
The System.Web.UI.WebControls Namespace
Like the HTML controls in the previous section, the web controls occupy a separate namespace in the .NET Frameworknamely, System.Web.UI.WebControls. Figure 1-11 shows the graphical breakdown of the namespace and the myriad server control objects available.
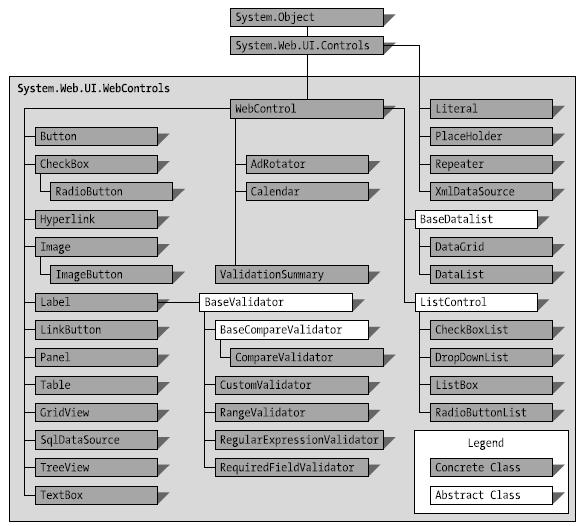
Figure 1-11. Controls in the System.Web.UI.WebControls namespace
The controls under the System.Web.UI.WebControls namespace are grouped into a few primary categories:
- Simple
- List
- Rich
- Validation
The following sections cover each category.
Simple Controls
The simple controls are the web control cousins to the HTML controls in that they generally map one-to-one to an HTML tag. Some good examples of this are the mappings of the Label control to the <span> tag and the TextBox control to the <input type="text"> tag.
Because simple controls map closely to a single HTML tag, we bring back the ever-popular tag-to-control mapping table in a manner similar to our discussion in the last section on HTML controls. Like the previous table, some controls in Table 1-2 handle more than one tag by property settings. The LiteralControl from the System.Web.UI namespace is used for tags that are not represented in System.Web.UI.WebControls as a control.
Table 1-2. HTML Tags and Their Web Control Counterparts
| HTML Tag |
Simple Web Control |
| <input type="text"> |
TextBox with TextMode=Single |
| <input type="password"> |
TextBox with TextMode=Password |
| <textarea> |
TextBox with TextMode=MultiLine |
| <input type="checkbox"> |
CheckBox |
| <input type="radio"> |
RadioButton |
| <input type="submit"> |
Button |
| <input type="image"> |
ImageButton |
| <button> |
Button |
| <select> |
DropDownList |
| <select size=3> |
SelectList with Rows=3 |
| <textarea> |
HtmlTextArea |
| <img> |
Image |
| <a> |
HyperLink, LinkButton |
| <table> |
Table |
| <tr> |
TableRow |
| <td> |
TableCell |
| <table> |
Panel |
| <span> |
Label |
A Simple Controls Demonstration
The following simple controls demonstration is a port of the original HTML controls demonstration to show the same output using dynamically built controls from the System.Web.UI.WebControls namespace. Listings 1-7 and 1-8 contain the code.
Listing 1-7. The SimpleControls Web Form .aspx File
<%@ Page Language="C#" MasterPageFile="~/MasterPage/ControlsBook2MasterPage.Master" AutoEventWireup="true" CodeBehind="SimpleControls.aspx.cs" Inherits="ControlsBook2Web.Ch01.SimpleControls" Title="Simple Controls Demo" %>
<asp:Content ID="Content1" ContentPlaceHolderID="ChapterNumAndTitle" runat="server">
<asp:Label ID="ChapterNumberLabel" runat="server"
Width="14px">1</asp:Label> <asp:Label\
ID="ChapterTitleLabel" runat="server" Width="360px">
Server Control Basics and What's new in ASP.NET</asp:Label>
</asp:Content>
<asp:Content ID="Content2" ContentPlaceHolderID="PrimaryContent" runat="server">
<h3>
Simple Controls</h3>
X
<asp:TextBox ID="XTextBox" runat="server"></asp:TextBox><br />
<br />
Y
<asp:TextBox ID="YTextBox" runat="server"></asp:TextBox><br />
<br />
<asp:Button ID="BuildTableButton" runat="server"
Text="Build Table" OnClick="BuildTableButton_Click">
</asp:Button><br />
<asp:PlaceHolder ID="TablePlaceHolder" runat="server"></asp:PlaceHolder>
</asp:Content>
Listing 1-8. The SimpleControls Code-Behind Class File
using System;
using System.Web;
using System.Web.UI;
using System.Web.UI.WebControls;
using System.Drawing;
namespace ControlsBook2Web.Ch01
{
public partial class SimpleControls : System.Web.UI.Page
{
protected void Page_Load(object sender, EventArgs e)
{
}
protected void BuildTableButton_Click(object sender, EventArgs e)
{
int xDim = Convert.ToInt32(XTextBox.Text);
int yDim = Convert.ToInt32(YTextBox.Text);
BuildTable(xDim, yDim);
}
private void BuildTable(int xDim, int yDim)
{
Table table;
TableRow row;
TableCell cell;
Literal content;
table = new Table();
table.BorderWidth = 1;
table.BorderStyle = BorderStyle.Ridge;
for (int y = 0; y < yDim; y++)
{
row = new TableRow();
for (int x = 0; x < xDim; x++)
{
cell = new TableCell();
cell.BackColor = Color.Blue;
cell.BorderWidth = 1;
cell.ForeColor = Color.Yellow;
cell.Font.Name = "Verdana";
cell.Font.Size = 16;
cell.Font.Bold = true;
cell.Font.Italic = true;
content = new Literal();
content.Text = "<SPAN>X:" + x.ToString() +
"Y:" + y.ToString() + "</SPAN>";
cell.Controls.Add(content);
row.Cells.Add(cell);
}
table.Rows.Add(row);
}
TablePlaceHolder.Controls.Add(table);
}
}
}
Comparing this simple controls demonstration to the HTML controls demonstration shows little difference beyond changes to control names and namespaces. One minor difference is the fact that in the simple controls demonstration, a PlaceHolder control (yes, there really is a PlaceHolder class) acts as the container for holding the cell content. The PlaceHolder control does not have a UI; instead, it renders only the UI of its child controls. This is in contrast to the HTML controls demonstration, which used HtmlGenericControl representing a <span> tag for holding the cell content.
The bigger difference between the two examples is the Cascading Style Sheet (CSS) style configuration. In the HTML controls demonstration, we had to use a more explicit syntax without the benefit of help from the control object model or IntelliSense in Visual Studio. However, in this simple controls demonstration, we have full access to the assistance provided by the Framework and Visual Studio. The following code snippet shows how easy it is to set color and other font styling in with simple controls:
cell = new TableCell();
cell.BackColor = Color.Blue;
cell.BorderWidth = 1;
cell.ForeColor = Color.Yellow;
cell.Font.Name = "Verdana";
cell.Font.Size = 16;
cell.Font.Bold = true;
cell.Font.Italic = true;
The content rendered in the browser demonstrates the nice abstraction of CSS styling made available to controls by the System.Web.UI.WebControls namespace:
<td style="color:Yellow;background-color:Blue;border-width:1px;border-style:solid; font-family:Verdana;font-size:16pt;font-weight:bold;font-style:italic;">
<span>X:0Y:0</span>
</td>
Figure 1-12. Shows the output from this simple controls demonstration.
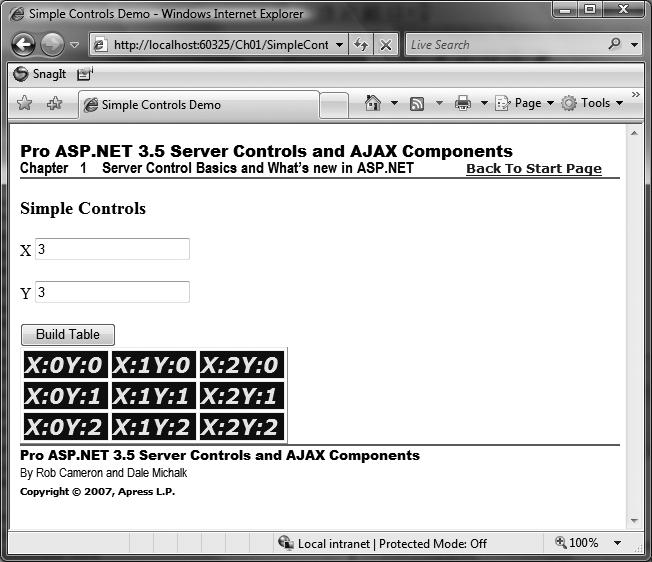
Figure 1-12. Output from the simple controls web form
List Controls
List controls provide enhanced capabilities beyond those of the simple controls by generating their content using an external data source. They range from the simple CheckBoxList and RadioButtonList controls, which build a group of simple HTML tags, to the more complex DataGrid, DataList, and Repeater controls, which support a highly customizable UI. In ASP.NET 2.0, the GridView was added to the arsenal, providing a very powerful list-based control, and in Chapter 2, the simple user control demonstration includes a GridView control. List controls are a key instrument in the toolkit of the ASP.NET developer, because they provide broad functionality when tasked with quickly getting a data-oriented web site up and running.
A List Controls Demonstration
The following list controls demonstration uses a Repeater control to build an HTML table representing data from a simple Access database containing a Books table with information from the Apress web site; the source code is provided in Listings 1-9 and 1-10. The previous edition of this book used the SQL Northwind database Customer table, but in this edition, we've made things a bit simpler by using an Access database. However, generally, you would want to use an enterprise-quality database such as SQL Server for a real application. The demonstration illustrates two key features of ASP.NET UI development: templates and data binding, which we cover in Chapter 7.
With templates and data binding available, the programmer can focus on building the data access class library in the n-tier model and hooking up the control to a data source via data binding in the code-behind page, while the UI designer can tweak the HTML content and templates on the .aspx page to ensure that it is displayed according to the requirements of the web development project.
Listing 1-9. The ListControls Web Form .aspx File
<%@ Page Language="C#" MasterPageFile="~/MasterPage/ControlsBook2MasterPage.Master" AutoEventWireup="true" CodeBehind="ListControls.aspx.cs" Inherits="ControlsBook2Web.Ch01.ListControls"
Title="List Controls Demo" %>
<asp:Content ID="Content1" ContentPlaceHolderID="ChapterNumAndTitle" runat="server">
<asp:Label ID="ChapterNumberLabel" runat="server"
Width="14px">1</asp:Label> <asp:Label
ID="ChapterTitleLabel" runat="server" Width="360px">
Server Control Basics and What's new in ASP.NET</asp:Label>
</asp:Content>
<asp:Content ID="Content2" ContentPlaceHolderID="PrimaryContent" runat="server">
<h3>
List Controls</h3>
<asp:Repeater ID="Repeater1" runat="server" DataSourceID="ApressBooksds">
<HeaderTemplate>
<table>
<th>
Title</th>
<th>
Author</th>
<th>
ISBN</th>
<th>
Date Published</th>
</HeaderTemplate>
<ItemTemplate>
<tr style="background-color: Silver">
<td>
<%# DataBinder.Eval(Container.DataItem,"Title") %></td>
<td>
<%# DataBinder.Eval(Container.DataItem,"Author") %></td>
<td>
<%# DataBinder.Eval(Container.DataItem,"ISBN") %></td>
<td>
<%# DataBinder.Eval(Container.DataItem,"DatePublished") %></td>
</tr>
</ItemTemplate>
<AlternatingItemTemplate>
<tr style="background-color: White">
<td>
<%# DataBinder.Eval(Container.DataItem,"Title") %></td>
<td>
<%# DataBinder.Eval(Container.DataItem,"Author") %></td>
<td>
<%# DataBinder.Eval(Container.DataItem,"ISBN") %></td>
<td>
<%# DataBinder.Eval(Container.DataItem,"DatePublished") %></td>
</tr>
</AlternatingItemTemplate>
<FooterTemplate>
</table>
</FooterTemplate>
</asp:Repeater>
<asp:AccessDataSource ID="ApressBooksds" runat="server" DataFile="~/App_Data/ApressBooks.mdb" SelectCommand="SELECT [Title], [Author], [ISBN], [DatePublished] FROM [Books]"></asp:AccessDataSource>
<br />
</asp:Content>
Listing 1-10. The ListControls Web Form Code-Behind Class File
using System;
using System.Web.UI.WebControls;
namespace ControlsBook2Web.Ch01
{
public partial class ListControls : System.Web.UI.Page
{
protected void Page_Load(object sender, EventArgs e)
{
}
}
}
The data source in the list controls example is an AccessDataSource named ApressBooksds that contains rows from a sample database of Apress books. The Repeater control is bound directly to the ApressBooksds control.
The Repeater control is templated to produce an HTML table with HTML rows representing each data row in the ApressBooksds data-source control. The HeaderTemplate and FooterTemplate give us the table opening and closing tags, and the ItemTemplate and AlternatingItemTemplate give us the structure for each row in the table.
The data in each row of the DataSet is available via the Container.DataItem reference available for use inside the template content. A string index name something like "Title" is used to grab a particular column for display. Although using code-behind over inline script as much as possible is preferable, DataBinder.Eval() is a late-bound formatting method that we use to keep from having to do ugly casts to satisfy the strongly typed nature of C# and ASP.NET. Interestingly, the Repeater control is the only list-based control that allows HTML formatting to span across the templates. Figure 1-13 shows the output from this list controls demonstration.
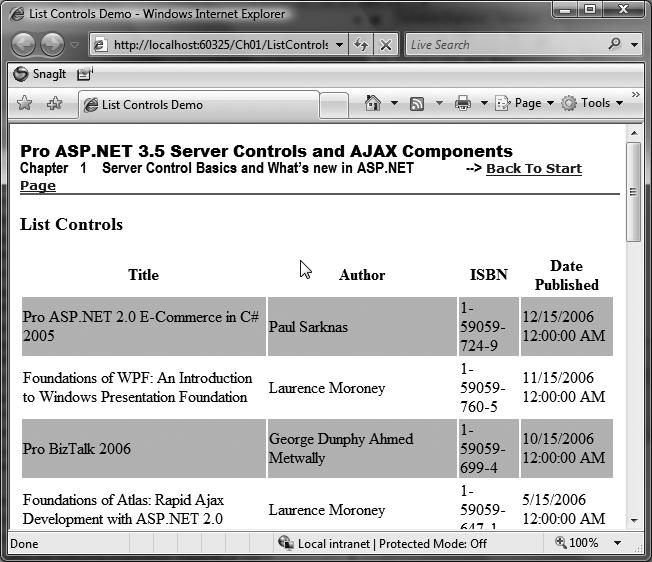
Figure 1-13. Output from the list controls web form
Rich Controls
The list controls are nice for working with data sources and building templated user interfaces, but sometimes, a web project needs more help from a control when building dauntingly complex pieces of HTML content. This is the domain of rich controls, such as the Calendar and AdRotator, in System.Web.UI.WebControls. They make hard-to-generate HTML appear easy, as they require little in the way of development to generate significant HTML output.
A Rich Controls Demonstration
This rich controls web form demonstration shows the Calendar control in action. The source code is provided in Listings 1-11 and 1-12.
Listing 1-11. The RichControls Web Form .aspx File
<%@ Page Language="C#" MasterPageFile="~/MasterPage/ControlsBook2MasterPage.Master" AutoEventWireup="true" CodeBehind="RichControls.aspx.cs" Inherits="ControlsBook2Web.Ch01.RichControls" Title="Rich Controls Demo" %>
<asp:Content ID="Content1" ContentPlaceHolderID="ChapterNumAndTitle" runat="server">
<asp:Label ID="ChapterNumberLabel" runat="server"
Width="14px">1</asp:Label> <asp:Label
ID="ChapterTitleLabel" runat="server" Width="360px">
Server Control Basics and What's new in ASP.NET</asp:Label>
</asp:Content>
<asp:Content ID="Content2" ContentPlaceHolderID="PrimaryContent" runat="server">
<h3>
Rich Controls</h3>
<p>
<asp:Calendar ID="Calendar1" runat="server" BackColor="White" Width="220px"
ForeColor="#003399"
Height="200px" Font-Size="8pt" Font-Names="Verdana"
BorderColor="#3366CC" BorderWidth="1px"
DayNameFormat="FirstLetter" CellPadding="1"
OnSelectionChanged="Date_Selected">
<TodayDayStyle ForeColor="White" BackColor="#99CCCC"></TodayDayStyle>
<SelectorStyle ForeColor="#336666" BackColor="#99CCCC"></SelectorStyle>
<NextPrevStyle Font-Size="8pt" ForeColor="#CCCCFF"></NextPrevStyle>
<DayHeaderStyle Height="1px" ForeColor="#336666"
BackColor="#99CCCC"></DayHeaderStyle>
<SelectedDayStyle Font-Bold="True" ForeColor="#CCFF99"
BackColor="#009999"></SelectedDayStyle>
<TitleStyle Font-Size="10pt" Font-Bold="True" Height="25px"
BorderWidth="1px" ForeColor="#CCCCFF"
BorderStyle="Solid" BorderColor="#3366CC" BackColor="#003399"></TitleStyle>
<WeekendDayStyle BackColor="#CCCCFF"></WeekendDayStyle>
<OtherMonthDayStyle ForeColor="#999999"></OtherMonthDayStyle>
</asp:Calendar>
</p>
<p>
<asp:Label ID="Label1" runat="server"></asp:Label></p>
</asp:Content>
Listing 1-12. The RichControls Web Form Code-Behind Class File
using System;
using System.Web;
using System.Web.UI;
using System.Web.UI.WebControls;
namespace ControlsBook2Web.Ch01
{
public partial class RichControls : System.Web.UI.Page
{
protected void Page_Load(object sender, EventArgs e)
{
}
protected void Date_Selected(object sender, EventArgs e)
{
Label1.Text = "Selected: " + Calendar1.SelectedDate.ToLongDateString();
}
}
}
The rich controls demonstration has the least amount of code surface area of all the demonstrations we've shown in this chapter. The .aspx page contains the Calendar control and all the declarative settings to have the Calendar render in a manner pleasing to the eye, along with a Label control to display the selected date. The code-behind has a Date_Selected() method mapped to the SelectionChanged event of the Calendar control to set the value of the Label control to the date we select (by clicking it). Figure 1-14 shows the output from this rich controls demonstration.
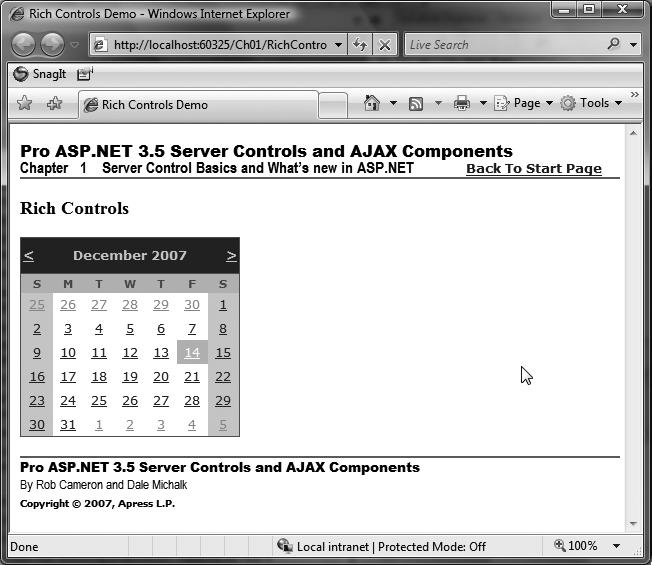
Figure 1-14. Output from the rich controls web form
Rich Controls and XSLT
Another interesting control from the rich controls portion of the System.Web.UI.WebControls namespace is the XML control. This control takes both an XML data source and an XML Style Sheet Language Transformations (XSLT) style sheet to generate the final HTML output. An XSLT style sheet can be brought to bear as an alternate UI generation paradigm that separates the display of data from its source in a similar fashion to what we accomplished with templates and data binding in the previous list controls demonstration.
An XML Control and XSLT Demonstration
The XML control web form generates an HTML table similar to the list controls demonstration, using the same data source and the native XML support available in ADO.NET. Listings 1-13 and 1-14 provide the source code for our demonstration. Listing 1-13 presents the XML control web form's ApressBooks.xslt file, and Listing 1-14 shows the code-behind file.
Listing 1-13. The XMLControl Web Form .aspx File
<%@ Page Language="C#" MasterPageFile="~/MasterPage/ControlsBook2MasterPage.Master" AutoEventWireup="true" CodeBehind="XMLControl.aspx.cs" Inherits="ControlsBook2Web.Ch01.XMLControls" Title="XML Control Demo" %>
<asp:Content ID="Content1" ContentPlaceHolderID="ChapterNumAndTitle" runat="server">
<asp:Label ID="ChapterNumberLabel" runat="server"
Width="14px">1</asp:Label> <asp:Label
ID="ChapterTitleLabel" runat="server" Width="360px">
Server Control Basics and What's new in ASP.NET</asp:Label>
</asp:Content>
<asp:Content ID="Content2" ContentPlaceHolderID="PrimaryContent" runat="server">
<h3>
XML Control</h3>
<asp:Xml ID="Xml1" runat="server"></asp:Xml><br />
<asp:AccessDataSource ID="ApressBooksds" runat="server"
DataFile="~/App_Data/ApressBooks.mdb"
SelectCommand="SELECT [ISBN], [Author], [DatePublished], [NumPages], [Price]
FROM [Books]">
</asp:AccessDataSource>
</asp:Content>
Listing 1-14. The XMLControl Web Form Code-Behind Class File
using System;
using System.Data;
using System.Web.UI;
using System.Web.UI.WebControls;
namespace ControlsBook2Web.Ch01
{
public partial class XMLControls : System.Web.UI.Page
{
protected void Page_Load(object sender, EventArgs e)
{
if (!Page.IsPostBack)
{
LoadXMLControl();
}
}
private void LoadXMLControl()
{
//Create a DataView from the AccessDataSource control
DataView dv = (DataView)ApressBooksds.Select(new DataSourceSelectArguments());
try
{
dv.Table.TableName = "Books";
DataSet ds = dv.Table.DataSet;
ds.DataSetName = "ApressBooks";
// give the XML control the XML and xslt
Xml1.DocumentContent = ds.GetXml();
Xml1.TransformSource = "ApressBooks.xslt";
}
finally
{
dv.Dispose();
}
}
}
}
The code has a copy of the AccessDataSource ApressBooksds used in the list controls demonstration to generate a DataSet from the AccessDataSource:
DataView dv = new DataView();
dv = (DataView)ApressBooksds.Select(new DataSourceSelectArguments());
dv.Table.TableName = "Books";
DataSet ds = dv.Table.DataSet;
ds.DataSetName = "ApressBooks";
The code from the first version of this book uses now obsolete methods for ASP.NET 2.0. This code no longer uses the XslTransform class or obsolete properties on the XML control. Instead, the DocumentContent and TransformSource properties are set in the code-behind class:
Xml1.DocumentSource = ds.GetXml();
Xml1.TransformSource = "ApressBooks.xslt";
These changes in the ASP.NET 2.0 object model simplify the code required. Figure 1-15 shows the output from this XML and XSLT demonstration.
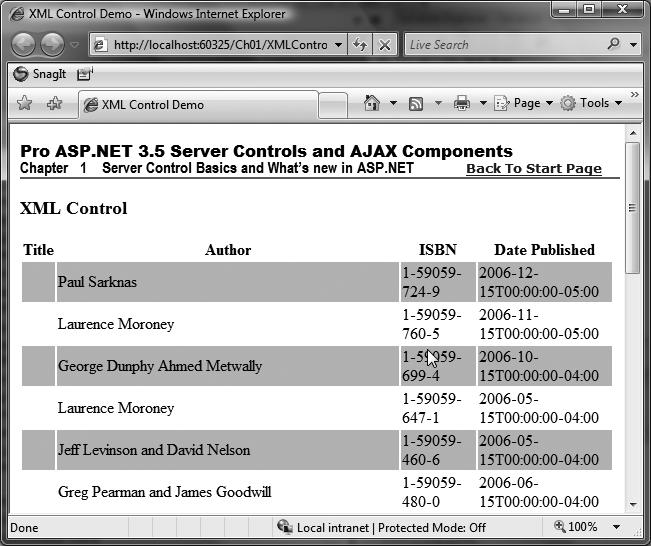
Figure 1-15. Output from the XML control Web Form
Although the XML control seems to be a great way to build UIs, we do not recommend the XSLT technique as a way to take advantage of ASP.NET and its server control mechanism for several reasons:
- All UI layout information must be specified declaratively inside the XSLT document, which requires the programmer to take over the task of rendering the entire HTML document.
- It is not possible to leverage server controls, which have the capability to render conditional UI based on browser capabilities in this model, nor is it possible to capture events during postback on the server side that are connected to the HTML tags rendered by the XSLT.
- Extra steps are required to debug the XSLT style sheet outside of Visual Studio. The programmer must either manually look at the HTML output or buy a third-party XSLT debugger, such as XML Spy, to be able to step through the XSLT code. Contrast this with the ability to completely step through the page generation process with templates and data binding.
Validation Controls
Checking user input on a web page is one of the least favorite tasks on a web developer's to-do list. It falls somewhere between maintenance of old code and sitting in another project planning meeting. Fortunately, ASP.NET comes to the rescue with a set of controls that not only take care of validation of input when it reaches the web server but also handle the task of generating JavaScript validation routines to check the validity of input on the client side, minimizing additional
round-trips to the server. This is accomplished by setting the EnableClientScript property to true.
Table 1-3 shows the various validation controls that are available in the System.Web.UI.WebControls namespaces and the input-checking features they provide.
Table 1-3. Validation Controls Available in ASP.NET
| Validation Control |
Description |
| RequiredFieldValidator |
Checks for a null or empty value in a server control |
| CompareValidator |
Compares two server controls by various operators |
| RangeValidator |
Ensures the values of a server control fall in a specific range |
| RegularExpressionValidator |
Uses a regular expression to validate the input of a server control |
| CustomValidator |
Allows the programmer to specify client-side and server-side validation routines to constrain a server control's input |
| ValidationSummary |
Shows a summary of all the error messages |
A Validation Controls Demonstration
The following validation controls web form demonstrates all of the validation controls in action. Full source code is provided in Listings 1-15 and 1-16. The web form has TextBox controls to test input and a Label to display the success or failure of the web form postback according to the validation process.
Listing 1-15. The ValidationControls Web Form .aspx File
<%@ Page Language="C#" MasterPageFile="~/MasterPage/ControlsBook2MasterPage.Master" AutoEventWireup="true" CodeBehind="ValidationControls.aspx.cs" Inherits="ControlsBook2Web.Ch01.ValidationControls" Title="Validation Controls Demo" %>
<asp:Content ID="Content1" ContentPlaceHolderID="ChapterNumAndTitle" runat="server">
<asp:Label ID="ChapterNumberLabel" runat="server"
Width="14px">1</asp:Label> <asp:Label
ID="ChapterTitleLabel" runat="server" Width="360px">
Server Control Basics and What's new in ASP.NET</asp:Label>
</asp:Content>
<asp:Content ID="Content2" ContentPlaceHolderID="PrimaryContent" runat="server">
<script type="text/javascript">
function ValidateEvent(oSrc, args){
args.IsValid = ((args.Value % 2) == 0);
}
</script>
<asp:Label ID="Label1" runat="server"> RequiredField</asp:Label><br />
<asp:TextBox ID="RequiredField" runat="server"></asp:TextBox>
<asp:RequiredFieldValidator ID="RequiredFieldValidator1" runat="server"
ErrorMessage="RequiredField needs an input value!"
ControlToValidate="RequiredField"></asp:RequiredFieldValidator><br />
<asp:Label ID="Label2" runat="server"> ComparedField</asp:Label><br />
<asp:TextBox ID="ComparedField" runat="server"></asp:TextBox>
<asp:CompareValidator ID="CompareValidator1" runat="server"
ErrorMessage="RequiredField and ComparedField are not equal!"
ControlToValidate="ComparedField"
ControlToCompare="RequiredField"></asp:CompareValidator><br />
<asp:Label ID="Label3" runat="server"> RangeField</asp:Label><br />
<asp:TextBox ID="RangeField" runat="server"></asp:TextBox>
<asp:RangeValidator ID="RangeValidator1" runat="server" ErrorMessage="RangeField
value must be between 1-10!"
ControlToValidate="RangeField" MaximumValue="10" MinimumValue="1"
Type="Integer"></asp:RangeValidator><br />
<asp:Label ID="Label4" runat="server"> RegexField (Phone)</asp:Label><br />
<asp:TextBox ID="RegexField" runat="server"></asp:TextBox>
<asp:RegularExpressionValidator ID="RegularExpressionValidator1" runat="server"
ErrorMessage="RegexField must be a valid US phone number!"
ControlToValidate="RegexField" ValidationExpression=
"((\(\d{3}\) ?)|(\d{3}-))?\d{3}-\d{4}"></asp:RegularExpressionValidator><br />
<asp:Label ID="Label5" runat="server">CustomField (Even Number)</asp:Label><br />
<asp:TextBox ID="CustomField" runat="server"></asp:TextBox>
<asp:CustomValidator ID="CustomValidator1" runat="server" ErrorMessage=
"CustomField must be an even number!"
ControlToValidate="CustomField" ClientValidationFunction="ValidateEvent"
OnServerValidate="ValidateEvent"></asp:CustomValidator><br />
<br />
<asp:Button ID="ValidateButton" runat="server" Text="Submit"
OnClick="ValidateButton_Click">
</asp:Button><br />
<asp:Label ID="ResultsLabel" runat="server"></asp:Label><br />
<br />
<asp:ValidationSummary ID="ValidationSummary1"
runat="server"></asp:ValidationSummary>
</asp:Content>
Listing 1-16. The ValidationControls Web Form Code-Behind Class File
using System;
using System.Web;
using System.Web.UI;
using System.Web.UI.WebControls;
namespace ControlsBook2Web.Ch01
{
public partial class ValidationControls : System.Web.UI.Page
{
protected void Page_Load(object sender, EventArgs e)
{
}
protected void ValidateButton_Click(object sender, EventArgs e)
{
ResultsLabel.Text = "Page submitted at " + DateTime.Now + " IsValid: " + Page.IsValid;
}
protected void ValidateEvent(object source, ServerValidateEventArgs args)
{
if ((Convert.ToInt32(args.Value) % 2) == 0)
args.IsValid = true;
else
args.IsValid = false;
}
}
}
The web form button that submits the .aspx page uses the IsValid property of the Page class to determine if the form post was successful. It also displays the time.
Of course, this Label output won't be displayed on the browser window, like in Figure 1-17, unless the form post has successfully passed through the client-side validation that occurs when the demonstration is executed using a JavaScript-capable browser, such as Internet Explorer 6.0. Figure 1-16 shows the result of erroneous client-side input with the JavaScript features enabled. You should also notice the display of the error messages by the input elements and the summary at the bottom generated by the ValidationSummary control.
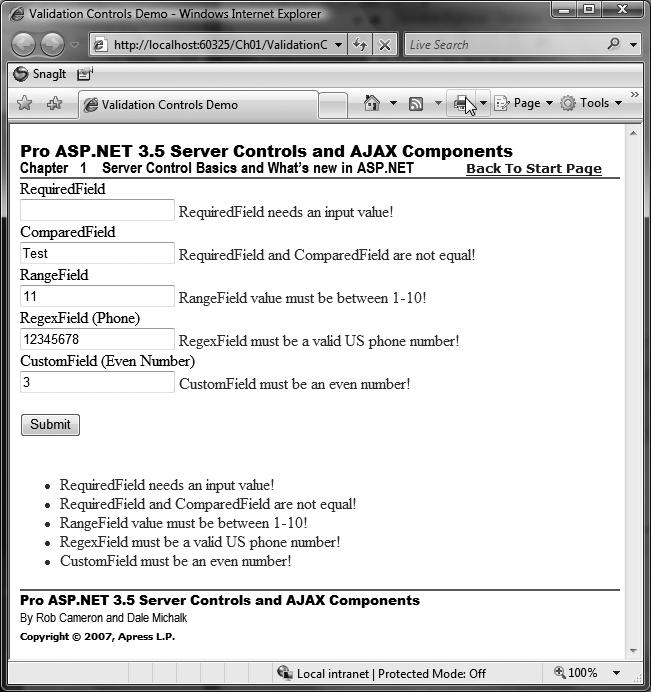
Figure 1-16. Output from the validation controls web form with validation errors
If the posted data makes its way past the guard of client-side validation, it has a second hurdle to overcome: validation on the server side. Each validation control is checked once again for correctness of values. This prevents spoofing or tampering with the HTTP postback to the web server in an attempt to get around the validation process.
The validation system in ASP.NET also provides the ability to customize the client-side and server-side routines that verify input. The preceding example demonstrates this with the CustomValidator control that is linked to the CustomField TextBox control. The first step is to wire up custom client-side validation through the ClientValidationFunction property. We set the value of this property to ValidateEvent and include a like-named JavaScript function in our .aspx page in the <head> section of the HTML content:
<script type="text/javascript">
function ValidateEvent(oSrc, args){
args.IsValid = ((args.Value % 2) == 0);
}
</script>
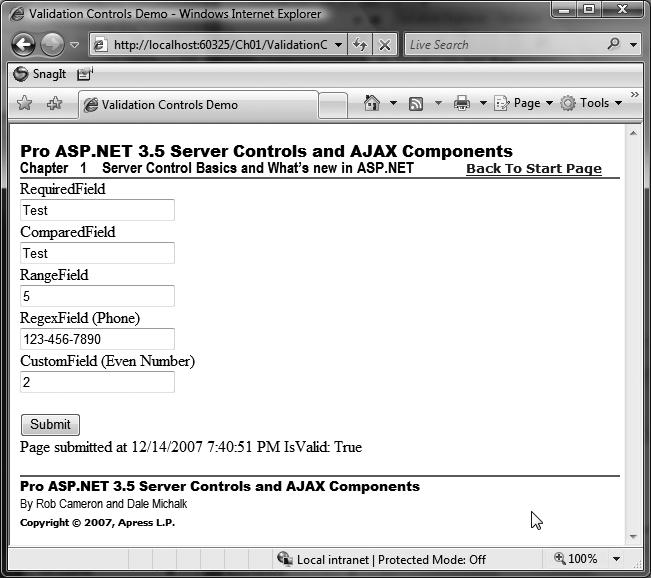
Figure 1-17. Successful output from the validation controls web form
The arguments passed to our routine provide us with the means to check the state of the validated HTML element and communicate the results of our validation work. The second argument is a structure with an IsValid property that is set to true or false to signal the results as well as a Value property representing the input value. The ValidateEvent routine uses modulo arithmetic to detect if a number is even or odd.
Configuring the server-side validation for the same control is done by wiring up the ValidateEvent method in the code-behind file with the ServerValidate event of the CustomValidator control. The parameters work in a similar fashion to their JavaScript counterparts with a Value and IsValid property.
private void ValidateEvent(object source, System.Web.UI.WebControls.ServerValidateEventArgs args)
{
if ((Convert.ToInt32(args.Value) % 2) == 0)
args.IsValid = true;
else
{
args.IsValid = false;
}
}
The next two sections provide a high-level overview of namespaces introduced in ASP.NET 2.0 or later.
System.Web.UI.WebControls.Adapters Namespace
System.Web.UI.WebControls.Adapters was introduced in ASP.NET 2.0. It allows developers to build control adapters. An ASP.NET 2.0 control adapter allows developers to plug into any ASP.NET server control and override, modify, and/or tweak the rendering output logic of that control. We provide an example adapter in Chapter 10.
System.Web.UI.WebControls.WebParts Namespace
System.Web.UI.WebControls.WebParts was introduced in ASP.NET 2.0 and allows developers to build WebPart functionality into ASP.NET 2.0 or later applications. The WebParts namespace was previously only available via the SharePoint SDK for use in a SharePoint portal application but was mainstreamed in ASP.NET 2.0. In Chapter 10, we cover WebPart-based controls in more detail.
Web Controls vs. HTML Controls
The controls discussed in this chapter span both the System.Web.UI.WebControls and System.Web.UI.HtmlControls namespaces. On the surface, the functionality in these two namespaces appears to overlap, particularly when generating content that maps to a single HTML tag such as <input type="text"> or <textarea>. Both the HTML control HtmlInputText and web control TextBox handle this with equal functionality when added to a web form as a server control. Deciding which to use in this situation is a commonly asked question about ASP.NET.
The HTML controls have the advantage of looking similar to their HTML brethren, taking on attributes that are familiar to web developers. This eases the porting process and helps keep people comfortable with the changes to ASP.NET. This is both a blessing and a curse. It is easy to overlook the runat="server" attribute and assume that the control is raw HTML. This is especially a problem late at night, when things on the monitor don't look as they should to tired eyes.
The web controls provide a more consistent attribute model for specifying properties on controls. The best example is the use of the more intuitive Text property on a Label and TextBox control, contrasted with the Value or Name property that is used in the HtmlControls namespace. The CSS styling support is also much better with web controls, as the web controls example demonstrated in the CSS-related types added to the System.Web.UI.WebControls namespace.
Also, notice that web controls have an asp: tag prefix added to the HTML tag on the .aspx page to identify the tag as a server control within a particular namespace. The classes in the HtmlControls namespace do not have a tag prefix and cannot be used as a base class for a custom server control.
We would have been remiss not to include a detailed discussion of what is available in the HtmlControls namespace, as these controls can provide a potential interim step to help ease the migration challenges to ASP.NET from ASP. However, it is our opinion that, outside the necessary HtmlForm control for web form construction and the file upload functionality of the HtmlInputFile control, programmers should stay away from using the HTML controls in ASP.NET applications. We recommend that developers strive to fully migrate toward the web control classes in application development to gain the benefits from the level of abstraction web controls provide as well as the rich programming model available. This is especially true if custom control development is planned or desired.
Summary
This chapter was devoted to the topic of server controls. Server controls are objects, and as such, they provide the time-honored constructs of properties, methods, and events. The HTML content rendered to the browser client is generated in its entirety by a tree of server controls representing each item on the page.
Controls in ASP.NET are separated into three hierarchies: System.Web.UI, System.Web.UI.HtmlControls, and System.Web.UI.WebControls. System.Web.UI contains the Page class, which represents the web form, and the Control class, which is the root base class of all the other server controls in ASP.NET.
System.Web.UI.HtmlControls contains controls that directly map to HTML tags and make porting from HTML pages easier. HtmlInputText, HtmlForm, and HtmlInputHidden are examples of HTML controls.
System.Web.UI.WebControls contains a full-featured set of controls, including simple, list, rich, and validation controls. Simple controls are web controls that provide server-side mapping to HTML tags. TextBox, Button, and DropDownList are examples of simple controls. List controls support building HTML content through data binding and templates. The DataList, DataGrid, and Repeater controls are some examples of list controls. Rich controls generate complex UI from a minimal amount of input. The Calendar control is an example of a rich control.
Validation controls simplify the tedious nature of web form input validation. Validation can occur on the client side for JavaScript-capable browsers. It is also possible to write custom validation scripts using the CustomValidator control.
There is overlapping functionality between WebControls and HtmlControls. We recommend using the System.Web.UI.WebControls namespace over System.Web.UI.HtmlControls due to its rich control set, enhanced styling features, and powerful abstraction layer around HTML rendering. Also, it is not possible to create a custom server control that derives from an HtmlControl class.
Book Details