

Introduction
Artillery is a modern, powerful, and easy-to-use load performance testing tool that can be smoothly implemented with Jenkins via plugins. Use it to ship scalable applications that can have high performance and resilience under high load. It can be used for testing any application backed that works on HTTP, socket.io, and Websockets.
For more information, you can visit here
What is Performance Testing?
Various project stakeholders have different levels of concern and views regarding application performance.
- Solution Architect: Need to balance scalability and performance of application services as compare to other services.
- Developer: Should be aware when to start performance testing and the level of software optimization needed
- Quality Assurance Team: Should validate the ability of the application to support the expected workload during scheduled or unexpected events.
- Project Manager: Should check for application compliance to service level agreements and create effective and future realistic growth plans.
- Product owner: Would be more interested in the performance of the application with lower total cost of ownership of the software that the organization creates.
Why Artillery?
As this is a powerful load testing tool which help developers many ways like:
- Develop easy-to-use applications.
- Build application faster.
- Make application more scalable and resilient
Features
- Supports multiple protocols like HTTP, WebSocket & socket.io
- Scenario based test steps interaction in API or Web Services
- User can write custom script using JavaScript to perform any action
- Supports multiple platforms and can integrate with them like Datadog, Librato, InfluxDB, and statsd
- It can generate report in HTML format
- It can be parameterized using CSV File
- It generates performance metrics for latency, requests per second, concurrency and throughput.
How we can install Artillery?
Pre-requisites to install artillery in your local system
- Artillery working on Node.js, it should be preinstalled version > v6+
In terminal type: npm install -g artillery
*-g = defines global installation
After the installation check dinosaur should print on command prompt.
Use command > artillery dino to verify artillery installation on machine.
*dino = Dinosaur
Basic commands
> artillery -help = List all the available commands with options.
> artillery run - To run a script
> artillery quick - To run a quick test without test script
> artillery report - To create a report from a JSON file created by artillery while running the test
> artillery convert <file> - To convert JSON to YAML and vice Versa
> artillery quick - Quick test command is used to run a test without the test script.
Example - artillery quick -c 10 -n 50 https://localhost/api/users/2
where -c is the count of virtual users to perform load test and -n is the number of requests each user sends.
Artillery Test Script
It has two sections.
- Configuration section
- target - API for test (pass the value of the URL to hit)
- phase - load phase definition (define the duration and number of virtual users)
- environments - defines the list of environments and associated targets.
- payload - imports data.
- defaults - sets default headers applicable to all the HTTP requests.
- timeout - defines wait time for the server before responding.
- Scenarios section
- Holds how the user interacts
Our final script looks like below
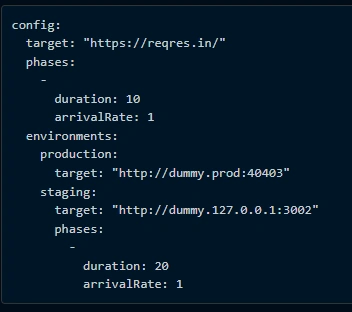
Here we have used few words as below definition:
arrivalRate - defines the arrival of virtual user for the set duration
arrivalCount - defines the number of users to create over a period.
pause - wait time
To execute script run below command:
artillery run -e production <filename>.yml
*-e = environment name
How can we debug our script?
To debug the artillery script, use DEBUG. Using DEBUG=http prints all the requests and errors.
Debugging HTTP Scenario
DEBUG=http artillery run <filename>.yaml.
Similary, using DEBUG=http:response prints all the responses.
DEBUG=http:response artillery run sample.yml
Using http:capture, prints the captured operation.
DEBUG=http:capture artillery run sample.yml.
Multiple debugging options can also be set together.
DEBUG=http,http:response artillery run sample.yml
Debugging Socket.io
DEBUG:socketio artillery run sample.yml.
Debugging WebSocket
DEBUG:ws artillery run sample.yml
Artillery Reporting
After every execution, reports are generated. Let us take a look at these reports, a sample of which is shown below.
Scenarios launched: 5
Scenarios completed: 5
Requests completed: 58
RPS sent: 0.86
Request latency:
min: 102.4
max: 3067.5
median: 325.5
p95: 2118.5
p99: 3020
Scenario duration:
min: 56745.4
max: 67339.1
median: 59275.6
p95: NaN
p99: NaN
Codes:
200: 58
You will notice that a logfile like artillery_report_xxxxxxx_xxxxxx.json is created.
To view JSON report, jq must be installed in the machine. jq command is used to slice, filter, map and transform structured data with ease.
Usage: jq .aggregate artillery_report_xxxxxxxx_xxxxxx.json.
Replace artillery_report_xxxxxxxx_xxxxxx.json with the json file that gets created after execution.
Please note, in our playground on katacoda, jq is not installed and hence you may encounter an error saying bash: jq: command not found.
Converting JSON Report to HTML
Let us convert our auto-generated JSON report file to HTML. To do so, you can run the following:
artillery report artillery_report_xxxxxx_xxxxxx.json
Replace artillery_report_xxxxxx_xxxxxx.json with the json file created at the time of execution.
Summary
So far we learn how to install artillery on local system, uses of basic commands, script writing, debugging of test script and reporting part of Artillery tool. In the next article, we will learn Jenkins integration with Artillery.
Stay tuned
Please add your feedback / Query in the comment section.
Join the conversation! Your thoughts help the community grow.