

I was working on an application for online store. I found that pretty often I
would create a textbox and link it to a calendar extender to perform some date
populating. So I decided to create a usercontrol that I could use each time I
wanted to perform that task.
Here it is. Enjoy!!
First create a new usercontrol and name it "DateTextBox", check the box to place
code in codebehind file. In design view drag and drop a textbox asp control on
the page. Note: Use an asp textbox control not an html text field.
Give your textbox control an identifier. I called mine txtDateVal. Now still in
design view use the smart tag of the textbox and click add extender.
Figure 1: adding extender.
Select the calendar extender. Give your extender an identifier and click ok. I
used "cDateValue" for my identifier.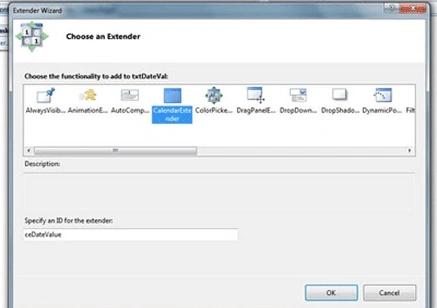
Figure 2: Choosing the calendar extender.
Next in the properties panel. If you don't see it go to "View" menu and select
"Properties Window". Switch to code view and place your cursor over the code of
the calender extender control... in the properties panel look for "TargetControlID"
and type txtDateVal (or whatever name you assigned to your textbox control). You
could also type it directly in the code of the calender extender; type
TargetControlID="txtDateVal". What this does is set the text of the textbox
control to the date selected in the calendar at runtime.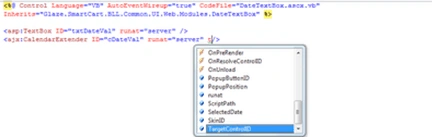
Figure 3: Assigning the TargetControlID property.
Now we're going to add validators to our control.
From the toolbox validators tab drag a RegularExpressionsValidator on to the
page in code view assign it an identifier (ID) of "regDateValidator". Switch to
design view and select the validator, set the "ValidationExpression" property to
the following; ValidationExpression="\d{2}/\d{2}/\d{4}", and set the "Display"
property to "None". Click add extender. Select the validation callout extender
assign it an identifier and click ok. I gave mine an ID of "vceRegExpression".
From your toolbox validation tab drag a requiredfieldvalidator on to the page,
assign it a name of "rqDateVal". Set it's "ControlToValidate" property to
txtDateVal. Extend your requiredfieldvalidator with a validation callout
extender
Your markup should now look something like the following ...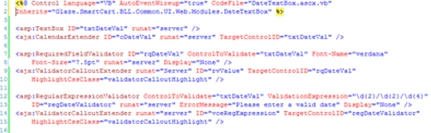
Now let's get into the fun stuff. Open your code page from the solution
explorer. If you don't see the solution explorer, in your visual studio editor
go to the "View" menu and click on "Solution Explorer".
Now that your code behind is opened we will add some Public Properties to our
custom control. Why Public Properties? This makes our properties accessible to
other controls and pages.
I think this would be a good time to point out that i'm using VB.NET for this
example. If you're using C# or another .NET language your code will look
different to mine, but i'll try to explain as clearly as possible so you can
follow along.
Firstly, we want to reference a few namespaces so i'll import them in the top of
my codebehind like this
Imports System
Imports System.Web
Imports System.Web.Security
Imports System.Web.UIImports System.Web.UI.WebControls
We are defining the basic properties that we want to make accessible to other controls.
these are ...
Text, TextMode, Width, Height, Enabled, ValidationGroup, ValidationText, ErrorMessage, IsRequired and AutoCompleteType
Let's begin
Note: don't worry about the namespace assignment. I used the namespace assignment of the solution for this control; you may use the namespace of yours (optional).
Public Property ValidationGroup() As String
Get
Return rqDateVal.ValidationGroup
End Get
Set(ByVal value As String)
Let's explain what we have so far.
On page load we want to set the popupbuttonid property of the calendar extender to the textbox's id if we're not using a calendar image button. The boolean property "UsePopupButton" is true if we're using an image button, and false if we're not. We also want to check whether or not the date textbox is a required field, if not then we disable the requiredfieldvalidator.
....
The calendar control's "PopupButtonID" property gets set to the id of the textbox only if that statement evaluates to true. What is the "PopupButtonID" for? Well... at runtime when a user clicks on the control with the popupbuttonid identifier this invokes the calenderextender, and it lauches the calendar control. So if the Identifier is the textbox, when a user mouse clicks inside of the textbox this launches the calendar. Some designers use a calendar icon position to the right of the textbox... in this case when that icon is clicked the calendar launches.
TheRequiredFieldValidator control's "Enabled" property is set to false only if that statement evaluates to true.
All of the other properties should be pretty self explanatory.
That's it for part 1. Next I'll show you how to use your control in a page. Coming in part 2.
Happy programming!! :)
shurland moorePosted Aug 30, 2010, 12:47 PM
I'm happy you like...
Abhijeet SinhaPosted Aug 18, 2010, 8:41 AM
its good