

Since I couldn’t find any resource on implementing the registration form using Angular 2 Forms with ASP.NET MVC., I decided to write an article about it. Hope it will be helpful to you.
Step 1
Step 2
Step 3
PM> Install-Package Angular2-Template-for-MVC-and-WebAPI -Version 1.0.0
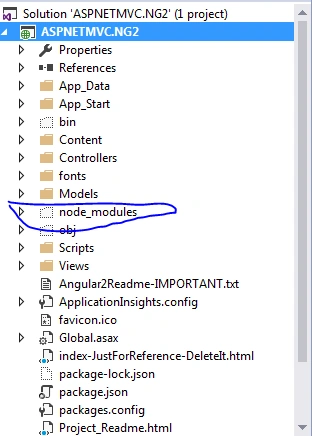
The above command installs the required TypeScript files with one sample template of Angular 2 in MVC project. Don’t forget to restore the packages from packages.json.
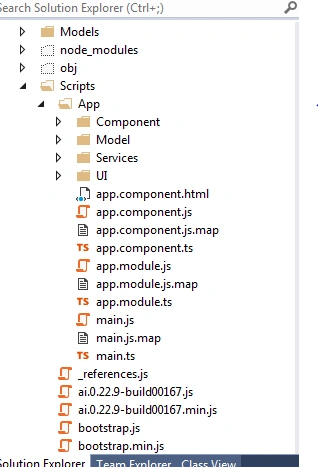
I have created the following folder structure to store the components of Angular 2; you can create your own folder structure.
Step 4
Step 5
Step 6
app.module.ts
This is the default root module of our Angular application and it will be rendered when our application is executed. The module is used to inherit our created components, directives, and services.
- import { NgModule } from '@angular/core';
- import { BrowserModule } from '@angular/platform-browser';
- import { FormsModule, ReactiveFormsModule } from '@angular/forms';
- import { AppComponent } from './app.component';
- @NgModule({
- imports: [ BrowserModule, FormsModule, ReactiveFormsModule ],
- declarations: [ AppComponent ],
- bootstrap: [ AppComponent ]
- })
- export class AppModule { }
You can see in the above code that app.module.ts will be created by default when we install the Angular template from the NuGet Package Manager. When we create any new component that needs to be registered in declarations in @NgModule, Bootstrap is the place where we can register the first starting component that needs to be loaded for the particular module.
Step 7
registration.component.ts
- import {Component } from '@angular/core';
- import { FormBuilder , FormGroup, Validators } from '@angular/forms';
- @Component({
- selector: 'app-registration',
- templateUrl: '../Scripts/App/UI/registration.component.html',
- styles: ['p {font-family: Lato;} ']
- })
- export class RegistrationComponent {
- userForm: any;
- constructor(private formBuilder: FormBuilder) {
- this.CreateForm();
- }
- CreateForm() {
- this.userForm = this.formBuilder.group({
- 'name': ['', Validators.required],
- 'email': ['', [Validators.required]],
- 'password': ['', [Validators.required]],
- 'confirmPassword': ['', [Validators.required]],
- // console.log(this.userForm);
- }
- saveUser(): void {
- if (this.userForm.dirty && this.userForm.valid) {
- // alert(`name' : ${this.userForm.value.name} 'email' : ${this.userForm.value.email}`);
- }
- }
- }
In the above code, we have imported necessary libraries and in @Component, we have declared the selector as 'app-registration' which will be used in the main view to render the component. And create one template in UI folder with a name registration.component.html and given this path in the templateUrl property.
In the constructor, we have injected the FormBuilder module. Using this, we can create the validations for the form that we are going to build. We have used the createForm () method in the constructor which will specify what fields have validation rules.
Step 8
registration.component.html
- <div class="container">
- <h2>Employee Registration</h2>
- <form class="form-horizontal" [formGroup]="userForm" (submit)="saveUser()">
- <div class="form-group">
- <label class="control-label col-sm-2" for="name">Name:</label>
- <div class="col-sm-10">
- <input class="form-control" formControlName="name" id="name" />
- </div>
- </div>
- <div class="form-group">
- <label class="control-label col-sm-2" for="email">Email:</label>
- <div class="col-sm-10">
- <input class="form-control" formControlName="email" id="email" />
- </div>
- </div>
- <div class="form-group">
- <label class="control-label col-sm-2" for="password">Password:</label>
- <div class="col-sm-10">
- <input class="form-control" type="password" formControlName="password" id="password" />
- </div>
- </div>
- <div class="form-group">
- <label class="control-label col-sm-2" for="confirmPassword">Confirm Password:</label>
- <div class="col-sm-10">
- <input class="form-control" type="password" formControlName="confirmPassword" id="confirmPassword" />
- </div>
- </div>
- <div class="form-group">
- <div class="col-sm-offset-2 col-sm-10">
- <button type="submit" [disabled]="!userForm.valid" class="btn btn-success">Submit</button>
- </div>
- </div>
- </form>
- </div>
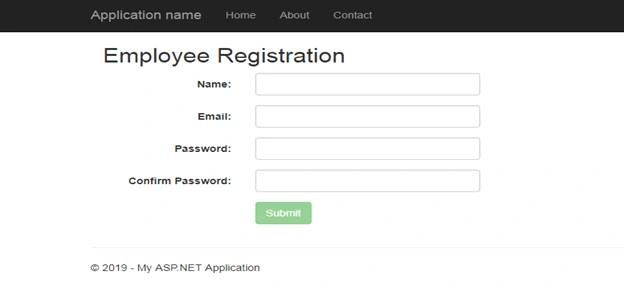
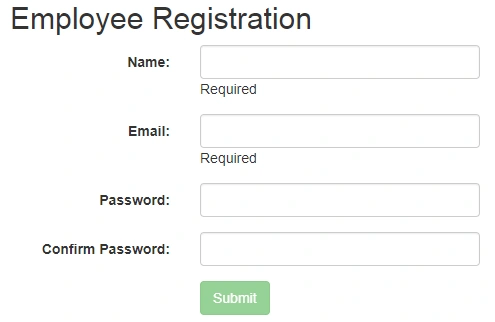
In the above HTML, we have used form group as userForm in the form tag and in controls like textbox, we have used formControlName to give name to the textbox and in Submit button, we have disabled the attribute to disable the button if the form is not valid.
Step 9
- import {RegistrationComponent} from './component/registration.component';
Declare the RegistrationComponent in the declarations section and don’t forget to add RegistrationComponent in Bootstrap as well, which will look like below. Change the name to app-registration in Index.cshtml which is present in the Views folder as this will render the component which looks like below.
- declarations: [
- RegistrationComponent
- ],
- bootstrap: [
- RegistrationComponent
- ]
Views/index.cshtml
- <app-registration>Loading...</app-registration>
Step 10
Step 11
- [HttpPost]
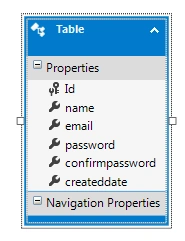
- public ActionResult Register(Table register)
- {
- try
- {
- _db.Tables.Add(register);
- _db.SaveChanges();
- }
- catch (Exception ex)
- {
- throw;
- }
- return Json("OK", JsonRequestBehavior.AllowGet);
- }
Step 12
User.service.ts
- import { Injectable } from '@angular/core';
- import { Http, Response, Headers, RequestOptions } from '@angular/http';
- import { Observable } from 'rxjs/Observable';
- import 'rxjs/add/operator/map';
- import 'rxjs/add/operator/do';
- import 'rxjs/add/operator/catch';
- @Injectable()
- export class UserService {
- constructor(private _http: Http) { }
- InsertUser(url: string, model: any): Observable<any> {
- let body = JSON.stringify(model);
- let headers = new Headers({ 'Content-Type': 'application/json' });
- let options = new RequestOptions({ headers: headers });
- return this._http.post(url, body, options)
- .map((response: Response) => <any>response.json())
- .catch(this.handleError);
- }
- private handleError(Error: Response) {
- console.error(Error);
- return Observable.throw(Error.json().error || 'Server error');
- }
- }
As you can see in the above code, we have imported the HTTP service library to perform HTTP operations and we have also imported some React.js libraries to handle the exceptions and map the response to the JSON as well.
I have created one method called InsertUser() which accepts the URL and model object as a parameter. This method returns the type observable. This service can be injected into other components and we have also created one method to handle the error using React.js library.
Step 13
User.interface.ts
- export interface User
- {
- name: string;
- email: string;
- password: string;
- confirmPassword: string;
- createddate: string
- }
Step 14
- import { User } from '../model/user.interface';
- import { UserService } from '../services/user.service';
The complete code of registration.component.ts will look like below.
registration.component.ts
- import { Component } from '@angular/core';
- import { FormBuilder, FormGroup, Validators } from '@angular/forms';
- import { User } from '../model/user.interface';
- import { UserService } from '../services/user.service';
- import { DatePipe } from '@angular/common';
- @Component({
- selector: 'app-registration',
- templateUrl: '../Scripts/App/UI/registration.component.html',
- styles: ['p {font-family: Lato;} '],
- providers: [UserService],
- })
- export class RegistrationComponent {
- userForm: any;
- user: User;
- toDay = new Date();
- constructor(private formBuilder: FormBuilder, private _userService: UserService, private _datepipe: DatePipe) {
- this.CreateForm();
- }
- CreateForm() {
- this.userForm = this.formBuilder.group({
- 'name': ['', Validators.required],
- 'email': ['', [Validators.required]],
- 'password': ['', [Validators.required]],
- 'confirmPassword': ['', [Validators.required]]
- });
- // console.log(this.userForm);
- }
- saveUser(): void {
- if (this.userForm.dirty && this.userForm.valid) {
- // alert(`name' : ${this.userForm.value.name} 'email' : ${this.userForm.value.email}`);
- this.user = {
- name: this.userForm.value.name,
- email: this.userForm.value.email,
- password: this.userForm.value.password,
- confirmPassword: this.userForm.value.confirmPassword,
- createddate: this._datepipe.transform(this.toDay, "yyyy-MM-dd")
- }
- console.log(this.user);
- this._userService.InsertUser("/Home/Register", this.user).subscribe((data) => {
- if (data == "ok") {
- console.log('success');
- }
- });
- }
- }
- }
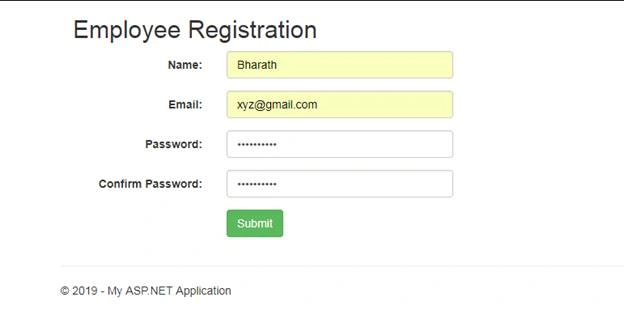
As you can see in the above code, we have imported the necessary libraries and in saveUser() method, we are filling the interface model. Here, we are calling the InsertUser method from userService. We can pass the correct controller and action method as parameters which will subscribes the result of the server-side method.
Yazan KhouryPosted Dec 22, 2019, 3:40 AM
Dear Bharath, I have an enquiry about what's the proper way to install npm to the project folder, as when i installed the npm and built the project the the error was populated with 793 errors, Please Advise??
Pavan KumarPosted Aug 17, 2019, 2:13 AM
How to display the success msg in browser once data inserted into database
Israel AmambaPosted May 22, 2019, 9:30 AM
Thank you very much for this article. It gave me the start in using angular with typescript in my project. Keep up the good work
Jeeva SubburajPosted Jan 31, 2019, 9:20 AM
Hi.. title saying oImplement ? is that correct or is it implement?