Figure 1 - The Math Equation Editor with several different equation examples
Well its been a good summer so far. Even in New York City where its usually broiling, the weather has been nice. I picked up this book in Barnes & Noble called The Millenium Problems written by Keith Devlin. The book summarizes 7 challenging problems that the Clay Mathematics Institute is offering one million dollars if you can solve anyone of them. These problems are judged to be extremely difficult, some which have been brewing for a couple of centuries (the mystery of primes for example). I didn't really actually expect to solve any of these problems, but it made for some good beach reading. As I was browsing the book, a strange question popped into my head. How do the authors or publishers print the mathematical formulas you find inside the book? I guessed that there are some tools out there specifically for typing math formulas.
Further researching uncovered that Microsoft Word has an Equation Editor that is pretty good. (You can insert an equation as an object and edit using the many buttons provided.) This tool takes a little bit of a learning curve and requires you to remove your hands from the keyboard.
The Equation Editor I created in C# allows you to create a few simple equations using the keyboard. With the editor you can open and save files of your equations. The editor also allows you to print your equations to the printer or save the equations to a bitmap to insert into a Word or HTML document.
Editor Operation
The editor works as follows:
All letters, numbers and obvious symbols work as you would expect. If you type a letter or number, or hold down the shift key, you get the expected result. Holding down the control key, gives you the Greek symbols.
The control key + Shift also gives you some additional mathematical symbols. Most of the symbols are mapped to the Symbol font.
If you hold down the Alt Key and type a letter or number, you get a subscript. Holding down Alt and Shift gives you a superscript.
There are two additional modes included in the editor. You can enter divide mode by hitting the forward slash ('/') key. By using the left arrow key, you can force the current symbols you typed in to go in the numerator. Then type additional numbers to go in the denominator. Hitting escape lifts you out of divide mode and to the end of the fraction. Its not as intuitive as it could be, but hey, this was a two day effort.
There is also a square root mode. If you hit the Control key and the forward slash key, the square root sign will appear. As long is you continue to type, a line will be drawn above the encompassed numbers. Hitting the escape key escapes from the square root mode.
Inconveniences
As simple as this editor seems, you can really cover a lot of equation editing that would be next to impossible, say, in wordpad.exe. There is a little bit of kludgeness that may take some getting used to, but it gets the job done. For example, there is no mouse control. You can backspace to undo your last symbol as well, but you can't insert things in between characters.
UML Design
The UML design of the Math Editor is fairly simple. Most of the functionality is contained in the forms and encapsulated inside the key press events. The Symbol class allows you to keep all the relative information about a symbol, and the CharCursor class provides a blinking cursor so you can see where you are typing.
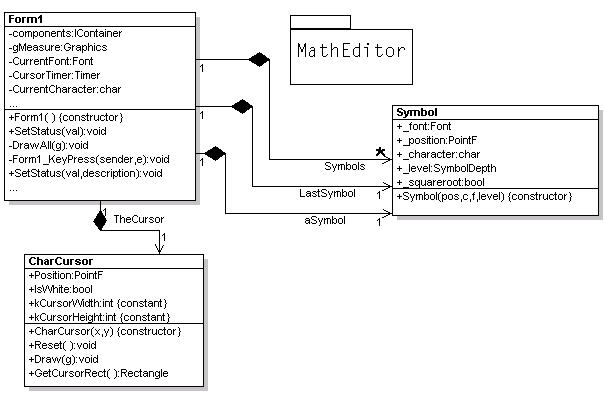
Figure 2 - UML Design reverse engineered using WithClass
Most of what the program does is shown in the UML Sequence diagram Figure 3 below. The user presses a key or combination of keys, and a new Symbol is created based on that combination. The symbols font, position, and style information is stored.
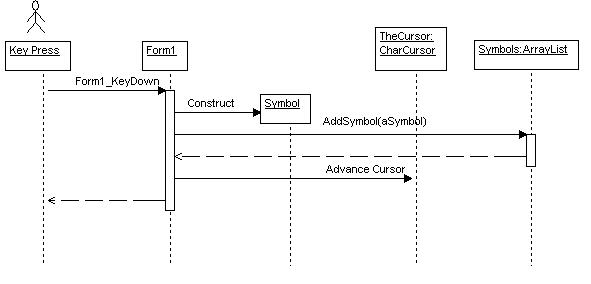
Figure 3 - UML Sequence Diagram showing Key Press Handler (drawn in WithClass)
Painting the Symbols
All of the editing is done through GDI+ and responding directly to key down and key press events. There are no edit controls in this application. Therefore, the paint event handler is completely overridden to do all of the drawing in the editor. The drawing of the symbols is accomplished simply by looping through all of the symbols and painting them in their proper positions and fonts onto the form. Below is the DrawAll routine called by the Paint event handler. This routine uses a bit of smart painting. It only draws certain areas when necessary. For example the cursor is drawn every 1/2 second on a timer event, but its not necessary to paint the whole form when the screen is invalidated just for the cursor. Smart Painting is covered in more detail in The Complete Visual C# Programmer's Guide by the Authors of C# Corner if you are interested in some of the more advanced GDI+ techniques.
Listing 1 - Drawing all of the Symbols from the Paint Event Handler
private
void DrawAll(Graphics g)
{
// A timer event flag is set every half second in the timer in order to create the blinking cursor effect
if (TimerEvent == false) // do smart painting, only repaint small background area on timer event
{
// paint white background area of the whole form
g.FillRectangle (Brushes.White, ClientRectangle);
}
else // paint only the white background of the cursor invalidation area
g.FillRectangle(Brushes.White, TheCursor.GetCursorRect());
// paint all of the symbols
foreach (Symbol s in Symbols)
{
g.DrawString(s._character.ToString(), s._font, Brushes.Black, s._position, new StringFormat());
// if the symbol is under a square root sign, paint a line over it
if (s._squareroot)
{
g.DrawLine(Pens.Black, s._position.X, s._position.Y - 5, s._position.X + 15, s._position.Y - 5);
}
}
// }
// Draw The Cursor
TheCursor.Draw(g);
TimerEvent = false;
}
Saving and Retrieving the Equation
This Program actually uses data sets to save the symbol ArrayList. I don't know if this was ideal, but it was easy enough to implement. The nice thing about datasets is that they can read and write XML. Below is the code that reads the math symbols into a data set. The DataSet previously imported the data using the ReadXML method.
Listing 2 - Reading all of the symbols from a DataSet
void
ReadPageFromDataset()
{
Symbols.Clear(); // clear out the old symbols ArrayList
// get a reference to the table of data
DataTable dt = ds.Tables["MathSymbols"];
// read in each symbol
foreach (DataRow dr in dt.Rows)
{
// construct the symbol based on the xml fields
Symbol s = new Symbol(new PointF((float)Convert.ToDouble(dr["X"].ToString()), (float)Convert.ToDouble(dr["Y"].ToString())),dr["Character"].ToString()[0],new Font(dr["FontFamily"].ToString(), Convert.ToSingle(dr["FontSize"].ToString()),(FontStyle)Convert.ToInt32(dr["FontStyle"].ToString())),(SymbolDepth)(Convert.ToInt32(dr["Level"].ToString())));
// also determine if its under a square root sign
s._squareroot = (dr["SquareRoot"].ToString().ToLower() == "true");
// add the symbol to the arraylist
AddSymbol(s);
}
// redraw the screen to show the equation
Invalidate();
}
Divide Mode
The DivideMode can best be described in a state machine. Divide mode is entered immediately upon pressing the forward slash key and each state transition is determined by the next key press. The UML State Diagram in Figure 4 gives you a good idea of the transitions occuring in each state.
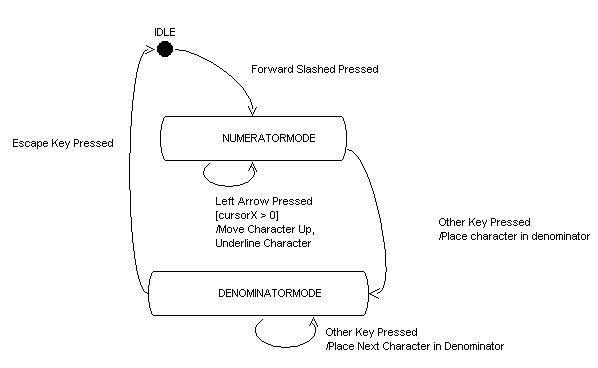
Figure 4 - UML State Diagram showing Divide Mode (drawn in WithClass)
The code for handling the numerator mode in creating fractions is shown below. This routine is called when the left arrow is pressed when in the NUMERATORMODE state. As shown in the state diagram in Figure 4, the code boosts the character up and underlines the character:
Listing 3 - Handling the Actions in the NumeratorMode after a Left Arrow Key Press
void
HandleNumeratorMode()
{
// retrieve the current symbol
Symbol currentSymbol = ((Symbol)Symbols[CurrentDivideSymbolIndex]);
// boost the symbol up onto the numerator
currentSymbol._position.Y -= kNumeratorDistance;
// create an underline font for the character if its not a subscript or superscript
if (currentSymbol._level == SymbolDepth.Normal)
currentSymbol._font = new Font(currentSymbol._font.FontFamily.Name, currentSymbol._font.SizeInPoints, FontStyle.Underline);
// move the cursor back to the next symbol
MoveCursorBack(CurrentDivideSymbolIndex);
// get the next numerator index to the left
CurrentDivideSymbolIndex--;
// don't go past the beginning of the symbol list
if (CurrentDivideSymbolIndex < 0) // post condition
CurrentDivideSymbolIndex = 0;
Invalidate();
}
Conclusion
The Math Editor in this article gives you a good idea on how to start developing your own editing tool or editing control. This application can be greatly improved by adding mouse capability and responding to mouse events. It would be nice to be able to insert, select regions of symbols, and delete symbols anywhere on the screen. Look for improvements in this application in the near future as I formulate new enhancements.