Introduction
I finally found some time to download Visual Studio 2005 and take a look at some of its powerful new features. One feature that struck me as a real time saver was the new code snippet Intellisense feature. This feature allows you to create pieces of commonly used code with just a few keystrokes. For example, if I want to create a property using the snippet feature, I simply type prop into Visual Studio, hit the tab key twice, and Walla, instant property and corresponding private variable. I then have the ability to edit the private variable type and name, which simultaneously changes my property type and internal get and set variables.
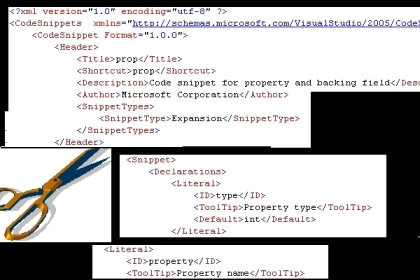
Figure 1 - Snippets in Visual Studio 2005
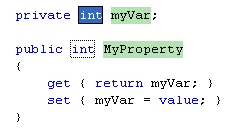
Figure 2 - Property generated by the Intellisense Code Snippet
Visual Studio contains several built-in intellisense code snippets. Many of the shortcuts for these snippets are C# keywords themselves that just expand after hitting the magical tab key twice. These include C# keywords such as for, if, switch, try, foreach, while, and using. There are some also less obvious shortcuts such as tryf, mbox, and ctor (try-finally, messagebox, constructor). All of these snippets can greatly increase the efficiency of your coding.
Understanding a Snippet
Snippets are like templates and can be described completely in XML. You'll find all of the above snippet xml file representations in the C:\Program Files\Microsoft Visual Studio 8\VC#\Snippets\1033\Visual C# directory. If you understand the snippet xml schema, you can easily begin to create your own snippets. In order to begin understanding snippets, let's look at a simple predefined xml snippet, the if statement.
<?xml version="1.0" encoding="utf-8" ?>
<CodeSnippets xmlns="http://schemas.microsoft.com/VisualStudio/2005/CodeSnippet">
<CodeSnippet Format="1.0.0">
<Header>
<Title>if</Title>
<Shortcut>if</Shortcut>
<Description>Code snippet for if statement</Description>
<Author>Microsoft Corporation</Author>
<SnippetTypes>
<SnippetType>Expansion</SnippetType>
<SnippetType>SurroundsWith</SnippetType>
</SnippetTypes>
</Header>
<Snippet>
<Declarations>
<Literal>
<ID>expression</ID>
<ToolTip>Expression to evaluate</ToolTip>
<Default>true</Default>
</Literal>
</Declarations>
<Code Language="csharp"><![CDATA[if ($expression$)
{
$selected$ $end$
}]]>
</Code>
</Snippet>
</CodeSnippet>
</CodeSnippets>
Listing 1 - Code Snippet for the if statement in C#
The first part of the snippet is the header. This contains the title of the snippet, the shortcut keys needed to invoke the snippet, a description of the snippet, and the company that made the snippet. It also contains the different kinds of snippets the snippet supports. There are three allowed types of snippets: Refactoring, SurroundsWith, and Expansion. SurroundsWith allows you to use the snippet by selecting the code you want to affect and invoking the snippet around the selected code. Our if statement supports SurroundsWith. Therefore if you select a group of statements, right click and choose Surrounds With from the popup, and select the if snippet, the statements will suddenly be engulfed by a bracketed if statement. Expansion types simply expand the snippet after the cursor. The if statement also supports the Expansion type. If you type if and then tab twice, the if statement will expand from the point of the cursor.
It is useful to insert header information into your snippet because it can be used to describe your snippet in the Snippet Manager which can be brought up from the Visual Studio 2005 Tools Menu shown in Figure 3:
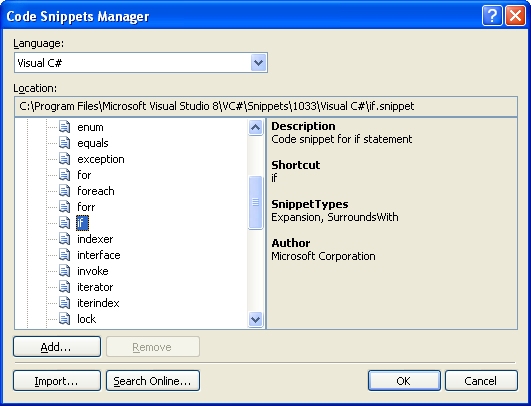
Figure 3 - Snippet Manager
After the header, we have the snippet itself. The snippet is similar to a template and contains two main sections: declarations and code. Declarations consist of literals and objects. In our if example, we only use literals. Literals are simply variables inside your snippet code. These literals can be substituted and edited inside the code snippet produced. In our example, the literal has three sections: the ID, the tooltip, and the default value . The ID identifies the literal inside the code. expression is our ID for the if statement. In the code section, expression is represented as $expression$. The dollar signs indicate that we have a variable in our code. The tooltip tag supplies the information for our tooltip. If we drag over our literal expression after the snippet is expanded inside our code, it brings up the tooltip defined in the tooltip node, giving us a little more information about our literal variable. The default value is the initial text inserted inside the if statement, in this case is the value true.
The Code section starts with the attribute "Language" to let us know which programming language our code snippet produces. The next part of the Code section is mostly a template containing variables marked for substitution with the bookend dollar signs. Our only variable is the literal expression seen between the dollar signs as $expression$. The other two dollar signed variables, $selected$ and $end$, tell us where the cursor selection will be placed after we've edited our literal expression and hit the enter key.
Below is the snippet produced for the if statement code snippet. Note that the default value true is inserted into the literal variable and the if statement expression is ready to be edited.
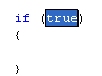
Figure 4 - if statement generated from snippet
Creating a Custom Snippet
Now that we have a fairly good feel of how our snippet can help us create code fragments, let's create our own simple snippet. The snippet we create will contain commented copyright information for our source class. We will be able to edit the author, copyright year, and company name. The shortcut key will be cp. When the snippet is finished, it will exit two lines below the copyright information.
The first part of our copyright snippet is the header containing description, shortcut, snippet type(s) and author of the snippet shown in listing 2.
<?xml version="1.0" encoding="utf-8" ?>
<CodeSnippets xmlns="http://schemas.microsoft.com/VisualStudio/2005/CodeSnippet">
<CodeSnippet Format="1.0.0">
<Header>
<Title>CopyRight Insert</Title>
<Shortcut>cp</Shortcut>
<Author>Microgold Software Inc.</Author>
<SnippetTypes>
<SnippetType>Expansion</SnippetType>
</SnippetTypes>
<Description>Inserts a copyright string</Description>
</Header>
Listing 2 - Header for the copyright snippet
The shortcut cp will show up in the snippet menu. If we type cp <tab> <tab> it will generate our code snippet right at the cursor point in our code since it is an expansion snippet. The next part of our snippet are the literal (variable) declarations for author, year, and company. All are editable variables and all have default values. You can change the default values to your own personal copyright information, or you can set them to more generic values such as Author, Year, and Company.
<Declarations>
<Literal Editable="True">
<ID>author</ID>
<ToolTip>author of class</ToolTip>
<Default>Mike Gold</Default>
</Literal>
<Literal Editable="True">
<ID>year</ID>
<ToolTip>copyright year</ToolTip>
<Default>2005</Default>
</Literal>
<Literal Editable="True">
<ID>company</ID>
<ToolTip>company owning code</ToolTip>
<Default>Microgold Software Inc.</Default>
</Literal>
</Declarations>
Listing 3 - Declarations of variables inside the code snippet that can be edited
The last part of our snippet is the code template contained in a CDATA tag shown in listing 4. This template will be copied into our source at the cursor along with all the variable place holders. The coder can change the variables by tabbing between them. The $selected and $end are placed two lines down from the copyright comment. This placement of these variables will have the effect of moving two lines after the user hits the enter key.
<Code Language="csharp" Format="CData">
<![CDATA[// This code was written by $author$ . This code may be used only for educational purposes.
// Any distribution of this code may only be carried out with written consent from the auhor.
// Copyright © $year$ by $company$
$selected$ $end$
]]>
</Code>
Listing 4 - code template node for the copyright snippet