In this article, we will explore the steps to create connectable web parts in SharePoint Foundation 2010.
Overview
In SharePoint, a web part can be 'connected' to another web part to provide some information at run-time. The Provider web part pushes out the contracted information and the Consumer web part is set up to receive and consume the shared information.
This functionality lends to setting up a combination of simple web parts which may have been developed separately, into a functional and re-usable solution.
Basics
(1) Interface
a. This custom interface will define the data to be shared from the Provider to the Consumer web part.
(2) Provider web part
a. Inherits from Microsoft.SharePoint.WebPartPages.WebPart
b. Implements a data interface - this interface is a definition of the data that will be shared from the Provider web part to the Consumer web part.
c. Provide mechanisms for user selection of the interfacing data
d. Provide a ConnectionProvider method which will expose the interfacing data to the Consumer web part.
(3) Consumer web part
a. ConnectionConsumer method which will receive the interfacing data
b. 'Consume' the interfacing data and provide enriching details to the user.
Sample Scenarios
Master-Detail type functionality - in this scenario, the Provider acts as the master and provides the user selection to the Consumer. The consumer acts on the user selection by generating a detail view.
Re-usable Selectors - for example in a custom reporting web part package, a common criteria selector web part can be designed as the selector and can be connected to various consumer web parts displaying customized reports.
Code
We will take a look at a very simplified sample just to focus on the mechanisms of setting up connectable web parts. However, the same sample can be taken steps further to include intricate details.
Step 1 - We create an Empty SharePoint Project in Visual Studio 2010.
The following selections were made for this sample:
|
What Local site do you want to use for debugging |
<Specify your SharePoint site name here> |
|
Deploy as farm solution |
Selected |
Step 2 - we add a new C# Interface code class and name it IUser.
IUser.cs
using System; using System.Collections.Generic; using System.Linq; using System.Text;
namespace ConnWP_art
{
interface IUser
{
string UserName { get; }
}
}
|
Step 3 - Provider web part: add a new web part in the project. The next steps are highlighted in the code comments below
ProviderWP.cs
using System;
using System.ComponentModel;
using System.Web;
using System.Web.UI;
using System.Web.UI.WebControls; using System.Web.UI.WebControls.WebParts; using Microsoft.SharePoint;
using Microsoft.SharePoint.WebControls;
namespace ConnWP_art.ProviderWP {
[ToolboxItemAttribute(false)]
public class ProviderWP : Microsoft.SharePoint.WebPartPages.WebPart, IUser { Label _lblUserName = null; TextBox _txtUserName = null; Button _btnOK = null;
protected override void CreateChildControls()
{ try
{
//From the UI, we collect the user selections _lblUserName = new Label(); _txtUserName = new TextBox(); _btnOK = new Button();
_lblUserName.Text = "User Name: "; _btnOK.Text = "OK";
this.Controls.Add(_lblUserName);
this.Controls.Add(_txtUserName);
this.Controls.Add(_btnOK);
} catch (Exception ex)
{
this.Controls.Clear();
this.Controls.Add(new LiteralControl("Error: " + ex.Message));
}
}
public string UserName
{
get { return _txtUserName.Text; }
}
[ConnectionProvider("User Name")]
public IUser ConnProviderMethod()
{
// This method will expose the shared data to the Consumer.
return this;
}
}
}
|
Step 4 - Provider web part: add a new web part in the project. The next steps are highlighted in the code comments below
ConsumerWP.cs
using System;
using System.ComponentModel;
using System.Web;
using System.Web.UI;
using System.Web.UI.WebControls;
using System.Web.UI.WebControls.WebParts;
using Microsoft.SharePoint;
using Microsoft.SharePoint.WebControls;

namespace ConnWP_art.ConsumerWP
{
     [ToolboxItemAttribute(false)]    public class ConsumerWP : WebPart    {        Label _lbl = null;
        IUser _user = null;
        //Receive the data from the Provider web part here        [ConnectionConsumer("UserName")]
        public void ConsumerMethod(IUser User)
        {
            _user = User;
        }

        protected override void CreateChildControls()
        {
            try
            {                _lbl = new Label();                // Here we utilize the data received from the Provider
                // In this simplied example, we are just displaying the received data.
                // However, you can take this further
                // query databases/SP Lists/other manipulations of the data                 // and provide an enriched result back to the user!
                if (_user != null)                    if (_user.UserName != "")
                        _lbl.Text = "Hello "+ _user.UserName;
                    else
                         _lbl.Text = "Hello Guest!";
                else
                    _lbl.Text = "No provider connected";
                this.Controls.Add(_lbl);
            }
            catch (Exception ex)
            {
                this.Controls.Clear();
                this.Controls.Add(new LiteralControl("Error: " + ex.Message));
            }
        }
    }
}
|
Step 5 - Connecting the web parts
Navigate to your SharePoint site. Add a new WebPartPage. In this webpart page, add the Provider and Consumer web parts.
Add a new web part - add the Provider web part in the desired web part zone.
Next, Add a new web part - add the Consumer web part in the desired web part zone.
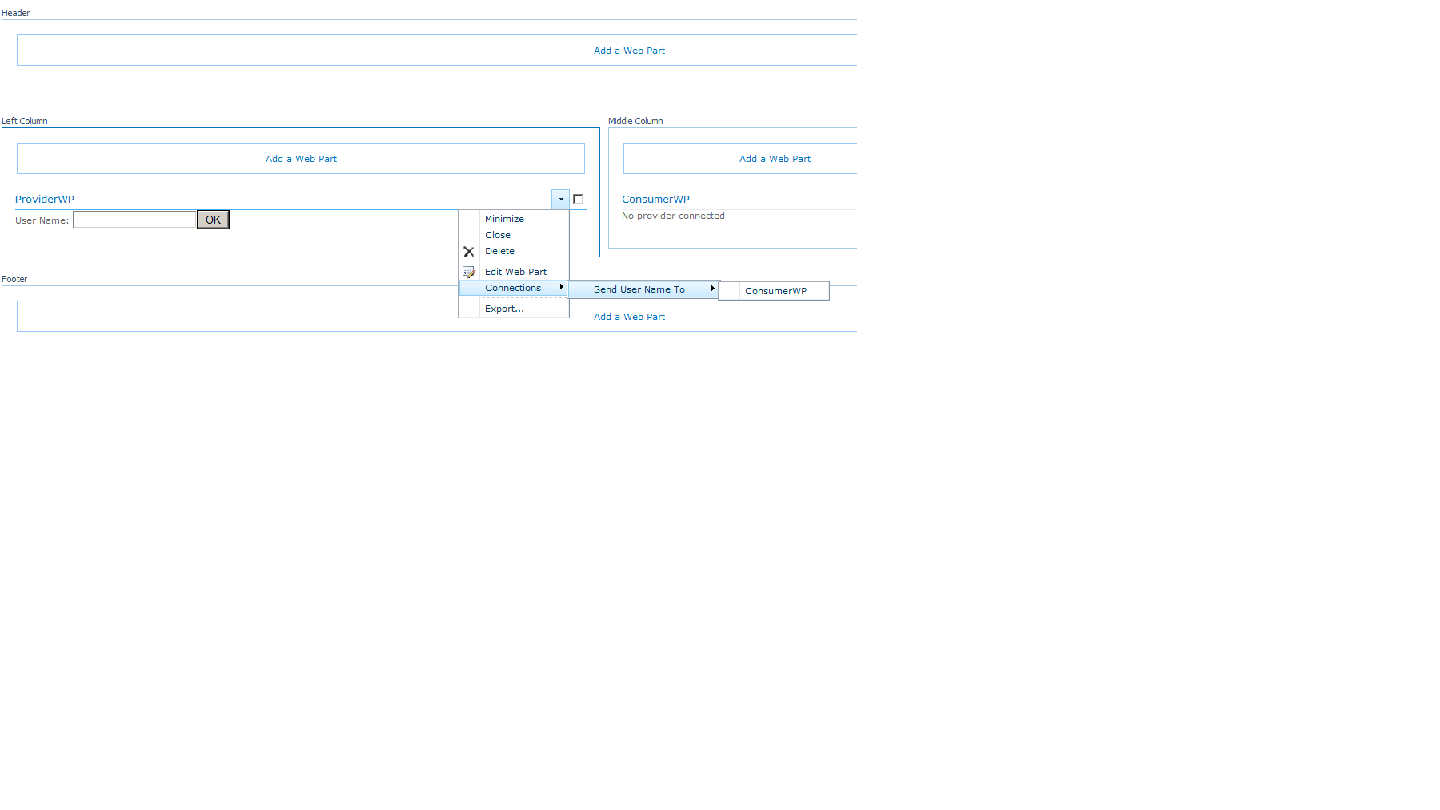
Initially, the Consumer web part will display the message "No provider connected".
Edit the Provider web part, click "Connections", then select "Send User Name to" and then select the Consumer web part.
Figure: Setting up the connections
Now, when you enter a user name and click the OK button, the Consumer web part will receive the IUser data and will update the user interface to reflect the shared data sent by the Consumer.
Figure: Working Connected Web Parts
