Objective
This article will give a walkthrough on how to perform a CRUD operation on Azure table.
Step 1
Creating the
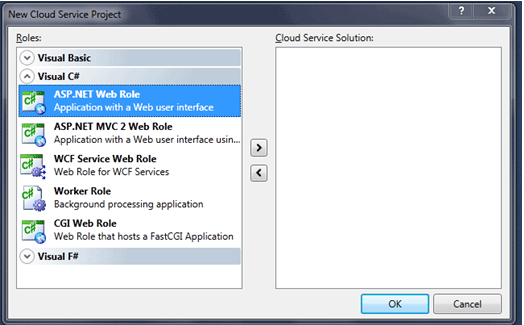
Create a new Cloud Service Application. To create, File -> New -> Projects -> Cloud Services. Select ASP.Net Web Role. I am giving CRUDSample to the name of the project and CRUDWebRole to the name of the Web Role.
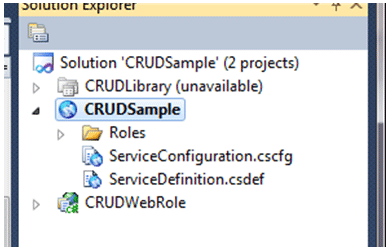
After adding project, in solution explorer you can see two projects. One is project to publish in azure and other is simple asp.net project. In our case CRUDSample is project which contains configuration settings for azure and CRUDWebRole is asp.net project for development.
Step 2
Make sure below references are added CRUDWebRole projects.
System.Data.Service
System.Data.Service.Client
Microsoft.WindowsAzure.Diagnostics
Microsoft.WindowsAzure.ServiceRunTime
Microsoft.WindowsAzure.StorageClient.
Step 3
Creating Entity class
Now right click to asp.net project add a class which will model the table in azure. Give any name to this class. This class will act as entity table.
-
Inherit the class from Microsoft.WindowsAzure.StorageClient.TableServiceEntity
-
Add a default constructor
-
In Default constructor initialize the Row key and Partition key
-
Properties of the class define columns of the table.
Row Key and Partition key
These two keys uniquely define a table and row in azure storage.
using System;
using System.Collections.Generic;
using System.Linq;
using System.Web;
using System.Data.Services;
namespace CRUDWebRole
{
public class USTEntity : Microsoft.WindowsAzure.StorageClient.TableServiceEntity
{
public USTEntity()
{
RowKey = String.Format("{0:10}_{1}", (DateTime.MaxValue.Ticks - DateTime.Now.Ticks), Guid.NewGuid());
PartitionKey = "UST";
}
public String Name { get; set; }
public String Id { get; set; }
public String Manager { get; set; }
public String Experience { get; set; }
public String Technology { get; set; }
public String Location { get; set; }
}
}
Step 4
Creating Context class
Now right click on asp.net project and add a new class as context class. This class will contain function to perform all the CRUD operation. This class is inherited from TableServiceContext class.
-
In default constructor passes the base address and storage credentials to base class.
-
Since TableServiceContext class performs the operations against a class which is implementing IQueryable interface, so we will implement the interface for the entity class.
-
Just write simple LINQ for other CRUD functions.
Entire class is as below
using System;
using System.Collections.Generic;
using System.Linq;
using System.Web;
using Microsoft.WindowsAzure;
using Microsoft.WindowsAzure.StorageClient;
namespace CRUDWebRole
{
public class USTContext : TableServiceContext
{
public USTContext(string baseAddress, StorageCredentials credentials)
: base(baseAddress, credentials)
{
}
public IQueryable<USTEntity> USTEntities
get
{
return this.CreateQuery<USTEntity>("USTEntities");
}
}
public void ADDUSociate(USTClientEntity entity)
{
this.AddObject("USTEntities", new USTEntity {Name = entity.Name ,Manager =entity.Manager,Id =entity.Id,Location=entity.Location,Technology=entity.Technology,Experience=entity.Experience});
this.SaveChanges();
}
public void DELUSociate(string id)
{
USTEntity res = (from r in USTEntities where r.Id == id select r ).First();
this.DeleteObject(res);
this.SaveChanges();
}
public void UPDATEUSociate(USTClientEntity entity)
{
USTEntity res = (from r in USTEntities where r.Id == entity.Id select r).First();
res.Technology = entity.Technology;
res.Manager = entity.Manager;
res.Experience = entity.Experience;
this.UpdateObject(res);
this.SaveChanges();
}}}
In above code I have used USTClientEntity class. This class is mapping of Entity class. This class is as below
USTClientEntity.cs
using System;
using System.Collections.Generic;
using System.Linq;
using System.Web;
namespace CRUDWebRole
{
public class USTClientEntity
{
public String Name { get; set; }
public String Id { get; set; }
public String Manager { get; set; }
public String Experience { get; set; }
public String Technology { get; set; }
public String Location { get; set; }
}
}
Step 5
Working with connection strings
We have two options to work with
-
Use local development center
-
Use Azure table from Windows azure
Use Local Development center
This option will use the local storage created by development fabric controller when you install Azure SDK.
-
Go to Azure Project. In this case it is , CRUDSample
-
Click on Roles folder
-
Then click on CRUDWebRole
-
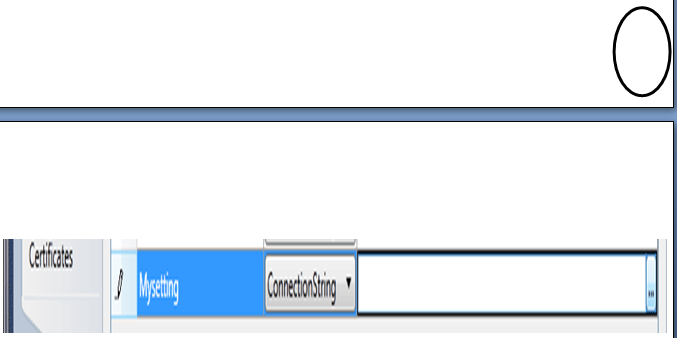
Click on setting tab
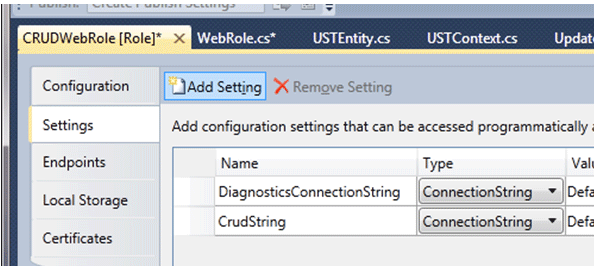
-
Click on Add Setting
-
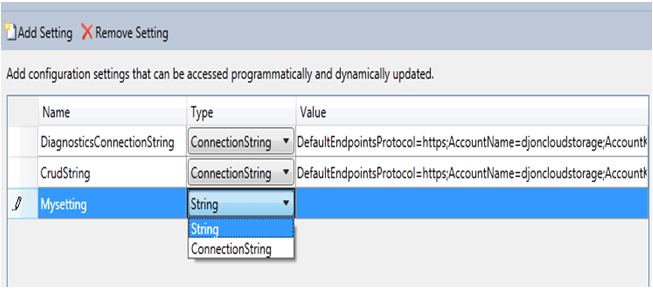
Make sure while adding connection string, you are choosing connection string from the drop down. Give any name to the string setting.
-
Now click on left corner button
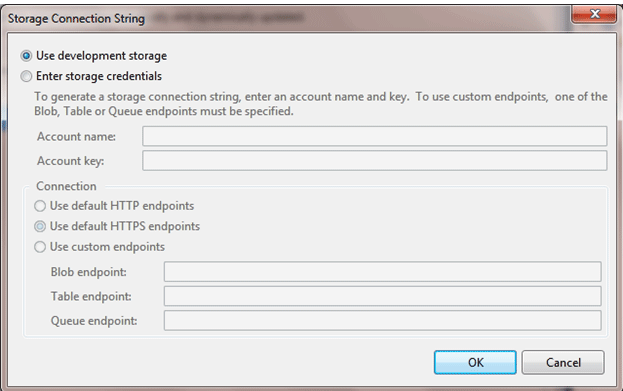
-
To use local storage select the radio button
Use Development Storage and click on OK button.
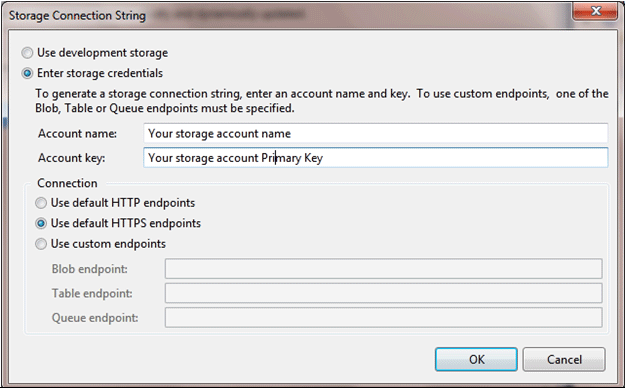
-
To use AZURE table setting
Account Name: Give Azure storage account name
Account Key: Give Primary key from azure storage
Leave other setting as default and press ok.
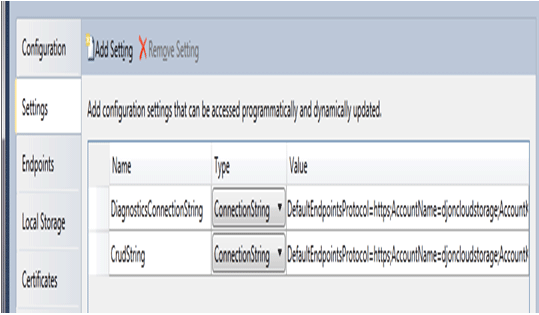
For My purpose I have two connection strings in my application.
DiagnosticConnectionString
And
CrudString
Step 6
Creating table
-
To create table in ASP.net project click on WebRole.cs class
-
And add below line of code to create class.
var account = CloudStorageAccount.FromConfigurationSetting("CrudString");
CloudTableClient.CreateTablesFromModel(typeof(USTContext), account.TableEndpoint.AbsoluteUri, account.Credentials);
Whole WebRole.Cs class will look like below ,
WebRole.cs
using System.Linq;
using Microsoft.WindowsAzure.Diagnostics;
using Microsoft.WindowsAzure.ServiceRuntime;
using System.Data.Services.Client;
using Microsoft.WindowsAzure;
using Microsoft.WindowsAzure.StorageClient;
namespace CRUDWebRole
{
public class WebRole : RoleEntryPoint
{
public override bool OnStart()
{
DiagnosticMonitor.Start("DiagnosticsConnectionString");
// For information on handling configuration changes
// see the MSDN topic at http://go.microsoft.com/fwlink/?LinkId=166357.
RoleEnvironment.Changing += RoleEnvironmentChanging;
CloudStorageAccount.SetConfigurationSettingPublisher((configName, configSetter) =>
{
configSetter(RoleEnvironment.GetConfigurationSettingValue(configName));
RoleEnvironment.Changed += (anotherSender, arg) =>
{
if (arg.Changes.OfType<RoleEnvironmentConfigurationSettingChange>()
.Any((change) => (change.ConfigurationSettingName == configName)))
{
if (!configSetter(RoleEnvironment.GetConfigurationSettingValue(configName)))
{
RoleEnvironment.RequestRecycle();
}
}
};
});
var account = CloudStorageAccount.FromConfigurationSetting("CrudString");
CloudTableClient.CreateTablesFromModel(typeof(USTContext), account.TableEndpoint.AbsoluteUri, account.Credentials);
return base.OnStart();
}
private void RoleEnvironmentChanging(object sender, RoleEnvironmentChangingEventArgs e)
{
// If a configuration setting is changing
if (e.Changes.Any(change => change is RoleEnvironmentConfigurationSettingChange))
{
// Set e.Cancel to true to restart this role instance
e.Cancel = true;
}
}
}
}
Here CrudString is name of the connection string.
Step 7
CRUD Operations
-
To add a record
var account = CloudStorageAccount.FromConfigurationSetting("CrudString");
var context = new USTContext(account.TableEndpoint.ToString(), account.Credentials);
USTClientEntity entity = new USTClientEntity(){Id= txtEmployeeID.Text.ToString(),Name = txtEmployeeName.Text.ToString(),Manager=txtManagerName.Text.ToString(),Experience=ddlExperience.Text.ToString(), Technology = ddlTechnology.Text.ToString(),Location = ddlCurrentLocation.Text.ToString()};
context.ADDUSociate(entity);
-
To update a record
entity = new USTClientEntity() {Id=ddlEmployees.SelectedItem.Text , Manager = txtManagerName.Text, Location = ddlCurrentLocation.SelectedItem.Text, Technology = ddlTechnology.SelectedItem.Text, Experience = ddlExperience.SelectedItem.Text };
var account = CloudStorageAccount.FromConfigurationSetting("CrudString");
var context = new USTContext(account.TableEndpoint.ToString(), account.Credentials);
context.UPDATEUSociate(entity);
-
To Delete a record
var account = CloudStorageAccount.FromConfigurationSetting("CrudString");
var context = new USTContext(account.TableEndpoint.ToString(), account.Credentials);
if(!string.IsNullOrEmpty(ddlEmployees.Text.ToString()))
{
context.DELUSociate(ddlEmployees.Text.ToString());
}
-
To View all records
var account = CloudStorageAccount.FromConfigurationSetting("CrudString");
var context = new USTContext(account.TableEndpoint.ToString(), account.Credentials);
List<USTClientEntity> lst = new List<USTClientEntity>();
foreach (USTEntity u in context.USTEntities)
{
if (!string.IsNullOrEmpty(u.Id))
{
lst.Add(new USTClientEntity() { Id = u.Id, Name = u.Name, Manager = u.Manager, Experience = u.Experience, Location = u.Location, Technology = u.Technology });
}
}
this.grdViewAll.DataSource = lst;
this.grdViewAll.DataBind();
In all above cases drodownlist , Textboxes and GridView has been used as input and output control.
Now your application Is ready to run. Thanks for reading.