Objective:
In this article I am going to discuss new feature of Silverlight 3.0 called Element to Element Binding. I will discuss three samples to understand Element to Element Binding.
Example
I will take an example to explain Element to Element binding. I will bind value of slider control to text of a text block. First I will bind using ValueChanged event of slider control (Sample #1) then I will move to accomplish same task using Element to Element Binding (Sample#2)
Element to Element Binding
This is a new feature provided by Silverlight 3.0. This allows one element to bind other element's property. This feature is very useful when you want to tie two objects such that when value of one objects changes it got reflected in other object's value.
Sample #1 [Event Handler Approach]
- Take a Stack Panel
- Create one Text Block and one Slider inside Stack Panel.
<UserControl x:Class="ElementBindingDemo.MainPage"
xmlns="http://schemas.microsoft.com/winfx/2006/xaml/presentation"
xmlns:x="http://schemas.microsoft.com/winfx/2006/xaml"
xmlns:d="http://schemas.microsoft.com/expression/blend/2008" xmlns:mc="http://schemas.openxmlformats.org/markup-compatibility/2006"
mc:Ignorable="d" d:DesignWidth="640" d:DesignHeight="480">
<Grid x:Name="LayoutRoot" Background="Aqua">
<Grid.RowDefinitions>
<RowDefinition Height=" 1*" />
<RowDefinition Height=" 1*" />
</Grid.RowDefinitions>
<StackPanel x:Name="topStkPanel" HorizontalAlignment="Stretch" VerticalAlignment="Stretch" Grid.Row="0" Orientation="Vertical">
<Slider x:Name="topSlider" Width="200" Height="200" Maximum="100.0" Minimum="0" Value="50" HorizontalAlignment="Center"/>
<TextBlock x:Name="topTextBlock" Height="Auto" Width="Auto" FontFamily="Georgia" FontSize="18" HorizontalAlignment="Center" Text="20"/>
</StackPanel>
</Grid>
</UserControl>
- Add event handler for ValueChanged of slider
- Assign value of slider to text of text box while handling the event ValueChanged
namespace ElementBindingDemo
{
public partial class MainPage : UserControl
{
public MainPage()
{
InitializeComponent();
topSlider.ValueChanged += new RoutedPropertyChangedEventHandler<double>(topSlider_ValueChanged);
}
void topSlider_ValueChanged(object sender, RoutedPropertyChangedEventArgs<double> e)
{
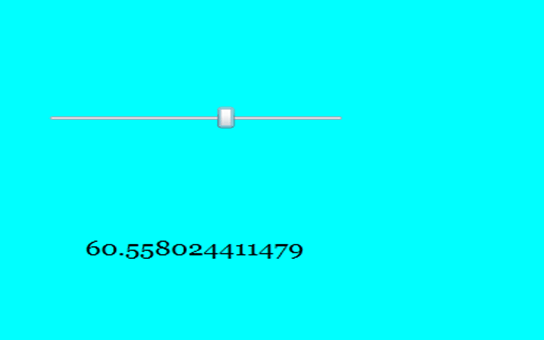
topTextBlock.Text = topSlider.Value.ToString();
}
}
}
Output
Problem with above approach
If we need to bind one slider control then above approach is fine but imagine if we need to bind many elements value to other elements value. In that scenario event handler approach is not quiet ok. So in Silverlight3.0 we got Element to Element Binding.
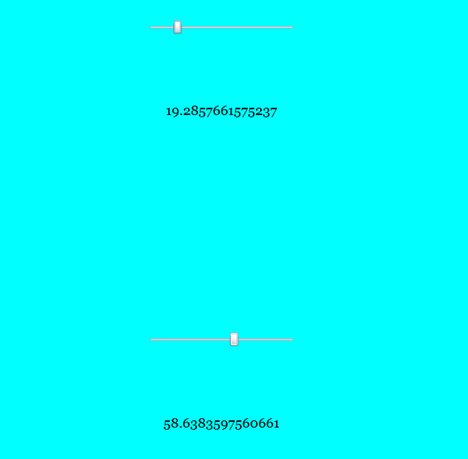
Sample #2 [Element to Element Binding]
This is new way of binding introduced in Silverlight 3.0. This is called Element to Element Binding. The best part of this approach is that rather than binding a property , we could bind an element to other element.
Element binding is done as; where bottomSlider is name of the element we are binding to text of text block.
Text="{Binding Value,Mode=OneWay, ElementName=bottomSlider }
<StackPanel x:Name="topStkPane2" HorizontalAlignment="Stretch" VerticalAlignment="Stretch" Grid.Row="1" Orientation="Vertical">
<Slider x:Name="bottomSlider" Width="200" Height="200" Maximum="100.0" Minimum="0" Value="50"/>
<TextBlock x:Name="bottomTextBlock" Height="Auto" Width="Auto" FontFamily="Georgia" FontSize="18" HorizontalAlignment="Center" Text="{Binding Value,Mode=OneWay, ElementName=bottomSlider }"/>
</StackPanel>
So we do not need any event handler in place for binding.
Output
Sample #3
Binding image width and height value with slider value.
In this sample I will add textbox with Event approach and height and width of image with Element to Element binding approach.
MainPage.Xaml
<UserControl x:Class="ElementBindingDemo.MainPage"
xmlns="http://schemas.microsoft.com/winfx/2006/xaml/presentation"
xmlns:x="http://schemas.microsoft.com/winfx/2006/xaml"
xmlns:d="http://schemas.microsoft.com/expression/blend/2008" xmlns:mc="http://schemas.openxmlformats.org/markup-compatibility/2006"
mc:Ignorable="d" d:DesignWidth="640" d:DesignHeight="480">
<Grid x:Name="LayoutRoot" Background="Aqua" Height="Auto" Width="Auto">
<Grid.RowDefinitions>
<RowDefinition Height="Auto"/>
</Grid.RowDefinitions>
<StackPanel x:Name="topStkPanel" HorizontalAlignment="Stretch" VerticalAlignment="Stretch" Grid.Row="0" Orientation="Vertical" >
<Slider x:Name="topSlider" Width="200" Height="200" Maximum="1000.0" Minimum="100.0" Value="50" HorizontalAlignment="Center"/>
<TextBlock x:Name="topTextBlock" Height="Auto" Width="Auto" FontFamily="Georgia" FontSize="18" HorizontalAlignment="Center" Text="20"/>
<Image Source="a.jpg" Width="{Binding Value , ElementName=topSlider}" Height="{Binding Value , ElementName=topSlider}"></Image>
</StackPanel>
</Grid>
</UserControl>
MainPage.Xaml.cs
using System;
using System.Collections.Generic;
using System.Linq;
using System.Net;
using System.Windows;
using System.Windows.Controls;
using System.Windows.Documents;
using System.Windows.Input;
using System.Windows.Media;
using System.Windows.Media.Animation;
using System.Windows.Shapes;
namespace ElementBindingDemo
{
public partial class MainPage : UserControl
{
public MainPage()
{
InitializeComponent();
topSlider.ValueChanged += new RoutedPropertyChangedEventHandler<double>(topSlider_ValueChanged);
}
void topSlider_ValueChanged(object sender, RoutedPropertyChangedEventArgs<double> e)
{
//throw new NotImplementedException();'
topTextBlock.Text = topSlider.Value.ToString();
}
}
}
Output

Conclusion
In this article, I showed three samples on element to element binding. Thanks for reading.