From my previous article for "Reference web part in SharePoint 2010", I am extending the same sandbox solution with this article. So you just need to download code for sandbox web part and follow the steps below.
The Sandbox in SharePoint 2010 allows Site Collection administrators to upload solutions in their Site Collections without access to the physical server. Sandbox Solutions do have some limitations, for instance we cannot add new application pages. Application pages are normally pages added to the _layouts folder, which are located in the 14 hive\TEMPLATE\LAYOUTS physical folder on each server. Sandboxed solutions still allows us to upload Content Pages; that is pages that are located in a document library for instance.
The following are the steps to create a custom page in sandbox solution.
1. Create a project
Create a new empty SharePoint 2010 project using Visual Studio 2010 and deploy it as a Sandboxed solution.
2. Add a Web Part item
Then add a new Web Part item to your project. Remove the Web Parts Control Description file (.web part) and the Elements.xml file (This step is optional you can use if you do not want to add the Web Part to the Web Part gallery, then Web Part will only be used by our Sandboxed Application Page). Then build your control logic in the Sandboxed Web Part.
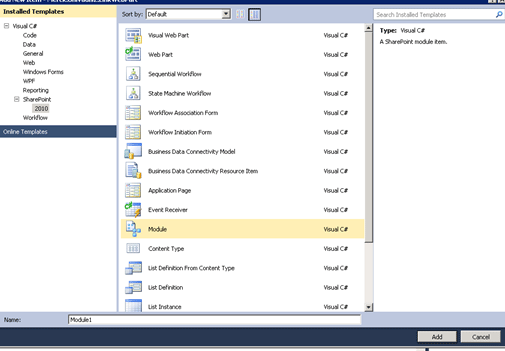
3. Add new Item and select Module


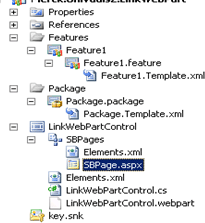
In the Web Part item add a new Module item. Rename the Sample.txt file to SBPage.aspx or similar; just make sure the extension is .aspx. Your Solution Explorer should then look like the image to the right.
Edit the URL and location in the elements.xml file if you want to deploy it in a document library or any other location. If you have named your items as shown above your page will end up at http://site/SBPages/SBPage.aspx.
4.Edit the ASPX page
Open up the SBPage.aspx and build a standard Web Part Page. Add the code shown below (you can modify based on your requirements):
<!DOCTYPE html PUBLIC "-//W3C//DTD XHTML 1.0 Strict//EN" "http://www.w3.org/TR/xhtml1/DTD/xhtml1-strict.dtd">
<%@ Page Language="C#"%>
<%@ Register Tagprefix="SharePointWebControls" Namespace="Microsoft.SharePoint.WebControls" Assembly="Microsoft.SharePoint, Version=14.0.0.0, Culture=neutral, PublicKeyToken=71e9bce111e9429c" %> <%@ Register Tagprefix="WebPartPages" Namespace="Microsoft.SharePoint.WebPartPages" Assembly="Microsoft.SharePoint, Version=14.0.0.0, Culture=neutral, PublicKeyToken=71e9bce111e9429c" %> <%@ Register Tagprefix="PublishingWebControls" Namespace="Microsoft.SharePoint.Publishing.WebControls" Assembly="Microsoft.SharePoint.Publishing, Version=14.0.0.0, Culture=neutral, PublicKeyToken=71e9bce111e9429c" %> <%@ Register Tagprefix="PublishingNavigation" Namespace="Microsoft.SharePoint.Publishing.Navigation" Assembly="Microsoft.SharePoint.Publishing, Version=14.0.0.0, Culture=neutral, PublicKeyToken=71e9bce111e9429c" %>|
<html dir="ltr" xmlns="http://www.w3.org/1999/xhtml">
<head id="Head1" runat="server">
<title>Sandbox Page</title>
</head>
<body onload="loadPage()">
<form id="form1" runat="server">
<div id="result">
hi..</div>
</form>
</body>
</html>
You can use any kind of HTML in here. You cannot however use code-behind or inline server-side code.
5. Add the Web Part
In the body section the Web Part will be added. This is done by using the SPUserCodeWebPart, which is a wrapper for Web Parts that lives in the Sandbox. In my case it will look like this:
<WebPartPages:SPUserCodeWebPart
runat="server"
Description="Admin"
Title="Link Web Part Page"
AssemblyFullName="$SharePoint.Project.AssemblyFullName$"
SolutionId="01d2e3c6-686b-45d6-aaea-185c7d373c0b"
ID="adminwp"
TypeFullName="Ravishankar.LinkWebPart.LinkWebPartControl.LinkWebPartControl" >
</WebPartPages:SPUserCodeWebPart>
Here we need to edit two things. First the TypeFullName must be the full name of your Web Part, just check the .cs file of your Web Part if you don't know how to get it. Secondly we need to set the SolutionId attribute to the solution id value of our solution. You can get solutionId id by opening up the Package Editor and select Manifest. Then check the Solution element for the SolutionId attribute and just copy it.

The AssemblyFullName attribute contains a Visual Studio replaceable parameter which inserts the full name of your assembly.
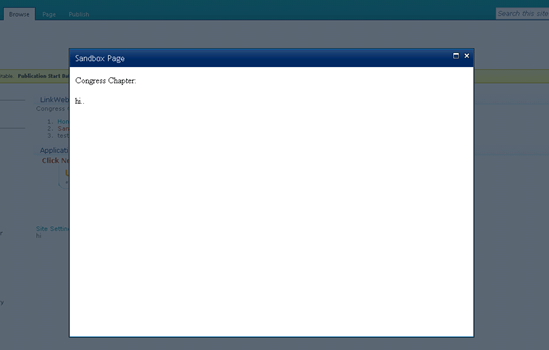
6. Deploy.I add a link to the page and using in modal-popup. It will look like below

I have not given an example with the custom page but you can use the below code for SBPage.aspx.
<%@ Page language="C#" Inherits="Microsoft.SharePoint.Publishing.PublishingLayoutPage,Microsoft.SharePoint.Publishing,Version=14.0.0.0,
Culture=neutral,PublicKeyToken=71e9bce111e9429c" %>
<%@ Register Tagprefix="SharePointWebControls" Namespace="Microsoft.SharePoint.WebControls" Assembly="Microsoft.SharePoint, Version=14.0.0.0, Culture=neutral, PublicKeyToken=71e9bce111e9429c" %> <%@ Register Tagprefix="WebPartPages" Namespace="Microsoft.SharePoint.WebPartPages" Assembly="Microsoft.SharePoint, Version=14.0.0.0, Culture=neutral, PublicKeyToken=71e9bce111e9429c" %> <%@ Register Tagprefix="PublishingWebControls" Namespace="Microsoft.SharePoint.Publishing.WebControls" Assembly="Microsoft.SharePoint.Publishing, Version=14.0.0.0, Culture=neutral, PublicKeyToken=71e9bce111e9429c" %> <%@ Register Tagprefix="PublishingNavigation" Namespace="Microsoft.SharePoint.Publishing.Navigation" Assembly="Microsoft.SharePoint.Publishing, Version=14.0.0.0, Culture=neutral, PublicKeyToken=71e9bce111e9429c" %>
<asp:Content ContentPlaceHolderId="PlaceHolderPageTitle" runat="server">
Sandbox Page </asp:Content>
<asp:Content ContentPlaceHolderId="PlaceHolderPageTitleInTitleArea" runat="server">
Sandbox Page </asp:Content>
<asp:Content ContentPlaceHolderId="PlaceHolderAdditionalPageHead" runat="server">
<style type="text/css">
body #s4-leftpanel {
display:none;
}
.s4-ca {
margin-left:0px;
}
</style>
</asp:Content>
<asp:Content ContentPlaceHolderId="PlaceHolderLeftNavBar" runat="server"></asp:Content>
<asp:Content ContentPlaceHolderId="PlaceHolderMain" runat="server">
<WebPartPages:SPUserCodeWebPart
runat="server"
Description="Sandbox Page"
Title=" Sandbox Page "
AssemblyFullName="$SharePoint.Project.AssemblyFullName$"
SolutionId="01d2e3c6-686b-45d6-aaea-185c7d373c0b"
ID="adminwp"
TypeFullName="Ravishankar.LinkWebPart.LinkWebPartControl.LinkWebPartControl" >
</WebPartPages:SPUserCodeWebPart></asp:Content>
Hope this article will help you. Sandboxes have some limitation but developers can easily find the workaround.