This article discusses vital concepts, including the life cycle of a graphics application. After reading this article, you should understand the basics of the GDI+ coordinate system, basic graphics structures used by GDI+, drawing surfaces, and how to write a graphics application using GDI+.
To write a graphics application, a good understanding of drawing surfaces and coordinates system is necessary. We will begin by discussing these concepts and how they are represented in GDI+. Then you'll learn step-by-step how to write a graphics application in the .NET Framework using GDI+. We will cover the following topics:
- How to add a reference to the GDI+ library
- How to get a drawing surface in the program
- How to create pens and brushes
- How to use pens and brushes to draw graphics objects
At the end of this article we will discuss some basic graphics structures and their members. The structures are used in examples throughout this article and include the following:
- Color
- Point and PointF
- Rectangle and RectangleF
- Size and SizeF
Drawing Surfaces
Every drawing application (regardless of the operating system), consists of three common components: a canvas, a brush or pen, and a process.
- The canvas is the space on which objects will be drawn. For example, in a Windows application, a Windows Form is a canvas.
- A brush or a pen represents the texture, color, and width of the objects to be drawn on the canvas.
- The process describes how objects are drawn on the canvas.
To draw graphics objects you need to have a pen or a brush, which defines the texture, color, and width of the drawing. For example, if you draw a line or a rectangle, you need to create a pen with a color and width.
The process component of the drawing application includes making a call to draw the line or rectangle on the form.
Each drawing surface has four common properties: width, height, resolution, and color depth.
- The width and height properties of a surface determine the size of the surface, and they are specified by the number of pixels horizontally and vertically, respectively.
- The resolution property of a surface is a measurement of the output quality of graphics objects or images in dots per inch (dpi). For example, as resolution of 72 dpi means that 1 inch of the surface holds 72 horizontal and 72 vertical pixels. For monitors and LCDs, the resolution is frequently specified in terms of the total number of pixels horizontally and vertically rather than a pixel density. Thus a monitor resolution of 1280x1024 means that the screen of the monitor can hold 1280 horizontal pixels and 1024 vertical pixels.
- The color depth of a surface is the number of colors used to represent each pixel.
Definition: PIXEL
A pixel is the smallest element that participates in the drawing process to display graphics objects or images on the screen. The pixel density is often represented by a value in dots per inch (dpi).
The quality of a pixel is directly proportional to the color depth. The Color structure represents a color in GDI+. It has four components: alpha, red, green, and blue. The RGB (red-green-blue) components of a color represent then umber of possible colors (see Figure below). Each component in the RGB has 256 (28) color combinations. Hence all three components of a GDI+ color represent 256x256x256 possible colors. The alpha component determines the transparency of the color, which affects how the color mixes with other colors.
To see the proper colors defined in the GDI+ color structure, a drawing surface must support at least a 24-bit color system (for the RGB components of a color structure), which means that each pixel of the surface must be able to hold 24 bits (8 bits each for the R, G, and B components, as noted already). Surfaces with less than 24 bits per pixel may not display graphics objects and images exactly as defined in a drawing application.
NOTE
The color depth of a surface is different from the color depth of a particular display device, such as a monitor or a printer. Most monitors can support over a million colors, and some printer may support only black and white.

FIGURE: Color components in GDI+
GDI+ provides three types of drawing surfaces: forms, printers, and bitmaps.
Forms as a Surface
When you write a Windows application that draws something on a form the forms acts as a drawing surface and supports all the properties required by a drawing surface.
Printers as a Surface
When you print from an application, the printer acts as a drawing surface. You can set a printer's resolution and color-depth, as well as the height and width of the paper.
Bitmaps as a Surface
When you create images in memory and save them as a bitmap, the bitmap functions as a drawing surface. You can set the image width, height, resolution, and color depth properties. Bitmap surfaces are commonly used for writing graphics Web applications. Drawing works a little differently in Web applications. For example, if you want to draw a line and a rectangle in a Web page using GDI+, you need to create an image, use this image as a surface for the line and rectangle objects, set its surface-related properties, and then send the image to the browser.
The Coordinate System
Understanding the coordinate system is another important part of graphics programming. The coordinate system represents the positions of graphics objects on a display device such as a monitor or a printer.
The Cartesian Coordinate System
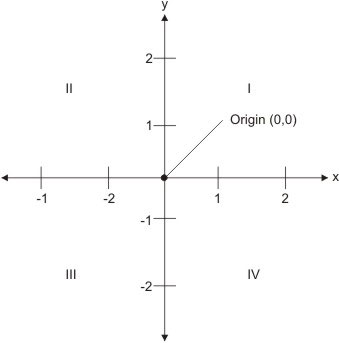
The Cartesian coordinate system (shown in Figure below) divides a two dimensional plane into four regions, also called quadrants, and two axes: x and y. The x-axis represented by a horizontal line and the y-axes by a vertical line. An ordered pair of z and y positions defines a point in a plane. The origin of the plane is a point with x=0 and y=0 values and the quadrants divide the plane relative to the origin.

FIGURE: The Cartesian coordinate system
To find out which point falls in which quadrant, we compare the point's x- and y- positions relative to the origin:
Quadrant I: x>0 and y>0
Quadrant II: x<0 and y>0
Quadrant III: x<0 and y<0
Quadrant IV: x>0 and y<0
A point with positive x and y values will fall in quadrant I. A point with +y and -x values will fall in quadrant II. A point with -x and -y values will fall in quadrant III, and a point with +x and -y values will fall in quadrant IV. For example, a point at coordinated (2, -3) will fall in quadrant IV, and a point at coordinates (-3,2) will fall in quadrant II.
The Default GDI+ Coordinate System
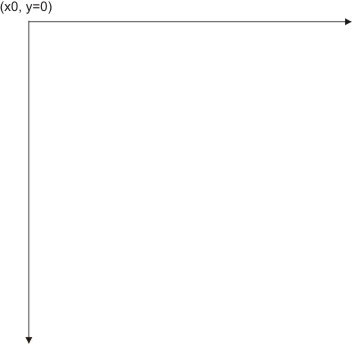
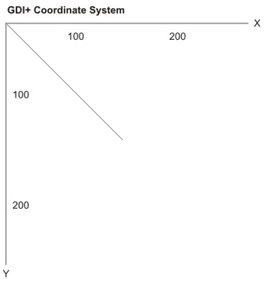
Unlike the Cartesian coordinate system, the default GDI+ coordinate system starts with the origin in the upper left corner. The default x-axis point to the right and the y-axis points down. As Figure below shows, the upper left corner with points x=0 and y=0. Points to the left of x=0 are negative values in the x-direction, and points above y=0 are negative values in the y-direction.

FIGURE: The GDI+ coordinate system
Because the default GDI+ coordinate system starts with (x=0, y=0) in the upper left corner of the screen, by default you can see only the points that have positive z and y values. Objects with either -x or -y values will not be visible on the screen. However, you can apply transformations to move objects with negative values into the visible area.
GDI+ provides three types of coordinate systems: world coordinates, page coordinates, and device coordinates.
- The coordinate system used in an application is called world coordinates. Suppose that your application draws a line from point a (0,0) to point B (120,80), as showing in Figure below. If you don't apply any transformation, the line will be displayed at the right location. Now suppose you want to draw a line from point A (-40, -50) to point B (-10, -20). The line drawn using these two points will not be displayed on the screen because the GDI+ coordinate system starts at point (0,0). However, you can transform the coordinates such that (-40, -50) is the starting point at the top left corner of the surface.
- The new coordinate system is called page coordinates. The process of converting world coordinates to page coordinates is called the world transformation.

FIGURE 2.4: Drawing a line from point (0,0) to point (10,80)
- You can also control the actual size of graphics objects. For example, if you want to draw a line in inches instead of pixels, you can simply draw a line from point A (1,1) to point B (1,2), thereby creating a line that is 1 inch long. The new coordinates are called device coordinates. The process of converting pages coordinates to device coordinates is called the page transformation.
Conclusion
Hope this article would have helped you in understanding the basics of the GDI+ coordinate system, basic graphics structures used by GDI+, drawing surfaces, and how to write a graphics application using GDI+.
Read my other articles on GDI+ on the website.