This chapter is taken from book "Pro ASP.NET 3.5 in C#2008 Second Edition" by Matthew MacDonald , Mario Szpuszta published by Apress.
Resources and Localization
Because more and more companies are reaching international markets through the Internet,supporting different cultures through your applications is essential for being successful. The .NET Framework comes with an integrated infrastructure for creating international applications.
Basically, the CLR supports a mechanism for packaging and deploying resources with any type of application. The CLR and the base class library of the .NET Framework come with several classes for managing and accessing resources in applications. These classes are located in the System.Resources and System.Globalization namespaces.
In this chapter, you will learn all the necessary details for working with resources in ASP.NET applications and for creating international ASP.NET applications based on embedded resources and the integrated localization support.
Resources in .NET Applications
Usually, applications use a number of images and strings for purposes such as toolbar or menu icons, menu captions, and label captions. Changing those strings and images can get really ugly if you put them directly in the source code. To make changing those strings and images in the program as easy as possible without having to go through the entire source code and search for them, you can put them in separate files and change them in only one place.
The .NET Framework and the CLR offer great support for this approach through embedded resources. You can put every string, image, and other type of data that should not exist directly in source code in separate resource files. Usually, these resources are compiled into the binaries of the application itself. Therefore, they are automatically deployed with the application, and no extra deployment steps are necessary.
The primary use case for resources is localization. Using resources, you can define values for control properties (such as the text of a Label control) in different resource files-one for each culture the application supports. Each of these resource files contains strings (key/value pairs) for the localized properties of the control translated into the corresponding culture. At runtime, the CLR loads these resources from the appropriate embedded resource files and applies them to the control's properties.
But localization is not the only useful application for resources. In Windows applications, resources are also used for toolbar, menu, and status icons so that they don't need to be deployed separately with the application (which is not common for web applications). You can also use resources in custom installer classes for embedding additional deployment scripts (such as database creation scripts or COM+ catalog modifications) so that you don't need to deploy them separately within the deployment process.
The definitions for resources are usually stored in .resx files. These .resx resource files are just XML files containing either string values or references to external files. These strings and referenced files are then compiled as embedded resources into the binaries of the application. You can add resources to your project by right-clicking the website or project in the Solution Explorer and then selecting Add New Item. Then just select Resource File from the Add New Item dialog.
The following example shows an excerpt of a sample .resx file. The file contains simple strings as well as a reference to an external image file.
<root>
<resheader name="resmimetype">
<value>text/microsoft-resx</value>
</resheader>
<resheader name="version">
<value>2.0</value>
</resheader>
...
<data name="Binary Code Sm"
type="System.Resources.ResXFileRef, System.Windows.Forms">
<value>
Binary Code Sm.png;System.Drawing.Bitmap, System.Drawing,
Version=2.0.0.0, Culture=neutral, PublicKeyToken=b03f5f7f11d50a3a
</value>
</data>
<data name="LegendAge">
<value xml:space="preserve">Age</value>
</data>
<data name="LegendFirstname">
<value xml:space="preserve">Firstname</value>
</data>
<data name="LegendLastname">
<value xml:space="preserve">Lastname</value>
</data>
</root>
Note This is just an excerpt of the .resx file. Visual Studio usually generates a bunch of comments and the XML schema for the resource file in the same XML file automatically.
Another way of compiling files as embedded resources in the application is to add them to the project and select the value Embedded Resource for the BuildAction property in the Properties window for the file. But this works only for Windows projects such as class libraries, Windows services, or Windows Forms applications. For ASP.NET applications, you have to take the approach introduced in this chapter. In any case, you can then access resources programmatically through the ResourceManager class.
Note You can also add resources as text files to the application. These text files consist of key/value pairs, one per line, in the format key = value. They can be compiled with the resgen.exe tool into a binary format with the file extension .resources. You can then add such .resources files as embedded resources (BuildAction=Embedded Resource) to your application. But because this is the old way of managing resources, we suggest not using it.
While going through the following web application sample, you will learn how you can use resources both for populating control properties and for getting some other information such as document templates for report generation. The web application requires users to enter their first name, last name, and age. Based on this information, the application generates an HTML fragment using XML and XSLT. For this purpose, two templates are stored in the resources of the application-one template represents the XML structure used as a basis for the XSLT stylesheet and the other template represents the XSLT stylesheet itself.
Note XSLT is the acronym for XSL Transformations. It is used for transforming XML structures into other XML structures or tag-based languages such as HTML. We will not delve into the details of XSLT in this book. If you want to get more information about XSLT, please refer to the following documentation on MSDN: http://msdn2.microsoft.com/ en-us/library/ms256069.aspx.
For implementing this example, we are going to use a very simple ASP.NET page, as shown in the following code snippet:
<%@ Page Language="C#" AutoEventWireup="true" CodeFile="Default.aspx.cs" Inherits="Default_aspx" %>
<!DOCTYPE html PUBLIC "-//W3C//DTD XHTML 1.1//EN"
"http://www.w3.org/TR/xhtml11/DTD/xhtml11.dtd">
<html xmlns="http://www.w3.org/1999/xhtml">
<head id="Head1" runat="server">
<title>Untitled Page</title>
</head>
<body>
<form id="form1" runat="server">
<div>
<asp:Label ID="LegendFirstname" runat="server" Text="Label" />
<asp:TextBox ID="TextFirstname" runat="server"></asp:TextBox><br />
<asp:Label ID="LegendLastname" runat="server" Text="Label" />
<asp:TextBox ID="TextLastname" runat="server"></asp:TextBox>
<br />
<asp:Label ID="LegendAge" runat="server" Text="Label" />
<asp:TextBox ID="TextAge" runat="server"></asp:TextBox><br />
<asp:Button ID="GenerateAction" runat="server" Text="Generate Document" OnClick="GenerateAction_Click" /><br />
<asp:Substitution ID="DocumentSubstitute" runat="server" MethodName="SubstituteHtml" />
</div>
</form>
</body>
</html>
As you can see, the labels in the preceding markup code aren't initialized with meaningful text for the end user at all. Furthermore, we have an <asp:Substitution /> control that we use for displaying the results of the transformation with an XSLT stylesheet based on an XML document. It retrieves the results through the method specified in the MethodName property. You will see the implementation of this method later in this chapter. Note that we do not use the <asp:Xml> control, as it requires the XslTransform object for transformation, which is deprecated as of the release of the .NET Framework 3.5. You will learn more about that later. Finally, all strings, as well as the XML and XSLT templates, are embedded resources. After adding an assembly resource file to the project, Visual Studio offers a resource editor for modifying the contents of the .resx file. It enables you to add strings as well as any other type of file to the project, as shown in Figure 1-1.
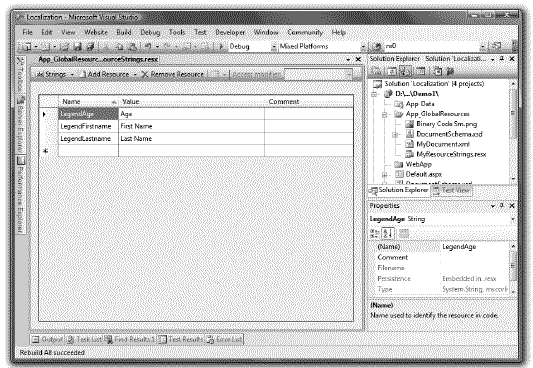
Figure 1-1. The Visual Studio 2008 resource editor
The first button in the resource editor's toolbar shows the type of resources you are currently working with. In Figure 1-1, the current view shows the string resources. By clicking on the button,you can switch between different views, such as images or other files. You can add string resources just by typing values into the last row of the grid shown in Figure 1-1. If you want to add other types of resources, you need to use the second button on the resource editor's toolbar (the one displaying the value Add Resource in Figure 1-1). By clicking Add Resource ➤ Add Existing File, you can add any external file stored in any format on the hard disk to the project. Depending on the project model you are using, Visual Studio uses different default approaches for adding these files to your project.
When you use the website model introduced with Visual Studio 2005, these files are automatically added to one of the special resource directories of the ASP.NET website (such as App_GlobalResources) and compiled as embedded resources into the resulting binaries during the dynamic compilation process during the first request.
When using web application projects, by default the resource file itself (.resx) gets added directly to the folder of your web application where you opened the context menu. Finally, the contents of the resource file get added as resources into the resulting assembly compiled by Visual Studio into the web application's Bin directory. Additional files such as images are added via Add Resource--> Add Existing File within the resource editor as well, as described at the beginning of this paragraph. But when using web application projects, they are added to a Resources subdirectory of your web application and get compiled into the resulting binary.
Now let's take a look at the special folders of ASP.NET for managing resources. Basically, with these special folders, Visual Studio and ASP.NET distinguish between global resources and local resources. Global resources are accessible from within any page of the application while local resources exist on a per-page basis and are accessible from within their page only. Global resources are stored in the App_GlobalResources special folder of ASP.NET. Local resources are stored in the App_LocalResources special directory for each page. The resource files added to the App_LocalResources directory are associated with their page by their name, with the pattern following this approach: <YourPageName>.aspx.resx.
But only when you use the website model are these folders used by default. With the web application project template, Visual Studio's approach is different, as outlined in the previous paragraph. The default approach of web application projects always creates globally available resources. Of course, you can use ASP.NET special folders, such as App_GlobalResources or App_LocalResources, in web application projects as well.
Figure 1-2 shows the current layout of the sample application we are using for exploring basic work with resources-in this figure, the application is running without usage of embedded resources.
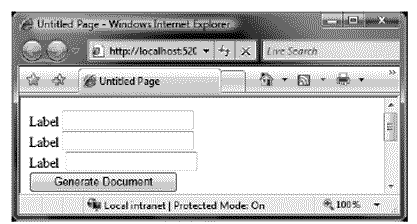
Figure 1-2. The sample application running without using the ResourceManager class
As you can see in Figure 1-2, the captions for the Label controls are not initialized. You will now add the code necessary for initializing the text properties as well as generating the simple document. While going through this example, you will learn the different ways for accessing embedded resources. Furthermore, you will see that resources can be used for many different purposes, although localization is definitely the most common use.
Basically, you can access embedded resources through a class generated by Visual Studio. This class is generated based on the information stored in the .resx file. That means that when you create or modify resources with the resource editor, Visual Studio embeds the resources in the application and automatically creates a strongly typed class behind the scenes for accessing these resources through properties (whereas the names of the properties are derived from the resource names you select in the resource editor). Therefore, every entry in the resource file results in a property of this generated class, whereas the class name is derived from the name of the resource file you have created.
The following code snippet demonstrates how you can access resources from the previously added MyResourceStrings.resx file. The class name for the strongly typed resource class therefore is MyResourceStrings, and the class contains three properties for the resources specified earlier.
protected void Page_Load(object sender, EventArgs e)
{
// These are simple string resources
LegendFirstname.Text = Resources.MyResourceStrings.LegendFirstname;
LegendLastname.Text = Resources.MyResourceStrings.LegendLastname;
LegendAge.Text = Resources.MyResourceStrings.LegendAge;
}
Note Later, in the "Localization of Web Applications" section, you will see how Visual Studio 2008 and ASP.NET provide much better support for localizing captions and other properties of controls. In this part of the chapter, we just want to show you the low-level API for managing any type of resources, not just localization resources.
Internally, the generated class uses an instance of the ResourceManager class, which is defined in the System.Resources namespace. The instance of this class is accessible through the generated class's ResourceManager property. Internally, the property procedures for accessing the embedded resources themselves are just wrappers around calls of one of the GetXxx methods (that is, GetString or GetStream) of this ResourceManager instance. For example, the resource that is accessible through the generated property procedure Resources.MyResourceStrings.LegendAge is also accessible through the resource
manager by using Resources.MyResourceStrings.ResourceManager.GetString("LegendAge"), as shown in Figure 1-3.
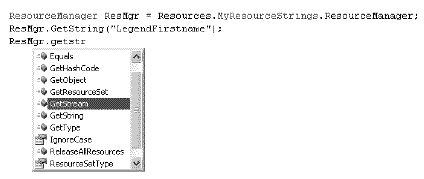
Figure 1-3. The ResourceManager class's methods
The ResourceManager property of the generated class creates an instance of the resource manager automatically, as shown in the following code snippet. Of course, anybody can do this.
ResourceManager ResMgr = new ResourceManager("Resources.MyResourceStrings",
Assembly.GetAssembly(typeof(Resources.MyResourceStrings)));
The first parameter specifies the base name for the resources that should be loaded by the ResourceManager class. The second parameter specifies the assembly into which the resources have been compiled. If the resources are compiled into the assembly that executes this code, using the GetExecutingAssembly() method of the System.Reflection.Assembly class is sufficient. Mostly this is true for class libraries or classic Windows applications. ASP.NET is a little bit different, as it generates and compiles the assemblies automatically. Internally, the ASP.NET infrastructure actually creates different assemblies for the page code and global resources. And the name of the dynamically generated assembly is basically unknown, as it is determined by the infrastructure as well. Therefore, using the GetExecutingAssembly() method won't work. Alternatively, using the GetAssembly method with the type description of the generated resource class is a possible way of creating a custom instance of the ResourceManager class, because this type resides in the assembly created by ASP.NET for the embedded resources contained in this class.
Now let's get to the next section-generating a simple report based on an XML file and an XSLT stylesheet that gets embedded directly into our page through the <asp:Substitution> control placed on our page. For this purpose, you need to create an XML file and an XSLT stylesheet, which you can do with any editor of your choice. You can use Visual Studio by right-clicking your website (or a folder within the website), selecting Add New Item, and then selecting XML File and XSLT File from the Add New Item dialog.
The XML file stores the basic information we have entered into our text boxes in a very simple XML structure-you can save this one in your web application as XmlTemplate.xml to any folder you want; here's an example:
<persontemplate>
<Firstname></Firstname>
<Lastname></Lastname>
<Age></Age>
</persontemplate>
The content of the XSLT file specifies instructions for transforming the preceding XML file into valid HTML code that can be embedded into your page by using the <asp:Substitution> control (called SubstituteHtml in the previous example). This stylesheet looks as follows:
<?xml version="1.0" encoding="utf-8" ?>
<xsl:stylesheet version="1.0" xmlns:xsl="http://www.w3.org/1999/XSL/Transform">
<xsl:template match="/">
<h1>
Person Report</h1>
<p>
This report has been generated for demonstrating usage of resources. It gets input
from an XML file stored in the resources as a template as well and transforms the
content into a nice looking report (hopefully nice looking;)).
</p>
<table>
<tr>
<td>
<b>Firstname:</b></td>
<td>
<xsl:value-of select=".//Firstname" />
</td>
</tr>
<tr>
<td>
<b>Lastname:</b></td>
<td>
<xsl:value-of select=".//Lastname" />
</td>
</tr>
<tr>
<td>
<b>Age:</b></td>
<td>
<xsl:value-of select=".//Age" />
</td>
</tr>
</table>
</xsl:template>
</xsl:stylesheet>
For this example, save this file as ReportTemplate.xslt to any folder in your web application. Now you have all the files in place. To make these files accessible as embedded resources and through the ResourceManager class you used before for your label strings, you need to add them using the resource editor introduced in Figure 1-1. Just open the resource editor by double-clicking the .resx file you added before (MyResourceStrings.resx in the App_GlobalResources folder, as shown in Figure 1-1), and then select Add Resource --> Add Existing File. Then browse to the previously created XmlTemplate.xml and ReportTemplate.xslt files and add them to your global resources. You can see the files added to the resources in Figure 1-4.
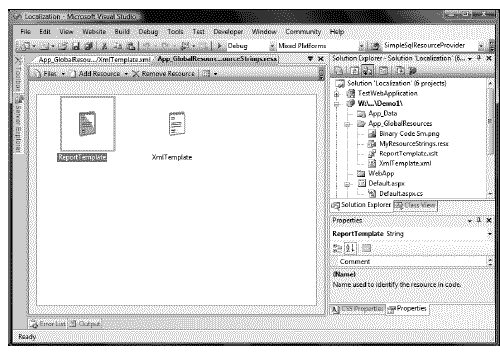
Figure 1-4. The XML and XSLT template added to the resources
You can find these file-based resources by switching to the Files view in the resource editor. You can do this by clicking the first button in the resource editor's toolbar, as explained earlier in this section. After saving the resources file, you can access the content of the file through the generated resources class as follows:
string XmlTemplate = Resources.MyResourceStrings.XmlTemplate;
string XslTemplate = Resources.MyResourceStrings.ReportTemplate;
As both files are text files, they are returned as strings from the generated resources class. If you add binary files such as images, the generated class will return them as byte arrays. You can also use the previously introduced GetStream() method of the ResourceManager class for accessing these resources via streams (which can be handy if you want to create instances of classes such as System.Drawing.Image out of the resource directly).
Now that you have both resources in place, you can write the code for generating the report, which gets embedded into your page through the DocumentSubstitute <asp:Substitution> control added to the page at the beginning of this section. Basically, you will load the XML template into an XML DOM tree using the System.Xml.XmlDocument class. Then you need to write the values for the first name, last name, and age from your text boxes to the XML document using XPath queries through the SelectSingleNode() method of the XmlDocument.
That means that you have a ready-to-use XML document in place and you can load the XSLT stylesheet into an instance of System.Xml.Xsl.XslCompiledTransform.
Note Previous versions of the .NET Framework included the XslTransform class for performing XSLT transformation in your code. While this class still exists for backward compatibility, it has been deprecated since the release of the .NET Framework 3.5. You should instead use the XslCompiledTransform class, which was first introduced with the .NET Framework 2.0. This class dynamically creates a compiled class for doing the transformation in the background while loading the XSLT document, and therefore improves the performance of the actual XSLT transformations dramatically.
The XslCompiledTransform object performs the XSLT transformation from your basic XML structure to HTML based on your XSLT stylesheet. Unfortunately, the <asp:Xml> control does not support the XslCompiledTransform yet. Therefore, you need to perform the transformation manually and store the results in the cache. The <asp:Substitution> control then retrieves this content by calling the method specified in its MethodName property, which in turn retrieves the transformed HTML from the cache and returns it as a string to the substitution control.
protected void GenerateAction_Click(object sender, EventArgs e)
{
// Now get the XML file and the XSLT template
// for report generation from the resources
string XmlTemplate = Resources.MyResourceStrings.XmlTemplate;
string XslTemplate = Resources.MyResourceStrings.ReportTemplate;
// Load the XmlTemplate into a DOM and initalize its properties
XmlDocument doc = new XmlDocument();
doc.LoadXml(XmlTemplate);
doc.SelectSingleNode(".//Firstname").InnerText = TextFirstname.Text;
doc.SelectSingleNode(".//Lastname").InnerText = TextLastname.Text;
doc.SelectSingleNode(".//Age").InnerText = TextAge.Text;
// Prepare XmlTextReader for loading the
// XSLT stylesheet and then create an XslCompiledTransform
// object for the XSLT transformation
XmlTextReader ReaderForXsl = new XmlTextReader(new StringReader(XslTemplate));
XslCompiledTransform transform = new XslCompiledTransform();
transform.Load(ReaderForXsl);
// Now perform the transformation manually using the
// XslCompiledTransform object. For that purpose we wrap the
// XML content we want to transform in an XmlTextReader and the target
// in an XmlTextWriter (we need to go through a StringReader and
// StringWriter as this is not supported directly).
StringReader sr = new StringReader(doc.OuterXml);
XmlTextReader xtr = new XmlTextReader(sr);
StringWriter sw = new StringWriter();
XmlTextWriter xtw = new XmlTextWriter(sw);
transform.Transform(xtr, xtw);
Cache["Content"] = sw.ToString();
}
public static string SubstituteHtml(HttpContext context)
{
if (context.Cache["Content"] != null)
{
return (string)context.Cache["Content"];
}
else
{
return "no content generated, yet!";
}
}
After you have added this code to the event handler of the GenerateAction button of the sample page introduced earlier in this chapter, you can run the application and take a look at the results. Finally, resources allow you to get some indirection between static resources and your application. Instead of directly hardcoding string resources in your code, or even complete templates (such as the XSLT stylesheet in the previous example) or path information to such templates (as an alternative to the approach shown previously), you just put them into replaceable resources. And best of all, ASP.NET automatically accesses the right resources for the appropriate languages. For example, if you provided a second XSLT template and .resx file for another culture in the preceding example, ASP.NET would automatically use the XSLT template assigned to the incoming culture in your resources without requiring you to write any custom code. This is an extremely elegant and smart way for providing culture-agnostic content, reaching from simple strings and files to images or any other type of culture-specific resources you can imagine. And this is exactly what we are going to explore in the next sections of this chapter!
Localization of Web Applications
The infrastructure presented in the first part of this chapter provides the fundamentals for localizing any type of .NET-based application, including Windows applications, class libraries, services, and (of course) web applications.
Before you learn about the technical details for localizing applications, we will discuss the major challenges in doing so. Figure 1-5 shows some challenges of localizing a web application.
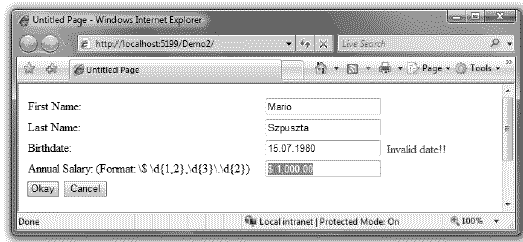
Figure 1-5. Sample application showing localization challenges
Although this is a simple example, it demonstrates some of the core challenges for localizing web applications. The simplest challenge, of course, is localizing the strings for the captions of the labels as well as the buttons. Also, you must localize the format for the currency values and for the dates and times. For that purpose, you need to localize the validation expression of the validation control.
Finally, when parsing the information in the code for storing it in a database or for other processing steps, you need to consider the format for dates, times, and currency values. All these values might be different and therefore customized from culture to culture.
Localization and the CLR
Resources are usually created for every culture that the application should support. In the earlier example, you learned how to create resources for the default culture, because you didn't specify any culture-specific information. These resources are used by the CLR as a last resort in the localization process.
The CLR defines a behavior for finding culture-specific resources. With that said, every set of resources has to define a base name that is specified through the first part of the name of the resource file. The second part of the name, which has been omitted in the first example of this chapter, defines the culture. If the culture portion in the name is not specified, the resources
defined in the resource file are used as default resources. For example, if the base name of an embedded resource file is MyResourceStrings.resx, then the culture-specific name will be MyResourceStrings.en-US.resx.
The CLR defines a hierarchy of cultures and languages, as you can see in Figure 1-6. (For a complete list of cultures and their hierarchies, refer to the CultureInfo class in the MSDN documentation.)
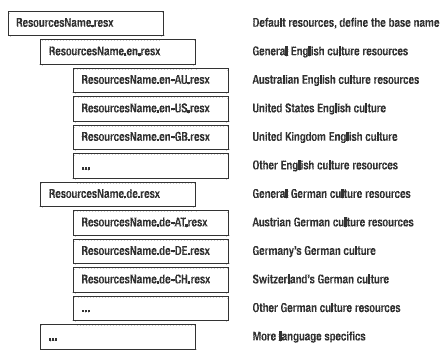
Figure 1-6. The culture hierarchy defined by the CLR
The CLR automatically finds culture-specific resources based on these hierarchies. Basically, it tries to find the closest matching set of resources for the current culture settings. More general culture resources are always used as a fallback if specific culture resources are not available. Further, if no culture resources are embedded for the current culture in the application, the CLR automatically uses the default resources embedded in the application. If the default resources don't include a value for the requested resource, the CLR throws an exception.
When loading resources through the ResourceManager class, you always specify the base name only. Therefore, when resource files with the names MyResourceStrings.resx and MyResource- Strings.en-US.resx have been added to the project, you use only the base name when instantiating the ResourceManager class, no matter which culture is going to be used. For example:
ResourceManager ResMgr = new ResourceManager("Resources.MyResourceStrings", Assembly.GetAssembly(typeof Resources. MyResourceStrings)));
Note ASP.NET automatically prefixes names for resources with the Resources prefix. So, the base name for (global) resources added to a web application project always has the format Resources.MyResourceFileName. When adding resources to a class library, for example, you can omit the Resources prefix.
Specifying culture-specific resource files is not mandatory. The CLR can load culture-specific resources from the resource files based on a "current" culture. But what is the current culture? HTTP specifies an HTTP header entry, enabling the browser to send culture-specific information from the client to the server. Based on this information, you can create an instance of the CultureInfo class, as shown in the following section.
CultureInfo Class
Any culture-specific information is stored in an instance of the CultureInfo class. This class is defined in the System.Globalization namespace. It enables querying information such as the name of the culture, its date formats, its number formats, and the currency formats. The following code creates an instance of CultureInfo based on the language sent by the browser:
protected void Page_Load(object sender, EventArgs e)
{
CultureInfo ci;
if ((Request.UserLanguages != null) && (Request.UserLanguages.Length > 0))
{
ci = new CultureInfo(Request.UserLanguages[0]);
System.Threading.Thread.CurrentThread.CurrentUICulture = ci;
}
else
{
ci = System.Threading.Thread.CurrentThread.CurrentUICulture;
}
StringBuilder MessageBuilder = new StringBuilder();
MessageBuilder.Append("Current culture info: ");
MessageBuilder.Append("<BR>");
MessageBuilder.AppendFormat("-) Name: {0}", ci.Name);
MessageBuilder.Append("<BR>");
MessageBuilder.AppendFormat("-) ISO Name: {0}",ci.ThreeLetterISOLanguageName);
MessageBuilder.Append("<BR>");
MessageBuilder.Append("-) Currency Symbol: " + ci.NumberFormat.CurrencySymbol);
MessageBuilder.Append("<BR>");
MessageBuilder.Append("-) Long Date Pattern: " + ci.DateTimeFormat.LongDatePattern);
LegendCI.Text = MessageBuilder.ToString();
}
The Request object includes a property called UserLanguages. This property includes language information the browser sent through the HTTP header to the server. But sending culture information through the HTTP header is optional and therefore might not be available to the web application. In that case, you can specify a default culture in the web.config file as follows:
<system.web>
<!-- ...Other configuration options... -->
<globalization enableClientBasedCulture="true"
culture="de-DE"
uiCulture="de-DE"/>
<!-- ...Other configuration options... -->
</system.web>
The settings specified in this element of the configuration are automatically set onto the Thread.CurrentThread.CurrentUICulture and Thread.CurrentThread.CurrentCulture properties.The CLR uses these properties for finding the appropriate data in the embedded resources as well as for controlling formatting functions such as ToString() or Parse of different, culture-aware types such as DateTime or Decimal.
Therefore, if the browser sends culture-specific information from the client, you need to override the settings, as demonstrated in the previous code example at the beginning of the Page_Load event. The CurrentCulture property affects the behavior of formatting functions. For example, if you call DateTime.Now.ToString or DateTime.Now.Parse, it uses the date format based on the Current- Culture property of the thread. The same is true for number formats.
On the other hand, the ResourceManager uses CurrentUICulture to look up culture-specific resources. That means that when a request is received from the browser, ASP.NET automatically initializes the CurrentUICulture property of the System.Threading. Thread.CurrentThread instance. Based on this CurrentUICulture property, as well as the culture hierarchy defined by the CLR (shown in Figure 1-6), the ResourceManager class automatically retrieves localized resources from the appropriate embedded resources when calling one of the GetXxx methods. Table 1-1 demonstrates some examples of this behavior if the following resource files are present for an application:
MyResources.resx: Default resources with values for Firstname, Lastname, Age, and DocumentName.
MyResources.en.resx: Default resources for English cultures with values for Firstname, Lastname, and Age.
MyResources.de.resx: Default resources for German cultures with values for Firstname, Lastname, and Age.
MyResources.de-DE.resx: Resources for Germany's German culture with values for Firstname and Lastname.
MyResources.de-AT.resx: Resources for Austria's German culture with values for Firstname and Lastname.
Table 1-1. Examples of the ResourceManager's Behavior in Different Situations
| CurrentUICulture |
Method Call |
Result
|
| en-US |
GetString("Firstname") |
The value Firstname of MyResources.en.resx is used, as no resources exist for the US English culture in the application. |
| en-GB |
GetString("Firstname") |
The value Firstname of MyResources.en.resx is used, as no resources exist for the UK English culture in the application. |
| en-US |
GetString("DocName") |
The value DocumentName of MyResources.resx is used, as no value is specified in the resource file for the English culture for the key DocName. |
| de-DE |
GetString("Firstname") |
The value Firstname of MyResources.de- DE.resx is used. |
| de-DE |
GetString("Age") |
The value Age of MyResources.de.resx is used, as the value is not specified in the file MyResources.de-DE.resx. |
| de-AT |
GetString("Lastname") |
The value Lastname of MyResources.de- AT.resx is used. |
| de-AT |
GetString ("DocumentName") |
The value DocumentName of MyResources.resx is used, as this value doesn't exist in MyResources.de-AT.resx or MyResources.de.resx. |
Local Resources for a Single Page
The classes you have seen up until now provide the basic infrastructure for localizing .NET-based applications of any type. With ASP.NET 1.x, you had to use this infrastructure for manually localizing the contents of your controls.
Fortunately, this has changed since the release of ASP.NET 2.0 and Visual Studio 2005, which now support the web developer in the same fashion Windows Forms did for localization from the start. As ASP.NET 3.5 builds on top of ASP.NET 2.0, the basic infrastructure is the same as with ASP.NET 2.0-ASP.NET 3.5 and Visual Studio 2008 did not introduce any core changes. For localizing a page, just select Tools ➤ Generate Local Resources-but beware that you need to have your page opened in design view before you can do that; the option is not supported in code view or split view (which shows both the code and visual design) in Visual Studio 2008. Visual Studio then generates a resource file in the App_LocalResources folder, which includes the values for every control of the page currently open in design view. Figure 1-7 shows the resources generated for the earlier example.
Visual Studio generates resources for several properties of each control. The resources are always prefixed with the name of the control and postfixed with the name of the property. Visual Studio automatically generates the default resources for the controls of the page only. You must add any further culture-specific resources manually by copying the generated resources and giving them the appropriate name (for example, Default.aspx.en-US.resx).
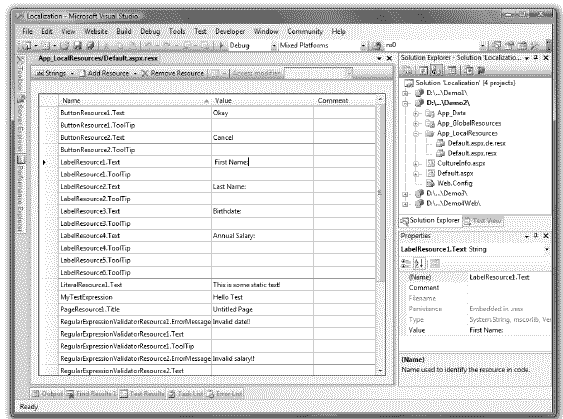
Figure 1-7. Generated resources for the application introduced in Figure 1-5
The resource generation tool creates an entry for every property that is marked with the [Localizable] attribute in the control. Therefore, if you want to create a custom localizable control, you have to mark all [Localizable] properties with this attribute, like so:
[Localizable(true)]
public string MyProperty
{
get { ... }
set { ... }
}
Copying the resources created previously and renaming this copy to Default.aspx.de.resx adds the culture-specific resources for the German culture to the application; the runtime is then able to initialize the control properties based on the CurrentUICulture of the thread with the strings contained in the embedded resource file for this culture. Figure 1-8 shows the adapted resource file, Figure 1-9 shows the result of browsing with German locale settings, and Figure 1-10 shows the results of browsing with English locale settings.
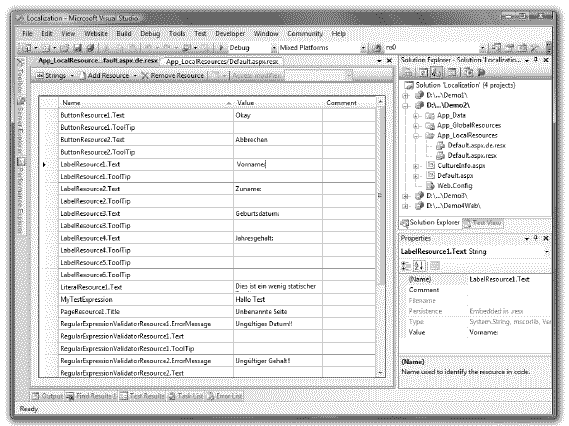
Figure 1-8. Added resource file for a different culture
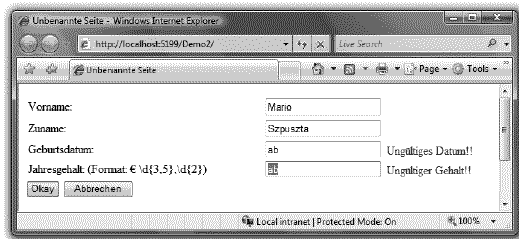
Figure 1-9. Browsing with German locale settings
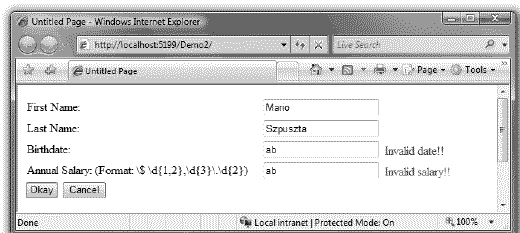
Figure 1-10. Browsing with English locale settings
In addition to generating the resource file, Visual Studio has changed the page's source code. For every [Localizable] property of each control placed on the page, it has added a localization expression, as shown in the following code snippet:
<asp:label id="LegendFirstname" runat="server" text="Firstname:" meta:resourcekey="Label1Resource1"></asp:label>
Localization expressions are identified by the meta:resourcekey attribute of the tag. During the page-parsing process, the runtime goes through the controls and generates the necessary code for getting the resource through the ResourceManager class. The declarative property assignments remain untouched and will be displayed in the design mode. Unfortunately, the names assigned by Visual Studio for the resource keys (e.g., Label1Resource1) are not derived from the control's ID value. They are generated from the control's type name and the localized property of that control, and they include one number that is incremented for each instance of a control from that specific type (e.g., LabelResource1.Property, LabelResource2.Property, Label3Resource.Property for label controls). Together the type-name, the number generated for each instance of that type as well as the property are uniquely identifying a resource.
The localization expression in the previous code snippet is a so-called implicit localization expression. Implicit localization expressions are something like shortcuts to resource keys included in the embedded resources for a page. They have to adhere to the naming conventions used by Visual Studio for generating the resources (for example, Resourcekey.Propertyname). Implicit localization expressions just specify the base resource key for the embedded resource without a property name. Property names are derived from the second part of the name.
Therefore, you can use implicit localization expressions for [Localizable] properties only. Further, they don't work for global applications resources. Another way to bind control properties to resources is using explicit localization expressions. These offer enhanced flexibility by enabling binding of any control property to embedded resources, and they work with global application
resources as well. You will learn about explicit localization expressions in the next section, which gives details about global resources.
If you take a closer look at the generated resource files in Figures 1-7 and 1-8, you will see that you are not done yet. Although the RegularExpressionValidator control is included in the generated resources, the validation expression property is not included, because it is not marked with the [Localizable] attribute. But the validation of both the birth date and the annual salary has to happen based on the culture settings of the user browsing to the page, because US visitors want to add their birth date in the format they are used to (and the same goes for Germans, Austrians, and other visitors).
Therefore, you need to do some additional work before you are finished localizing the application. Basically, two ways for localizing the validation of those two text fields are available. The first one is to automatically generate the regular expression for the validation based on the CultureInfo object created for the user's culture. The second approach is to add an entry to the embedded resources for the validation expression. As we want to discuss how explicit localization expressions work, we will show how to take the second approach.
First, you have to add two new entries, containing the regular expression for validating the user's birth date and annual salary input, to the embedded resources. To do so, please follow the steps outlined here:
- Open the local resource files for the different cultures of your current page. If you work with the Default.aspx page as we did in the previous sections of this chapter, these files will be Default.aspx.resx and Default.aspx.de.resx, as outlined in Figure 1-8.
- Add a new entry called RegularExpressionValidatorResource1.DateFormat to both files, one containing a regular expression for the US English culture (in Default.aspx.resx) with the value \d{1,2}/\d{1,2}/\d{2,4}, and one containing a regular expression for the German culture (in Default.aspx.de.resx) with the value \d{2}\.\d{2}\.\d{4}.
- Now add a new entry called RegularExpressionValidatorResource2.SalaryFormat to both resource files. The value for it in Default.aspx.resx should be a regular expression representing a valid US salary format (\$ \d{1,2},\d{3}\.\d{2}), and the value for it in Default.aspx.de.resx should be a regular expression representing a valid European salary format ( \d{3,5},\d{2}).Figure 1-11 shows the added contents for the standard resources file Default.aspx.resx with the expressions for the US English culture added.
- Save both resource files to make the resources available to your pages.
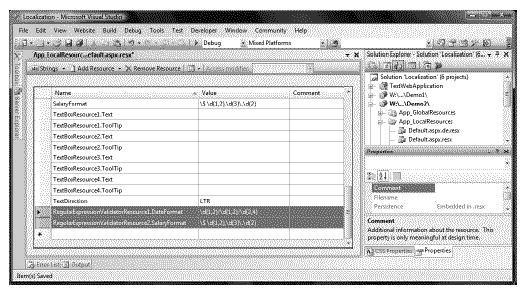
Figure 1-11. Additional resource values added to the local resources for Default.aspx
Afterward, you need to change the definition of those controls as follows (assuming that the resource entries are called RegularExpressionValidatorResource1.DateFormat and Regular-ExpressionValidatorResource2.SalaryFormat):
<asp:regularexpressionvalidator id="RegularExpressionValidator1" runat="server" controltovalidate="BirthdateText"
errormessage="Invalid date!!" validationexpression='<%$ Resources: RegularExpressionValidatorResource1.DateFormat %>'
meta:resourcekey="RegularExpressionValidatorResource1">
</asp:regularexpressionvalidator>
<asp:regularexpressionvalidator id="RegularExpressionValidator2" runat="server" controltovalidate="SalaryText"
errormessage="Invalid salary!!" validationexpression='<%$ Resources: RegularExpressionValidatorResource2.SalaryFormat %>'
meta:resourcekey="RegularExpressionValidatorResource2">
</asp:regularexpressionvalidator>
You can probably see that the previous validator still contains some static text-in this case, ErrorMessage. Don't worry about that. Because the validation control has a meta:resourcekey, the control will ignore the static text, and the runtime will get its data from the generated resources. As soon as a control has such a meta:resourcekey attribute, it ignores static text and reads all information from embedded, localized resources. In the case of the ValidationExpression, you have to use explicit localization expressions, because automatic localization is not provided for this property.
The general format for explicit localization expressions follows this syntax:
<%$ Resources: [ApplicationKey, ] ResourceKey %>
The application key identifies shared application resources and therefore can be omitted (and is omitted in the previous example) when accessing local resources. Figure 1-12 shows that localized properties are marked with special icons in the Properties window. The localization expressions themselves leverage the new expression engine included with ASP.NET.
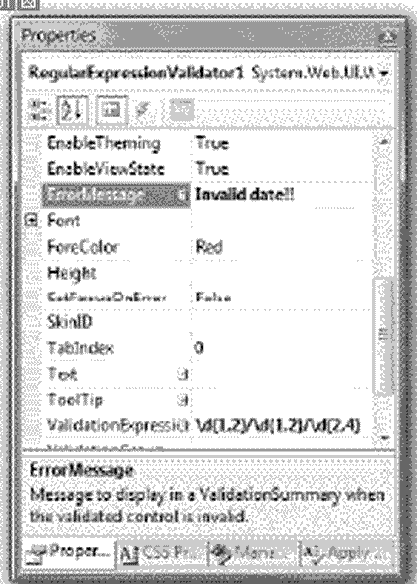
Figure 1-12. Localized attributes marked in the Properties window
You can edit expressions for all properties through the new expression editor. The Properties window includes a new Expressions property on the top. When you click the ellipsis button, the expression editor opens, as shown in Figure 1-13. The ClassKey property specifies the Application- Key parameter for the explicit localization expression, and the other one specifies the resource key. Actually, it specifies the name of the class generated for the global resources.
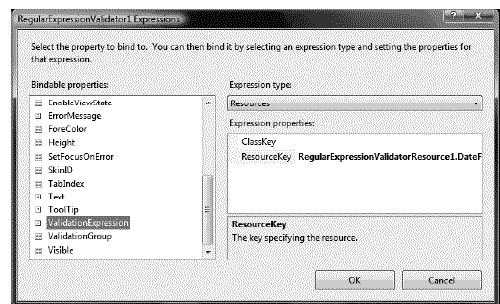
Figure 1-13. The Visual Studio expression editor
Sharing Resources Between Pages
Generating local resources for a single page might lead to a duplication of resource strings or other resource information. Therefore, it is definitely useful to share resources between pages through global resources.
The tool support for shared resources in terms of generating and binding resources to controls is not as good as with local page resources. In the first example of this chapter, you saw how to use application global resources that can be shared across multiple pages. When adding assembly resources to a project, Visual Studio asks if it should place those resources into the global resource directory. If the resources are placed into this directory, they are accessible from within all pages.
As the validation expressions for date formats and number formats used earlier are definitely good candidates to be reused in several pages of the application, it is useful to put them into a global resource file. For this purpose, you just need to add a new global resource file and then add the values to those resources, as shown in Figure 1-14.
Now you have to adopt the explicit localization expression for the two validation controls. For this purpose, you have to change the name and add the ApplicationKey parameter. Because you named the global resource file ValidationResources.resx previously, this will be the value for the ApplicationKey property (without the .resx extension).
<asp:regularexpressionvalidator controltovalidate="BirthdateText" errormessage="Invalid date!!" id="RegularExpressionValidator1" runat="server" validationexpression='<%$ Resources:ValidationResources, DateFormat %>'
meta:resourcekey="RegularExpressionValidatorResource1" />
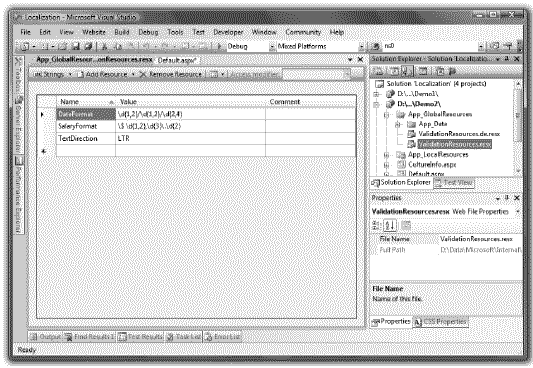
Figure 1-14. Global resources added to the application
Another big difference between local and global resources is how you access these resources programmatically. Although global resources can be accessed in a strongly typed way through the generated resource class page, local resources have to be accessed through the GetLocalResourceObject method.
this.GetLocalResourceObject("LabelResource1.Text")
Note Localization expressions and other types of expressions work for controls with the attribute runat="server" only. They are processed on the server side by the localization infrastructure of ASP.NET.Therefore, if you want to localize HTML controls with implicit or explicit localization expressions, you have to add the runat="server" attribute.
Basically, Visual Studio generates resources for every [Localizable] property of every control of a page or user control opened in design view in the already described naming format of Resourcekey.Propertyname. If a property of a control is already bound to a resource through an explicit localization expression, resource generation for this property is omitted completely. Therefore, for localizing the other properties, it still includes the meta:resourcekey attribute for the control.
By the way, Visual Studio automatically generates a resource entry for the page's title and adds a meta:resourcekey attribute to the Page directive. And you can apply explicit localization expressions to the Page directive, like so:
<%@ Page Language="C#" ... Culture="auto" UICulture="auto" meta:resourcekey="PageResource1" %>
<%@ Page Language="C#" ... Culture="auto" UICulture="auto" Title='<%$ Resources:ValidationResources, DateFormat %>' %>
The first example implicitly binds the page's properties such as the title to local resources, and the second example binds the page's title property to a global resource with the name DateFormat stored in the global ValidationResources class.
Furthermore, you can specify the default culture and UI culture settings at the page level in addition to the configuration in the web.config file demonstrated earlier.
Localizing Static Text
We have discussed how to use HTML controls with the attribute runat="server" for localization only.As they are processed on the server side, localizing properties of those controls is fairly easy. But what about static text and text directions?
Well, the answer is straightforward. Since the release of ASP.NET 2.0-and therefore in ASP.NET 3.5 as well-a control based on the well-known Literal control has been added to the controls library. This control is called Localize, and it just needs to be wrapped around the static text,as shown in the following code snippet:
<asp:Localize runat=server meta:resourcekey="LiteralResource1"> is some static text!</asp:Localize>
If this control is wrapped around some text, this text portion of the page is automatically included in the resource generation process like any other control. The big difference between the Literal control and the Localize control is the behavior of the designer. Although the content of the Literal control cannot be edited in the designer, text wrapped into a Localize control can be edited like any other text content of the page.
Text Directions
Finally, you need a way to specify the text direction in international applications, because some cultures read from left to right and others read from right to left.
You can use a couple of controls in ASP.NET, such as the Panel control and the WebPart control, to deal with this. Therefore, it makes sense to define a property in either the global resources or the local resources for the text direction and to use explicit localization expressions for setting the direction property of these controls. For setting this property directly in the root element of your HTML file, you must use the runat="server" attribute to the <html> tag itself, and then you can apply explicit localization expressions to it, as shown in the following code excerpt:
<html id="Html1" runat="server" dir='<%$ Resources:ValidationResources, TextDirection %>' xmlns="http://www.w3.org/1999/xhtml">
...
</html>
Dynamically Switching Locales
By default, ASP.NET leverages the user language's HTTP header for determining which language it should use for localizing the current page. But often website developers want to provide their users with the ability to select the language they want to work with from a list of available languages. That makes perfect sense when the user doesn't own the machine they are working with and therefore has no ability to change any regional settings on the machine or the browser. In such a situation, the user of course still wants to browse through your web application using the language of their choice.
Actually, ASP.NET provides you with a simple way to dynamically switch the language used for any localization-aware operation. The only thing you have to understand is that localization of the page itself and of some functionality provided by the base class library (such as DateTime.Parse() or DateTime.ToString()) are dependant on the Culture property as well as the UICulture property of the Page class. The only crucial task is setting those properties at the right point in the life cycle of the page. To make it as easy as possible, the System.Web.UI.Page base class allows you to override a method that is called by the infrastructure at the right time. This method is called InitializeCulture.All you have to do is set the Culture and UICulture properties of the Page class. These properties directly map to the CurrentCulture and CurrentUICulture properties on the Curreht Thread, which is a static property of the System.Threading.Thread class and returns an instance to the currently active thread. Therefore, it's clear that the Culture property of the page controls the behavior of culture-aware methods in classes (such as DateTime.Parse()), whereas the UICulture property affects the localization of the controls added to the page.
The following code example shows a page that consists of a title label as well as a DropDownList with the available languages and a button for switching the language. The default culture version of the corresponding resource file (Default.aspx.resx) is shown in Figure 1-15.
<%@ Page Language="C#" AutoEventWireup="true" CodeFile="Default.aspx.cs" Inherits="_Default"
Culture="auto" UICulture="auto" meta:resourcekey="PageResource1" %>
<html xmlns="http://www.w3.org/1999/xhtml">
<head id="Head1" runat="server">
<title>Testing Dynamic Localization</title>
</head>
<body>
<form id="form1" runat="server">
<div>
<h1>
<asp:Label runat="server" ID="TitleLabel" meta:resourcekey="TitleLabelResource1" />
</h1>
<asp:Label runat="server" ID="SelectionLegend" meta:resourcekey="SelectionLegendResource1" /><br />
<asp:DropDownList runat="server" ID="LanguageList" meta:resourcekey="LanguageListResource1"
Width="166px">
<asp:ListItem Text="German" Value="de-at" meta:resourcekey="ListItemResource1" />
<asp:ListItem Text="English" Value="en-us" meta:resourcekey="ListItemResource2" />
</asp:DropDownList>
<br />
<asp:Button runat="server" ID="SwitchCommand" meta:resourcekey="SwitchCommandResource1"
OnClick="SwitchCommand_Click" />
</div>
</form>
</body>
</html>

Figure 1-15. The Default.aspx.resx resource file for the preceding example
As you can see, all these controls have a resource key associated with them for localization. Notice that the Culture and UICulture properties are also set in the Page directive. The default value generated by the designer is auto. This means that the page gets the necessary information for localization from the user languages sent within the HTTP header. When the user clicks the button, the application should change locales according to the language selected in the LanguageList DropDownList control.
You can achieve this as follows:
public partial class _Default : System.Web.UI.Page
{
private const string LanguageSessionKey = "CurrentLanguage";
protected override void InitializeCulture()
{
base.InitializeCulture();
if (Session[_Default.LanguageSessionKey] != null)
{
// Set the current culture for the page
Page.UICulture = Session[_Default.LanguageSessionKey].ToString();
Page.Culture = Session[_Default.LanguageSessionKey].ToString();
}
}
protected void SwitchCommand_Click(object sender, EventArgs e)
{
if (LanguageList.SelectedIndex >= 0)
{
Session[_Default.LanguageSessionKey] = LanguageList.SelectedValue;
Response.Redirect(Request.Url.ToString());
}
}
}
In the code-beside file for the page, you need to override the InitializeCulture method, which is called by the infrastructure to initialize any information required for localization. First, the methodcalls the implementation of the base class. Second, the base implementation initializes the localization properties based on the settings of the Page directive of the ASP.NET page. Afterward, we verify in our overridden implementation whether a custom language setting has been added to the session state. If yes, we assign the language setting from the session state to the Page.Culture and Page.UICulture properties. The string contained in the session state must be a valid combination of a language code and a country code in the format [language code]-[country code]. Table 1-1 earlier in this chapter listed examples of valid combinations.
Custom Resource Providers
Localization is one area where the ASP.NET team did a really great job since version 2.0 of ASP.NET compared to ASP.NET 1.x. Localization is well integrated into the development environment, and the infrastructure is extremely flexible. But still that's not enough yet. One of the most frequently asked questions for localization is, "Can you store resources in a different location, such as a database?" This is especially appealing for large development teams-a central repository for localized resources makes perfect sense in such scenarios. Of course, in most large projects, special teams are doing the localization. In that case, it would be great if developers and designers could create their pages as usual and use Visual Studio 2005 as presented throughout this chapter to create localization resources. But instead of storing and retrieving these resources (especially the resource strings, which are used for translation) from .resx files, they should come from a central database.
Fortunately, ASP.NET is structured in an extremely flexible way. Nearly every part of the infrastructure is extensible (as you can see in Chapter 18 in the discussion of the VirtualPathProvider). And it's true for the localization engine of ASP.NET as well. As with many parts in ASP.NET, the resource and localization infrastructure consists of several layers, as shown in Figure 1-16.

Figure 1-16. The architecture of the resources and localization engine
You can extend the resources and localization engine at any level of this layered model (you have seen the top two levels so far). The lowest level-the resource provider layer-is responsible for reading and writing resources to and from a store of your choice. By default, the provider reads and writes information to and from .resx files that are either stored on the file system or compiled as embedded resources into the executables of your application. If you want to store resources in a different location or you want to provide a combination of .resx files and the store of your choice, this is the layer you have to use.
Implementing a ResourceProvider
Basically, you have to work with two sets of components when you want to customize the resource provider layer. One group of components is responsible for covering all the runtime parts of localization, such as retrieving and returning resources from your store; the other group of components integrates with Visual Studio 2005 for automatically generating resources based on the contents of web pages in your solution. Figure 1-17 shows the classes involved in creating a custom resource provider layer.
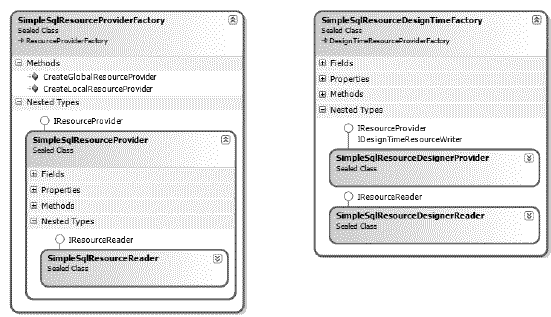
Figure 1-17. Necessary classes for implementing a custom resource provider layer
Let's look at the runtime layer before talking about design-time integration. The really hard work takes place in your ResourceProvider implementation-a class that implements the interface IResourceProvider of the System.Web.Compilation namespace. The ResourceProvider is managed by a ResourceProviderFactory implementation. You will take a closer look at ResourceProvider- Factory classes in the "Implementing the ResourceProviderFactory" section later in this chapter.
private sealed class SimpleSqlResourceProvider : IResourceProvider
{
object IResourceProvider.GetObject(string resourceKey, CultureInfo culture)
{
// ...
}
IResourceReader IResourceProvider.ResourceReader
{
get { /* ... */ }
}
}
Note that this class is marked with the private modifier, as the factory returns it just as IResource- Provider-the interface that this class implements. The class itself should never make its way outside the resource provider to keep any dependent parts independent of the concrete implementation and let dependencies exist at the level of the IResourceProvider interface only.
ASP.NET creates an instance of this class for each page (more exactly, for each virtual path) of your web application. This means that one instance of this class is responsible for managing all the resources of a single page. The interface IResourceProvider requires you to implement two methods. First, the GetObject method is called by ASP.NET whenever a localized resource is requested. It passes a unique key for the resource as well as the CultureInfo of the culture for which the object should be retrieved. The ResourceReader property returns an instance of an IResourceReader object, which allows ASP.NET to enumerate all available resource keys for the current page. This means that when localizing a page, ASP.NET first retrieves a set of available resources for this page by calling into the ResourceReader property. Afterward, it calls the GetObject method only for those controls with a meta:resourcekey attribute and with an entry in the previously retrieved IResourceReader instance.
Caution It is absolutely important that the ResourceReader property of your IResourceProvider implementation returns a complete list of the available resource keys for the page. Do not try to filter resources loaded in this property for the current culture or any similar operation. Unfortunately, the behavior of Visual Studio 2005 is strange when the list of resources returned by this method is incomplete.
As mentioned, ASP.NET creates an instance of the IResourceProvider implementation for every page in your web application. Of course, when storing resources in a database, you will require a connection string and some sort of helper class to read and write the information into a database. For the following example, suppose you have created a SimpleSqlResourceDatabaseHelper class with the following interface:
internal class SimpleSqlResourceDatabaseHelper
{
public SimpleSqlResourceDatabaseHelper(string connString)
{
// Create commands and connection objects
// ...
}
// Get resources returns a ListDictionary with the localized
// resource strings. ListDictionary is part of the namespace
// System.Collections.Specialized! So you need to import this namespace!
public ListDictionary GetResources(string cultureName, string virtualPath)
{
// Execute SELECT command and return results
}
public void AddResource(string virtualPath, string name,
string value, string cultureName)
{
// Execute UPDATE/INSERT commands
}
}
This class encapsulates all the ADO.NET and database access work for you. The AddResource method adds or updates resources in the database, and the GetResources method reads all the resources for a specific virtual path and culture. Because the implementation of this class is simple database logic and is really nothing special, we will skip it and continue discussing the resource provider implementations (for more information about ADO.NET, refer to Chapters 7 and 8). Now let's take a look at the IResourceProvider implementation for our example.
private sealed class SimpleSqlResourceProvider : IResourceProvider
{
private string _virtualPath;
private SimpleSqlResourceDatabaseHelper _db = null;
private ListDictionary _resCache = null;
internal SimpleSqlResourceProvider(string virtualPath, string connString)
{
_virtualPath = System.IO.Path.GetFileName(virtualPath);
_db = new SimpleSqlResourceDatabaseHelper(connString);
}
// ...
}
As you have seen earlier in this section, the IResourceProvider interface does not prescribe any method that supports a parameter for passing the virtual path of the web application the provider has been instantiated for. Therefore, your IResourceProvider implementation needs to provide a constructor where your own factory has the ability to pass the virtual directory path of the web application to the IResourceProvider implementation. Your implementation then needs to store the virtual path of the web application passed through the constructor in an instance variable to be able to find the appropriate resources for the web application in the underlying store. You will see this in the next code snippet after the following one.
So, in the constructor of your SimpleSqlResourceProvider class, you need to initialize the virtual path and create an instance of the previously mentioned database helper class. For simplicity in this example, you just work with the name of the page instead of the complete virtual path of the resource being localized. You will use the _resCache member in your implementation for caching the resources loaded from the database. For this purpose, you'll need to implement some helper methods. First you need a method for retrieving the resources from the store and adding them to your cache dictionary in your IResourceProvider implementation (which is SimpleSqlResource- Provider in our example):
private ListDictionary GetResources(string cultureName)
{
if (_resCache == null)
_resCache = new ListDictionary();
// Default culture will be added with key
// string.empty to the local cache
if (cultureName == null)
cultureName = string.Empty;
ListDictionary dict;
if (!_resCache.Contains(cultureName))
{
dict = _db.GetResources(cultureName, _virtualPath);
_resCache.Add(cultureName, dict);
}
else
{
dict = (ListDictionary)_resCache[cultureName];
}
return dict;
}
GetResources creates an instance of ListDictionary for your cache if this hasn't been done yet. The _resCache dictionary will contain a number of other ListDictionary instances. These will be the actual resource dictionaries containing the values for localization. Typically, the root cache (in this case, _resCache) will contain two resource dictionaries-one for the neutral culture and one for the currently selected culture. The method therefore then checks whether a dictionary for the requested culture exists in the cache. If it does, it just returns the existing dictionary from the cache. Otherwise, it reads the resources from the database using the SimpleSqlResourceDatabaseHelper created in the constructor, and then adds the retrieved dictionary to the local cache, and finally returns it. Now you can proceed with implementing the previously introduced GetObject method:
object IResourceProvider.GetObject(string resourceKey, CultureInfo culture)
{
// Retrieve the currently active culture
string cultureName = null;
if (culture == null)
{
CultureInfo currentUICulture = CultureInfo.CurrentUICulture;
if (currentUICulture != null)
{
cultureName = currentUICulture.Name;
}
}
else
{
cultureName = culture.Name;
}
// Now get the dictionary for the retrieved culture
ListDictionary dict = GetResources(cultureName);
// Return dictionary if it exists for the requested culture. Otherwise
// you just fall back on the dictionary for the neutral culture.
if (dict.Contains(resourceKey))
return dict[resourceKey];
else
{
dict = GetResources(null);
if (dict.Contains(resourceKey))
return dict[resourceKey];
}
// No dictionary found at all
return null;
}
Before the GetObject method retrieves the required resource dictionary, it tries to determine the current culture. If a culture has been passed into the method, it retrieves the dictionary for the culture passed in. Otherwise, it uses the CurrentUICulture property of the CultureInfo class to get the currently active culture (the current culture of the active thread). Then it retrieves the resource dictionary for the determined culture with the GetResources method introduced earlier. This dictionary contains the value for the requested resource key. If no resource dictionary exists for the requested culture, it retrieves the dictionary for the neutral culture and retrieves the value for the requested resource from there. Finally, just one property is missing in your ResourceProvider implementation- ResourceReader:
IResourceReader IResourceProvider.ResourceReader
{
get
{
return new SimpleSqlResourceReader(GetResources(null));
}
}
All you need to do here is return an instance of IResourceReader in the getter method of the property based on the default resources. But returning an IResourceReader requires you to implement one as well. As you can see, implementing an IResourceReader is fairly easy:
private sealed class SimpleSqlResourceReader : IResourceReader
{
private IDictionary _resources;
internal SimpleSqlResourceReader(IDictionary dict)
{
_resources = dict;
}
void IResourceReader.Close()
{
// Nothing to do...
}
IDictionaryEnumerator IResourceReader.GetEnumerator()
{
return _resources.GetEnumerator();
}
IEnumerator System.Collections.IEnumerable.GetEnumerator()
{
return _resources.GetEnumerator();
}
void IDisposable.Dispose()
{
// Nothing to do...
}
}
The resource reader just navigates through the available resources in a dictionary. Because you are already storing your resources in ListDictionary instances, which are IDictionary implementations, navigating through the contents is nothing more than returning an enumerator on the dictionary passed in. You can achieve that simply by calling the GetEnumerator() method of the dictionary as shown in the previous code snippet. Although this was the hard part of the work, you are not done yet. So far you have implemented a ResourceProvider class with all the necessary parts. But how will ASP.NET activate a ResourceProvider? How will ASP.NET know about your ResourceProvider at all? You can find the answer by taking a close look at ResourceProvider Factory classes.
Implementing the ResourceProviderFactory
A ResourceProviderFactory is responsible for creating instances of IResourceProvider implementations. As such, the factory is the entry point into your custom ResourceProvider. The factory is a simple class inherited from ResourceProviderFactory, which consists of two methods, as follows- please remember that this class actually contains the previously created IResourceProvider class as a nested class (in our case SimpleSqlResourceProvider):
public sealed class SimpleSqlResourceProviderFactory : ResourceProviderFactory
{
public override IResourceProvider CreateLocalResourceProvider(string virtualPath)
{
virtualPath = System.IO.Path.GetFileName(virtualPath);
return new SimpleSqlResourceProvider(virtualPath,ConfigurationManager.ConnectionStrings["ResDB"].ConnectionString);
}
public override IResourceProvider CreateGlobalResourceProvider(string className)
{
// Not implemented in this example
// The implementation would look fairly much the same as
// the one for local resources. The only difference is that this
// one would be used for global resources and therefore replacing
// content of App_GlobalResources while the local resource
// implementation replaces content of the App_LocalResources
return null;
}
private sealed class SimpleSqlResourceProvider : IResourceProvider
{
// ...
// Implementation of the IResourceProvider
// See previous code snippets
// ...
}
}
A ResourceProviderFactory needs to implement two methods: one for creating the global resource provider and one for creating local resource providers. Global resource providers are used for managing resources for all pages and parts of a web application. The default implementation for global resources stores localized objects in .resx files in the App_GlobalResources application folder. Local resources are managed on a per-page basis. For this example, you will implement local resources only (the concepts for implementing a global ResourceProvider are the same except that resources are not filtered by a virtual path but rather by a classKey that specifies the root name of a resource).
The CreateLocalResourceProvider method is called by ASP.NET when it starts localizing a page for the first time (instances of IResourceProvider classes are cached in the HttpApplication object). Therefore, all you have to do in this method implementation is create an instance of the previously implemented SimpleSqlResourceProvider class and return it. Finally, you need to register the ResourceProviderFactory in the application's web.config file as follows (assuming that all classes before were created in the Apress.Localization namespace):
<system.web>
<globalization resourceProviderFactoryType="Apress.Localization.SimpleSqlResourceProviderFactory" />
</system.web>
Now ASP.NET instantiates your SimpleSqlResourceProviderFactory class when it launches the application for the first time (the factory is cached in the HttpApplication as well). Every time a page launches for the first time and needs to be localized, it calls into the factory for creating a local ResourceProvider for this page. The ResourceProvider is then used for retrieving the resources for all controls with a meta:resourcekey attribute associated with them.
Caution Before you start testing your provider, you should continue with the implementation of the designtime support as shown in the next section ("Design-Time and Custom ResourceProviders") of this chapter. Without design-time support, you'd need to enter the resources manually into your database or your IResourceProvider would not work correctly, as it would not find any resources.
Design-Time and Custom ResourceProviders
The application is now ready to retrieve resources from a database. But you need to add resources somehow to this database as well-and of course you want to be able to do that directly from within Visual Studio. Your target should be supporting the developer directly from within Visual Studio through the well-known ways to add resources to this database. Fortunately, the resource provider infrastructure from ASP.NET supports you here as well. All you need to do is create a Resource- Provider and a ResourceProviderFactory for design-time support. The implementation of those classes is the same as implementing providers and factories for the runtime environment. In addition to implementing a ResourceProvider and a factory, you now need to implement an IDesign- TimeResourceWriter in your ResourceProvider implementation. An IDesignTimeResourceWriter implementation is responsible for writing resources back to the database (or data store of your choice). You will learn about this new interface later in this section when we talk about implementing the IResourceProvider for design-time support. But now let's get started with the provider factory class for design-time support. This one basically looks as follows:
public sealed class SimpleSqlResourceDesignTimeFactory : System.Web.UI.Design.DesignTimeResourceProviderFactory
{
private IServiceProvider _serviceProvider = null;
private SimpleSqlResourceDesignerProvider _localProvider = null;
private SimpleSqlResourceDesignerProvider LocalProvider
{
get
{
if (_localProvider == null)
{
_localProvider = new SimpleSqlResourceDesignerProvider(_serviceProvider);
}
return _localProvider;
}
}
public override IResourceProvider CreateDesignTimeGlobalResourceProvider(IServiceProvider serviceProvider, string classKey)
{
return null;
}
public override IResourceProvider CreateDesignTimeLocalResourceProvider(IServiceProvider serviceProvider)
{
_serviceProvider = serviceProvider;
return LocalProvider;
}
public override IDesignTimeResourceWriter
CreateDesignTimeLocalResourceWriter(IServiceProvider serviceProvider)
{
_serviceProvider = serviceProvider;
return LocalProvider;
}
private sealed class SimpleSqlResourceDesignerProvider : IResourceProvider, IDesignTimeResourceWriter
{
// ...
// Implementation of the local provider and resource writer
}
}
A DesignTimeResourceProviderFactory needs to support more factory methods than the ResourceProviderFactory for the runtime environment. In addition to factory methods for creating global and local resource providers, it needs to support a factory method for creating a Resource- Writer for local resources. The ResourceWriter is responsible for adding resources to the database as well as generating unique keys for these resources. In any case, these factory methods are getting a reference to the development environment as a parameter. This reference to the development environment is established through IServiceProvider instances. You can think of an IServiceProvider asbeing a callback interface into Visual Studio. If you need to read configuration settings from your web.config file or contents from pages, project settings, and so on, you can do that through the methods and properties of the passed-in serviceProvider parameter.
Implementing a Design-Time Provider
The implementation of the actual ResourceProvider is fairly similar to the implementation of the runtime version. In the previous example, the class implementing the IResourceProvider implements a second interface-IDesignTimeResourceWriter-as well. This interface requires you to implement a number of methods for generating keys for new resources, adding new resources to
your resource dictionary, and flushing those resources back to the database.
private sealed class SimpleSqlResourceDesignerProvider : IResourceProvider, IDesignTimeResourceWriter
{
public SimpleSqlResourceDesignerProvider(IServiceProvider provider)
{
_provider = provider;
_db = new SimpleSqlResourceDatabaseHelper(...);
}
object IResourceProvider.GetObject(string resourceKey, CultureInfo culture)
{
// Retrieve resource dictionary as with GetObject
// similar to the SimpleSqlResourceProvider class introduced earlier
}
IResourceReader IResourceProvider.ResourceReader
{
get
{
// Get the resource dictionary as in
// the SimpleSqlResourceProvider class introduced earlier
}
}
string IDesignTimeResourceWriter.CreateResourceKey(string resourceName, object obj)
{
// Generates a new key for a resource
// Key can be any string you want but must be unique
}
void IResourceWriter.AddResource(string name, byte[] value)
{
// Adds a byte[] array resource to dictionary
}
void IResourceWriter.AddResource(string name, object value)
{
// Adds an object (serializable) to dictionary
}
void IResourceWriter.AddResource(string name, string value)
{
// Adds a string resource to dictionary
}
void IResourceWriter.Close()
{
// Closes connections if necessary
}
void IResourceWriter.Generate()
{
// Walks through the resource dictionary and
// stores every entry in the database
}
void IDisposable.Dispose()
{
// Close anything you have used
}
}
During construction, you just need to hold a reference to the IServiceProvider passed into the constructor and create an instance of the database helper class used earlier in this example. The interesting part when creating an instance of your database class is that you need to initialize the connection string for the database appropriately. But as you are in design mode with this class, you cannot simply access the configuration file as usual. You need to go through the IServiceProvider as
follows:
private IServiceProvider _provider;
private SimpleSqlResourceDatabaseHelper _db;
private ListDictionary _resCache = null;
public SimpleSqlResourceDesignerProvider(IServiceProvider provider)
{
_provider = provider;
_db = new SimpleSqlResourceDatabaseHelper(CreateConnectionString(provider));
}
private const string DatabaseLocationKey = "ResDB";
private string CreateConnectionString(IServiceProvider serviceProvider)
{
if (serviceProvider == null)
{
return
System.Configuration.ConfigurationManager.AppSettings[DatabaseLocationKey];
}
else
{
IWebApplication webApp =(IWebApplication)serviceProvider.GetService(typeof(IWebApplication));
return webApp.OpenWebConfiguration(true).ConnectionStrings.ConnectionStrings[DatabaseLocationKey].ConnectionString;
}
}
As you know you are developing a web application and therefore working with a website project, you just need to ask the IServiceProvider for an IWebApplication service hosted by the Visual Studio 2005 IDE. This service provides you with access to anything specific to web application projects in Visual Studio (such as project properties, files in the project, and currently opened designers) and therefore allows you to open the web configuration for retrieving the connection string to the database from there through OpenWebConfiguration.
As you can see, your SimpleSqlResourceDesignerProvider class also holds a ListDictionary called _resCache, similar to the implementation you created before. This dictionary caches all the different resource dictionaries for the different cultures of the page being processed. The GetObject and ResourceReader implementations are similar to the implementations you saw in the SimpleSql- ResourceProvider class earlier, except they work with the default culture all the time.
object IResourceProvider.GetObject(string resourceKey,CultureInfo culture)
{
// Always use the default culture
string cultureName = string.Empty;
// Get the resource object
ListDictionary dict = GetResources(cultureName);
if (dict.Contains(resourceKey))
return dict[resourceKey];
else
{
dict = GetResources(null);
if (dict.Contains(resourceKey))
return dict[resourceKey];
}
return null;
}
IResourceReader IResourceProvider.ResourceReader
{
get
{
return new SimpleSqlResourceDesignerReader(GetResources(null));
}
}
But when thinking about retrieving resources for a page, you finally need to know about the virtual path in which you are working. Remember the implementation of the GetResources method used by the GetObject method and the ResourceReader property previously. In your previous implementation for the runtime environment (SimpleSqlResourceProvider), you use the virtualPath member variable of the class for retrieving the resources for the currently active page.This is similar in the design-time provider implementation, as you can see in the following code snippet. The IResourceReader implementation used in the ResourceReader property is the same as the SimpleSqlResourceReader implementation introduced earlier.
private ListDictionary GetResources(string cultureName)
{
if (_resCache == null)
_resCache = new ListDictionary();
if (cultureName == null)
cultureName = string.Empty;
ListDictionary dict;
if (!_resCache.Contains(cultureName))
{
dict = _db.GetResources(cultureName,
GetVirtualPath(_provider));
_resCache.Add(cultureName, dict);
}
else
{
dict = (ListDictionary)_resCache[cultureName];
}
return dict;
}
To retrieve the right resources for the current page from the database, you need the virtual path (at least the name of the page in this example). In the design-time environment, you need to follow a different approach for getting the name of the currently active page. The implementation of the GetVirtualPath method used previously demonstrates this.
private string GetVirtualPath(IServiceProvider provider)
{
System.ComponentModel.Design.IDesignerHost host =(IDesignerHost)provider.GetService(typeof(IDesignerHost));
WebFormsRootDesigner rootDesigner =host.GetDesigner(host.RootComponent) as WebFormsRootDesigner;
return System.IO.Path.GetFileName(rootDesigner.DocumentUrl);
}
Once again, the IServiceProvider is the answer for this secret. It gives you access to the designer service (called IDesignerHost). Through the designer service, you can access the currently active designer opened in Visual Studio. When it comes to page localization, this is always a web form designer. Through the web form designer, you then have access to the complete name of the file currently opened in the designer. Of course, this allows you to retrieve the name of the page currently o pen to get the appropriate resources from the database and write them back to the database appropriately.
The remaining implementation is fairly easy. It is all about adding resources to your cached dictionary (the _resCache member variable in your class) and writing the cached resources back to the database as follows:
string IDesignTimeResourceWriter.CreateResourceKey(string resourceName, object obj)
{
// Now add a dictionary for the specified object
// But also generate a key that is not used already
int counter = 1;
string objTypeName = obj.GetType().Name;
string keyBaseName = objTypeName + "Resource" + resourceName;
counter = GetNextKeyIndex(keyBaseName, counter);
return string.Format("{0}{1}", keyBaseName, counter);
}
void IResourceWriter.AddResource(string name, byte[] value)
{
if (Resources.Contains(name))
Resources[name] = value;
else
Resources.Add(name, value);
}
void IResourceWriter.AddResource(string name, object value)
{
if (Resources.Contains(name))
Resources[name] = value;
else
Resources.Add(name, value);
}
void IResourceWriter.AddResource(string name, string value)
{
if (Resources.Contains(name))
Resources[name] = value;
else
Resources.Add(name, value);
}
void IResourceWriter.Close()
{
// Closes connections if necessary
}
void IResourceWriter.Generate()
{
// Get the current virtual path
string vPath = GetVirtualPath(_provider);
// Writes back to the database
foreach (object k in Resources.Keys)
{
// For simplicity, we have just strings
// in our simple sample implementation
_db.AddResource(vPath, k.ToString(),
Resources[k].ToString(), null);
}
}
The methods you see in the previous code are called by Visual Studio mainly when you select the Generate Local Resource menu item in the Tools menu. For every localizable property of each control on the page, Visual Studio first calls the CreateResourceKey method for generating a unique key used in the meta:resourcekey attribute as well as in the database to identify the resource. Afterward,it calls one of the AddResource methods (depending on the type of the property), passing in the previously generated key for adding the resource to the resource dictionary. Finally, when Visual Studio goes through all controls and localizable properties, it calls the Generate method of the resource writer to write the resource entries back to the database. The previous implementation again uses the previously introduced helper class SimpleSqlResourceDatabaseHelper to add the entries to the database. The resources dictionary is accessed through a Resources property of the class for convenience. The actual key generation happens in the GetNextKeyIndex method called by CreateResourceKey. You can see the missing bits of the code in the following snippet:
private int GetNextKeyIndex(string key, int counter)
{
// Go through the existing items and verify whether the key is used
foreach (string k in Resources.Keys)
{
if (k.IndexOf(string.Format("{0}{1}", key, counter)) >= 0)
{
counter = GetNextKeyIndex(key, counter + 1);
}
}
return counter;
}
private ListDictionary _Resources = null;
private ListDictionary Resources
{
get
{
if (_Resources == null)
{
_Resources = _db.GetResources("none",
GetVirtualPath(_provider));
if (_Resources == null)
_Resources = new ListDictionary();
}
return _Resources;
}
}
The GetNextKeyIndex method simply walks through all the resource entries in the dictionary to verify whether the selected key name is already used. If it is used, it increments a counter to modify the postfix of the name for the key and then walks through the list of existing resources again to verify whether this one is used. The Resources property is just used for convenient access to the cultureneutral resources of the currently selected page. It verifies whether these resources are already instantiated. If not, it retrieves the resources for the current virtual path through the GetResources method, which you saw earlier in this chapter.
Registering the Design-Time Provider
Finally, you need a way to tell Visual Studio about the new design-time provider you have just created. This time, you will not make an entry in the web.config file. Typically, a design-time resource provider is tightly coupled to its runtime opposite. Therefore, the bridge between these two worlds is built through an attribute applied on the ResourceProviderFactory used at runtime. This attribute tells Visual Studio about the DesignTimeResourceProviderFactory.
[
DesignTimeResourceProviderFactoryAttribute
(
typeof(SimpleSqlResourceDesignTimeFactory)
)
]
public sealed class SimpleSqlResourceProviderFactory : ResourceProviderFactory
{
// ...
}
With this attribute in place and registering the ResourceProviderFactory in web.config, Visual Studio knows that there is also a ResourceProviderFactory for design time in place. Therefore, it uses the ResourceDesignTimeFactory to instantiate the resource provider and resource writer classes implemented in the previous two sections for reading resources, adding new resources, and writing those resources back to the store. Now, with the runtime and the design-time providers in place, you have a complete round-tripping for resources. Developers can create their pages as usual and select Generate Local Resources from the Tools menu as they are used to doing. This creates the new resource entries in a central database so all the other developers in the team have access to them. Furthermore, a separate team responsible for the translation could have access to this database (for example, with a simple, web-based front-end) to translate and update the resources for all the locales necessary. Every member of the team of course will automatically get any changes and updates of translated resources because a central database can be used with custom resource providers.
Note Having resources stored in a central database is definitely interesting and useful. But for highperformance environments, we still recommend storing any resources in compiled satellite assemblies for the solution because accessing embedded resources is much faster than accessing databases. An interesting approach would be to use a database during the development and have the custom build steps in place, which are reading the resources from the database for compiling them as embedded resources into assemblies for release builds.
Summary
In this chapter, you learned the fundamentals of creating international web applications with ASP.NET. First, you learned how .NET manages resources for applications and how you can access those resources programmatically. Furthermore, you saw that resources are not only useful for localization but also for other things, such as embedded default templates for reports (these can act as a fallback solution if no templates exist in other directories), additional setup scripts, and XML fragments used by your application.
Second, you learned about how the CLR manages culture-specific resources. The CLR selects embedded resources based on the CultureInfo set on the Thread.CurrentUICulture property. It includes a fallback mechanism (often referenced as hub and spoke) for locating resources by searching from the closest matching culture resources to the more general culture resources in a defined hierarchy of cultures. If it cannot find a matching culture, it uses the application's default culture for localization.
Next, you learned how ASP.NET and Visual Studio support you with localizing web applications through local page resources as well as shared application resources. You learned how to access these resources programmatically as well as declaratively through implicit and explicit localization expressions. And you learned how you can switch locales dynamically at runtime so that you can give the user their choice of language.
Finally, you learned how the extensible infrastructure of ASP.NET available since version 2.0 allows you to create custom resource providers, including customizing the design-time experience.
Book Details