A servlet can fetch the value of a form field using the getParameter() method of the servlet request. The HTML form can submit a value of the form fields by using url pattern of the servlet into the action attribute of the form tag. If the method attribute contains Get as its value and destination servlet is a sub-class of the Http servlet then doGet() method gets invoked. If the method attribute contains post as its value and destination servlet is a sub-class of http servlet then doPost() method of the servlet gets invoked. If the destination servlet is a sub-class of Generic servlet then the service() method gets invoked without depending upon value of method attribute. The getParameter() method of request accepts name of the form field as its arguments and returns value of the form fields as a string. If the specified form field does not exist in the request then the getParameter() method returns Null. If the form exists in a servlet and it requires submission of the form into the current servlet then the action attribute does not need to be used in the form tag.
Example
A servlet to receive two numbers and display the addition.
import javax.servlet.*;
import javax.servlet.http.*;
import java.io.*;
public class number extends HttpServlet
{
public void doGet(HttpServletRequest req,HttpServletResponse res)throws IOException,ServletException
{
String s1=req.getParameter("t1");
String s2=req.getParameter("t2");
PrintWriter out=res.getWriter();
out.println("<html><body>");
if(s1 ==null)
{
out.println("<form>");
out.println("<h1>Enter No1<input type='text' name='t1'></h1>");
out.println("<input type='submit' value='submit'>");
out.println("</form>");
}
else if(s2 ==null)
{
out.println("<form>");
out.println("<h1>Enter No2<input type='text' name='t2'></h1>");
out.println("<input type='hidden' name='t1' value='"+s1+"'>");
out.println("<input type='submit' value='submit'>");
out.println("<form>");
}
else
{
int x=Integer.parseInt(s1);
int y=Integer.parseInt(s2);
out.println("<h1>Result is "+(x+y)+"</h1>");
}
out.println("</body></html>");
}
}
Storing and Compiling
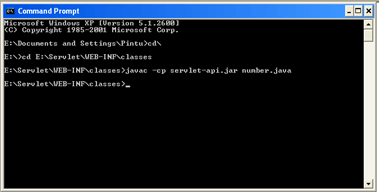
Store the file inside class folder of the context (E:\Servlet\WEB-INF\classes).
Compile the file as below:
javac -cp servlet-api.jar number.java (for tomcat 6.0)
Setting in web.xml file
Note: - Note the Highlighted or bold portion in the below web.xml file, to be added.
<?xml version="1.0" encoding="ISO-8859-1" ?>
- <!--
Licensed to the Apache Software Foundation (ASF) under one or more
contributor license agreements. See the NOTICE file distributed with
this work for additional information regarding copyright ownership.
The ASF licenses this file to You under the Apache License, Version 2.0
(the "License"); you may not use this file except in compliance with
the License. You may obtain a copy of the License at
http://www.apache.org/licenses/LICENSE-2.0
Unless required by applicable law or agreed to in writing, software
distributed under the License is distributed on an "AS IS" BASIS,
WITHOUT WARRANTIES OR CONDITIONS OF ANY KIND, either express or implied.
See the License for the specific language governing permissions and
limitations under the License.
-->
--<web-appxmlns=http://java.sun.com/xml/ns/javaee
xmlns:xsi=http://www.w3.org/2001/XMLSchema-instance
xsi:schemaLocation="http://java.sun.com/xml/ns/javaee
http://java.sun.com/xml/ns/javaee/web-app_2_5.xsd" version="2.5">
<servlet>
<servlet-name>number</servlet-name>
<servlet-class>number</servlet-class>
</servlet>
<servlet-mapping>
<servlet-name>number</servlet-name>
<url-pattern>/number</url-pattern>
</servlet-mapping>
</web-app>
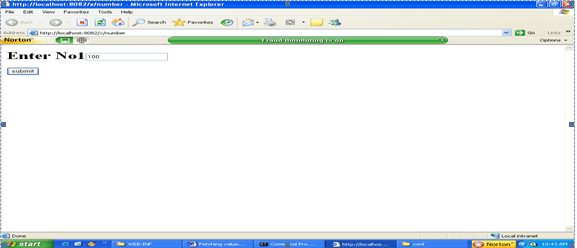
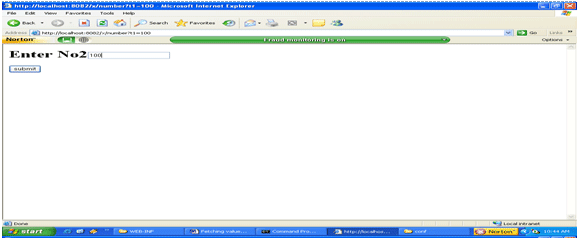
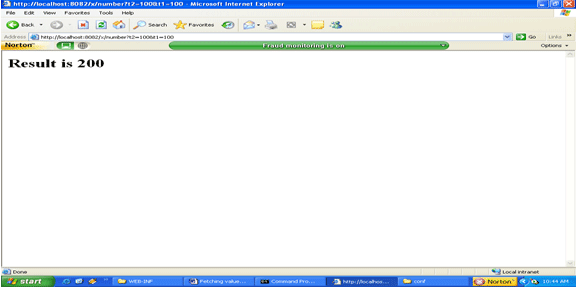
Running it in web browser
First start the Apache tomcat 6.0, which is a web server. Then type the below URL.
http://localhost:8082/x/number
Here x is the context path location, which we have to give in the server.xml file, which is present inside Tomcat installation directory (E:\Program Files\Apache Software Foundation\Tomcat 6.0\conf)
Server.xml settings
Note: - In the below server.xml file we have to specify the context path as below.
<Context path="/x" docBase="E:\Servlet" reloadable="true" debug="0" />
server.xml file
<?xml version='1.0' encoding='utf-8'?>
<!--
Licensed to the Apache Software Foundation (ASF) under one or more
contributor license agreements. See the NOTICE file distributed with
this work for additional information regarding copyright ownership.
The ASF licenses this file to You under the Apache License, Version 2.0
(the "License"); you may not use this file except in compliance with
the License. You may obtain a copy of the License at
http://www.apache.org/licenses/LICENSE-2.0
Unless required by applicable law or agreed to in writing, software
distributed under the License is distributed on an "AS IS" BASIS,
WITHOUT WARRANTIES OR CONDITIONS OF ANY KIND, either express or implied.
See the License for the specific language governing permissions and
limitations under the License.
-->
<!-- Note: A "Server" is not itself a "Container", so you may not
define subcomponents such as "Valves" at this level.
Documentation at /docs/config/server.html
-->
<Server port="8005" shutdown="SHUTDOWN">
<!--APR library loader. Documentation at /docs/apr.html -->
<Listener className="org.apache.catalina.core.AprLifecycleListener" SSLEngine="on" />
<!--Initialize Jasper prior to webapps are loaded. Documentation at /docs/jasper-howto.html -->
<Listener className="org.apache.catalina.core.JasperListener" />
<!-- JMX Support for the Tomcat server. Documentation at /docs/non-existent.html -->
<Listener className="org.apache.catalina.mbeans.ServerLifecycleListener" />
<Listener className="org.apache.catalina.mbeans.GlobalResourcesLifecycleListener" />
<!-- Global JNDI resources
Documentation at /docs/jndi-resources-howto.html
-->
<GlobalNamingResources>
<!-- Editable user database that can also be used by
UserDatabaseRealm to authenticate users
-->
<Resource name="UserDatabase" auth="Container"
type="org.apache.catalina.UserDatabase"
description="User database that can be updated and saved"
factory="org.apache.catalina.users.MemoryUserDatabaseFactory"
pathname="conf/tomcat-users.xml" />
</GlobalNamingResources>
<!-- A "Service" is a collection of one or more "Connectors" that share
a single "Container" Note: A "Service" is not itself a "Container",
so you may not define subcomponents such as "Valves" at this level.
Documentation at /docs/config/service.html
-->
<Service name="Catalina">
<!--The connectors can use a shared executor, you can define one or more named thread pools-->
<!--
<Executor name="tomcatThreadPool" namePrefix="catalina-exec-"
maxThreads="150" minSpareThreads="4"/>
-->
<!-- A "Connector" represents an endpoint by which requests are received
and responses are returned. Documentation at :
Java HTTP Connector: /docs/config/http.html (blocking & non-blocking)
Java AJP Connector: /docs/config/ajp.html
APR (HTTP/AJP) Connector: /docs/apr.html
Define a non-SSL HTTP/1.1 Connector on port 8080
-->
<Connector port="8082" protocol="HTTP/1.1"
connectionTimeout="20000"
redirectPort="8443" />
<!-- A "Connector" using the shared thread pool-->
<!--
<Connector executor="tomcatThreadPool"
port="8080" protocol="HTTP/1.1"
connectionTimeout="20000"
redirectPort="8443" />
-->
<!-- Define a SSL HTTP/1.1 Connector on port 8443
This connector uses the JSSE configuration, when using APR, the
connector should be using the OpenSSL style configuration
described in the APR documentation -->
<!--
<Connector port="8443" protocol="HTTP/1.1" SSLEnabled="true"
maxThreads="150" scheme="https" secure="true"
clientAuth="false" sslProtocol="TLS" />
-->
<!-- Define an AJP 1.3 Connector on port 8009 -->
<Connector port="8009" protocol="AJP/1.3" redirectPort="8443" />
<!-- An Engine represents the entry point (within Catalina) that processes
every request. The Engine implementation for Tomcat stand alone
analyzes the HTTP headers included with the request, and passes them
on to the appropriate Host (virtual host).
Documentation at /docs/config/engine.html -->
<!-- You should set jvmRoute to support load-balancing via AJP ie :
<Engine name="Standalone" defaultHost="localhost" jvmRoute="jvm1">
-->
<Engine name="Catalina" defaultHost="localhost">
<!--For clustering, please take a look at documentation at:
/docs/cluster-howto.html (simple how to)
/docs/config/cluster.html (reference documentation) -->
<!--
<Cluster className="org.apache.catalina.ha.tcp.SimpleTcpCluster"/>
-->
<!-- The request dumper valve dumps useful debugging information about
the request and response data received and sent by Tomcat.
Documentation at: /docs/config/valve.html -->
<!--
<Valve className="org.apache.catalina.valves.RequestDumperValve"/>
-->
<!-- This Realm uses the UserDatabase configured in the global JNDI
resources under the key "UserDatabase". Any edits
that are performed against this UserDatabase are immediately
available for use by the Realm. -->
<Realm className="org.apache.catalina.realm.UserDatabaseRealm"
resourceName="UserDatabase"/>
<!-- Define the default virtual host
Note: XML Schema validation will not work with Xerces 2.2.
-->
<Host name="localhost" appBase="webapps"
unpackWARs="true" autoDeploy="true"
xmlValidation="false" xmlNamespaceAware="false">
<!-- SingleSignOn valve, share authentication between web applications
Documentation at: /docs/config/valve.html -->
<!--
<Valve className="org.apache.catalina.authenticator.SingleSignOn" />
-->
<!-- Access log processes all example.
Documentation at: /docs/config/valve.html -->
<!--
<Valve className="org.apache.catalina.valves.AccessLogValve" directory="logs"
prefix="localhost_access_log." suffix=".txt" pattern="common" resolveHosts="false"/>
-->
<Context path="/x" docBase="E:\Servlet" reloadable="true" debug="0" />
</Host>
</Engine>
</Service>
</Server>
Output
Thanks for reading and please be kind enough to give the feedback.