

Introduction
In this article, we are performing a CRUD operation in a C# Windows Form application using a store procedure. We create a store procedure with different types of operations, Then we call the store procedure in a Windows form application button. I hope you enjoy this article.
Step 1. Open Visual Studio. Here I am using Visual Studio 2019 and SQL Server Management Studio 2018.
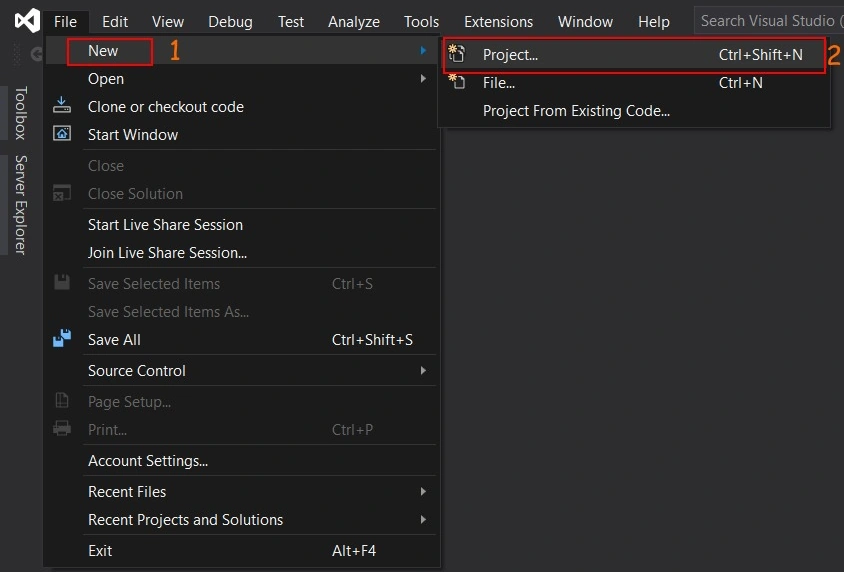
Step 2. Click on the File menu then hover on the new option. Then click on Project, or you can use the shortcut key Ctrl + Shift +N.
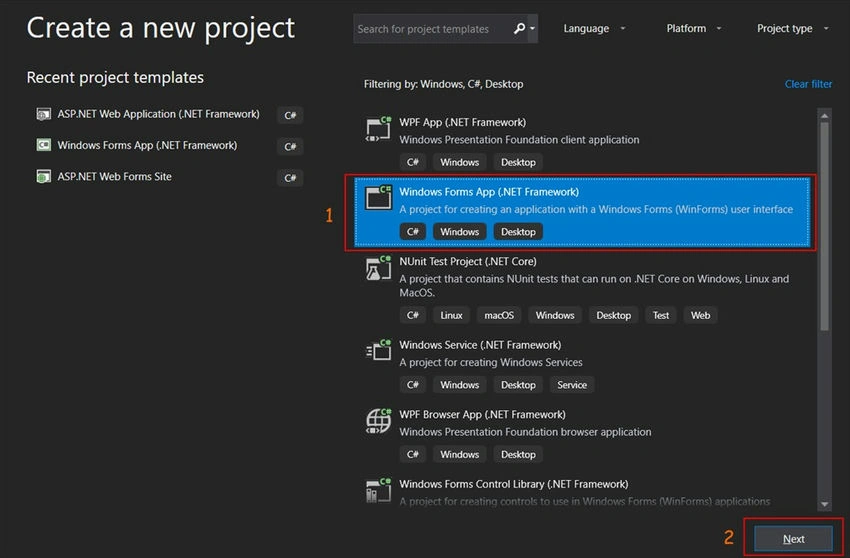
Step 3. Select the Windows Form application and click on the Next button. If you cannot find the Windows Form application, you can use the search box or filter dropdowns.
Step 4. On the next screen, you need to enter the following details and click on the Create button.
- Project Name: Your project name which is also your solution name.
- Location: Select the file location where you want to save your project.
- Framework: Select the .NET Framework version that you want to use. I prefer to use the latest version.

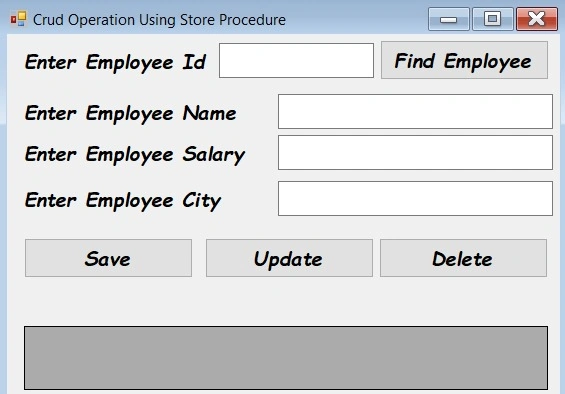
Step 5. Now your project is created. Now you can see the designer page of your form. Create a design as per your requirements. Here I create the following simple design for a CRUD operation.
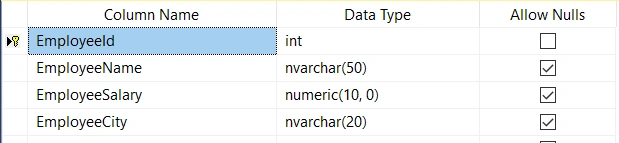
Step 6. Now open your SQL Server Management Studio and create a table as per your requirements. Here I created a table with the following fields. If you don’t want to use SQL Server Management Studio, you can also use Visual Studio Server Explorer by adding a new database to your project.
Step 7. Now your table is ready and we can create the store procedure for this CRUD operation. Following is the store procedure code.
USE [Tutorials]
GO

/****** Object:  StoredProcedure [dbo].[EmployeeCrudOperation]    Script Date: 11/14/2020 6:02:30 PM ******/
SET ANSI_NULLS ON
GO

SET QUOTED_IDENTIFIER ON
GO

-- =============================================
-- Author:       <Yogeshkumar Hadiya>
-- Description:  <Perform CRUD operation on employee table>
-- =============================================
ALTER PROCEDURE [dbo].[EmployeeCrudOperation]
    -- Add the parameters for the stored procedure here
    @Employeeid int,
    @EmployeeName nvarchar(50),
    @EmployeeSalary numeric(18,2),
    @EmployeeCity nvarchar(20),
    @OperationType int
    --================================================
    -- Operation types
    -- 1) Insert
    -- 2) Update
    -- 3) Delete
    -- 4) Select Particular Record
    -- 5) Select All
AS
BEGIN
    -- SET NOCOUNT ON added to prevent extra result sets from
    -- interfering with SELECT statements.
    SET NOCOUNT ON;

    -- Select operation
    IF @OperationType = 1
    BEGIN
        INSERT INTO Employee VALUES (@EmployeeName, @EmployeeSalary, @EmployeeCity)
    END
    ELSE IF @OperationType = 2
    BEGIN
        UPDATE Employee
        SET EmployeeName = @EmployeeName,
            EmployeeSalary = @EmployeeSalary,
            EmployeeCity = @EmployeeCity
        WHERE EmployeeId = @Employeeid
    END
    ELSE IF @OperationType = 3
    BEGIN
        DELETE FROM Employee WHERE EmployeeId = @Employeeid
    END
    ELSE IF @OperationType = 4
    BEGIN
        SELECT * FROM Employee WHERE EmployeeId = @Employeeid
    END
    ELSE
    BEGIN
        SELECT * FROM Employee
    END
END
Code Explanation
- First of all, here I declare the five following parameters which we will pass from the C# code.
- Employee ID: Employee ID will be used to select an employee, delete an employee, and update the employee record.
- Employee Name: Employee name will be passed in the employee name column in the employee table.
- Employee City: Employee City will be passed in the employee city column in the employee table.
- Employee Salary: Employee Salary will be passed in the employee salary column in the employee table.
- Operation Type: Operation Type defines the type of operation that we want to perform. We will use 1 for Insert, 2 For Update, 3 For Delete, 4 for Select single record, and 5 for Select all records.
- Then we divide the code by an if-else condition and perform the task as per the operation type parameter
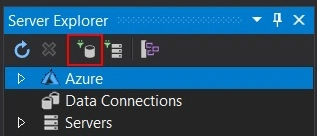
Step 8. Now back to Visual Studio. Open Server Explorer and click on the add database button. If you created a database in the project, then right-click on the database name and click on modify.
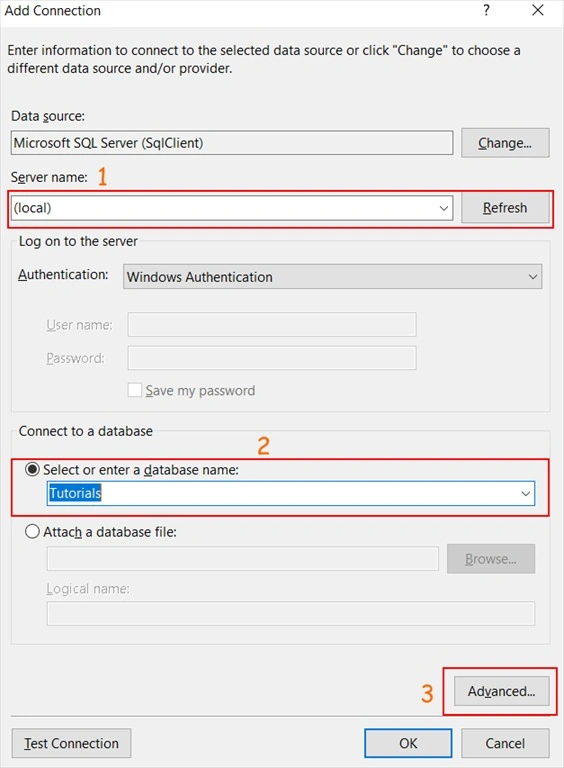
Step 9. Enter the Server name, here I used the local server so I just entered local and clicked on refresh. Select the database that you want to use and click on the advance button.
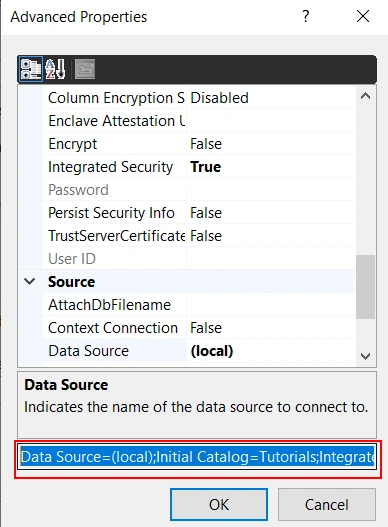
Step 10. Now you will see a new popup window, select the connection string code. Close all pop-ups.
Step 11. Now double-click anywhere in your form to generate a Form_Load event, or you can generate it by going to the property window and clicking on the event icon (thunder icon) and selecting Form_Load event. Replace the following code with your event code and also import System.Data.SqlClient namespace. Here, I disable the update and delete buttons on a load we will enable those buttons when the user gets a single employee record by clicking on the find employee button.
SqlConnection cn;
SqlCommand cmd;
SqlDataAdapter da;
SqlDataReader dr;

private void Form1_Load(object sender, EventArgs e)
{
    cn = new SqlConnection(@"Data Source=(local);Initial Catalog=Tutorials;Integrated Security=True");
    cn.Open();

    // Bind data in DataGridView
    GetAllEmployeeRecord();

    // Disable delete and update buttons on load
    btnUpdate.Enabled = false;
    btnDelete.Enabled = false;
}
Step 12. Now we create a method to get all data from the table and set it in data grid view. We will use this code many times, so we create a simple method for this. Following is the code to get all records from the table and set it in the data grid view.
private void GetAllEmployeeRecord()
{
    cmd = new SqlCommand("EmployeeCrudOperation", cn);
    cmd.CommandType = CommandType.StoredProcedure;
    cmd.Parameters.AddWithValue("@Employeeid", 0);
    cmd.Parameters.AddWithValue("@EmployeeName", "");
    cmd.Parameters.AddWithValue("@EmployeeSalary", 0);
    cmd.Parameters.AddWithValue("@EmployeeCity", "");
    cmd.Parameters.AddWithValue("@OperationType", "5");
    da = new SqlDataAdapter(cmd);
    DataTable dt = new DataTable();
    da.Fill(dt);
    dataGridView1.DataSource = dt;
}
Code Explanation
- First, we pass our Store Procedure name and Connection object in the SqlCommand object which we defined at the top of the page.
- Define command type as Store Procedure
- Pass all parameters with null and zero values and pass 5 (five) which is the Operation type to get all records from the Store procedure.
- Initialize Command object to DataAdapter object
- Create a new DataTable object and pass the value from the data adapter object to the data table object by the fill method.
- Set the data table object to the data grid view.
Step 13. Now generate a method for saving by double-clicking on a save button and add the following code in the save button click event.
private void Btnsave_Click(object sender, EventArgs e)
{
    if (txtempcity.Text != string.Empty && txtempname.Text != string.Empty && txtempsalary.Text != string.Empty)
    {
        cmd = new SqlCommand("EmployeeCrudOperation", cn);
        cmd.CommandType = CommandType.StoredProcedure;
        cmd.Parameters.AddWithValue("@Employeeid", 0);
        cmd.Parameters.AddWithValue("@EmployeeName", txtempname.Text);
        cmd.Parameters.AddWithValue("@EmployeeSalary", txtempsalary.Text);
        cmd.Parameters.AddWithValue("@EmployeeCity", txtempcity.Text);
        cmd.Parameters.AddWithValue("@OperationType", "1");
        cmd.ExecuteNonQuery();
        MessageBox.Show("Record inserted successfully.", "Record Inserted", MessageBoxButtons.OK, MessageBoxIcon.Information);
        GetAllEmployeeRecord();
        txtempcity.Text = "";
        txtempid.Text = "";
        txtempname.Text = "";
        txtempsalary.Text = "";
    }
    else
    {
        MessageBox.Show("Please enter value in all fields", "Invalid Data", MessageBoxButtons.OK, MessageBoxIcon.Information);
    }
}
Code Explanation
- First, we check that a user entered a value in all fields if not then show the message or else proceed.
- The same as the get all record method pass parameter in store procedure but here we use the ExecuteNonQuery method for insert into the table.
- Then show a success message, and next, a call function that we generated to get all data from the table and clear all text boxes.
Output

Step 14. Now generate a click event on the find employee button to get a single employee record by passing its ID and show data in another textbox. Add the following code in the find button event.
private void Btnfind_Click(object sender, EventArgs e)
{
    if (txtempid.Text != string.Empty)
    {
        cmd = new SqlCommand("EmployeeCrudOperation", cn);
        cmd.CommandType = CommandType.StoredProcedure;
        cmd.Parameters.AddWithValue("@Employeeid", txtempid.Text);
        cmd.Parameters.AddWithValue("@EmployeeName", "");
        cmd.Parameters.AddWithValue("@EmployeeSalary", 0);
        cmd.Parameters.AddWithValue("@EmployeeCity", "");
        cmd.Parameters.AddWithValue("@OperationType", "4");
        dr = cmd.ExecuteReader();
        if (dr.Read())
        {
            txtempname.Text = dr["EmployeeName"].ToString();
            txtempsalary.Text = dr["EmployeeSalary"].ToString();
            txtempcity.Text = dr["EmployeeCity"].ToString();
            btnUpdate.Enabled = true;
            btnDelete.Enabled = true;
        }
        else
        {
            MessageBox.Show("No record found with this id", "No Data Found", MessageBoxButtons.OK, MessageBoxIcon.Information);
        }
        dr.Close();
    }
    else
    {
        MessageBox.Show("Please enter employee id", "Error", MessageBoxButtons.OK, MessageBoxIcon.Error);
    }
}
Code Explanation
- First of all, check that the user entered an employee ID
- Then pass the employee ID and operation type parameter. All other parameters are null or zero
- Then we call the ExecuteReader method of SQL Command and initialize data into SQL Data Reader object
- Then we check if the data reader has data by the read() method
- If the data reader has data then put that data in the textbox and enable the delete and update buttons, otherwise show a message that the employee ID was not found
- In the last close data reader object.
Output

Step 15. Now generate a click event on the update button by double-clicking on that and replacing it with the following code. The code is the same as the insert code, but here we also check whether the employee ID is available or not.
private void BtnUpdate_Click(object sender, EventArgs e)
{
    if (txtempcity.Text != string.Empty && txtempid.Text != string.Empty && txtempname.Text != string.Empty && txtempsalary.Text != string.Empty)
    {
        cmd = new SqlCommand("EmployeeCrudOperation", cn);
        cmd.CommandType = CommandType.StoredProcedure;
        cmd.Parameters.AddWithValue("@Employeeid", txtempid.Text);
        cmd.Parameters.AddWithValue("@EmployeeName", txtempname.Text);
        cmd.Parameters.AddWithValue("@EmployeeSalary", txtempsalary.Text);
        cmd.Parameters.AddWithValue("@EmployeeCity", txtempcity.Text);
        cmd.Parameters.AddWithValue("@OperationType", "2");
        cmd.ExecuteNonQuery();
        MessageBox.Show("Record update successfully.", "Record Updated", MessageBoxButtons.OK, MessageBoxIcon.Information);
        GetAllEmployeeRecord();
        btnDelete.Enabled = false;
        btnUpdate.Enabled = false;
    }
    else
    {
        MessageBox.Show("Please enter value in all fields", "Invalid Data", MessageBoxButtons.OK, MessageBoxIcon.Information);
    }
}
Output

Step 16. Now generate a click event on the delete button and replace the following code with that.
private void BtnDelete_Click(object sender, EventArgs e)
{
    if (txtempid.Text != string.Empty)
    {
        DialogResult dialogResult = MessageBox.Show("Are you sure you want to delete this employee?", "Delete Employee", MessageBoxButtons.YesNo, MessageBoxIcon.Asterisk);
        if (dialogResult == DialogResult.Yes)
        {
            cmd = new SqlCommand("EmployeeCrudOperation", cn);
            cmd.CommandType = CommandType.StoredProcedure;
            cmd.Parameters.AddWithValue("@Employeeid", txtempid.Text);
            cmd.Parameters.AddWithValue("@EmployeeName", "");
            cmd.Parameters.AddWithValue("@EmployeeSalary", 0);
            cmd.Parameters.AddWithValue("@EmployeeCity", "");
            cmd.Parameters.AddWithValue("@OperationType", "3");
            cmd.ExecuteNonQuery();
            MessageBox.Show("Record deleted successfully.", "Record Deleted", MessageBoxButtons.OK, MessageBoxIcon.Information);
            GetAllEmployeeRecord();
            txtempcity.Text = "";
            txtempid.Text = "";
            txtempname.Text = "";
            txtempsalary.Text = "";
            btnDelete.Enabled = false;
            btnUpdate.Enabled = false;
        }
    }
    else
    {
        MessageBox.Show("Please enter employee id", "Invalid Data", MessageBoxButtons.OK, MessageBoxIcon.Information);
    }
}
Output

Conclusion
In this article, we performed a CRUD operation with a store procedure. If you have any questions or suggestions about this article, you can comment them below, and if you found this article helpful, please share it with your friends.
Duyet LePosted Jun 7, 2024, 4:03 AM
If there are many fields in the record, but I just want to update 2 fields. What should I do. Thanks,
Duyet LePosted Jun 7, 2024, 4:02 AM
Hi Yogeshkumar Hadiya,