This article is an introduction to drawing in XAML and Avalon model. In this article, I will talk about various graphics objects including lines, rectangles, ellipses, and paths and how to draw them using XAML.
Drawing a Line
The Line tag of XAML draws a line. The X1,Y1 and X2,Y2 attributes represent the starting and ending point of the line and Stroke represents the color of the line. The StrokeThickness attribute represents the thickness of the line.
The following code draws a line from point (100,100) t (300,100) with blue color and thickness is 2.
<Window x:Class="WindowsApplication1.Window1"
xmlns="http://schemas.microsoft.com/winfx/2006/xaml/presentation"
xmlns:x="http://schemas.microsoft.com/winfx/2006/xaml"
Title="WindowsApplication1" Width="550" Height="400">
<Line Stroke="#000fff" StrokeThickness="2" X1="100" Y1="100"
X2="300" Y2="100"/>
</Window>
The output looks like Figure 1.

Figure 1. Drawing a line
Drawing and Filling a Rectangle
The Rectangle tag of XAML draws a rectangle. The Height and Width attributes represent the height and width of the rectangle. The Stroke and StrokeThickness represents the color and thickness of the rectangle boundary.
The following code draws a rectangle with height 100 and width 300.
<Rectangle Width="300" Height="100" Stroke="Blue" StrokeThickness="5">
</Rectangle>
The output looks like Figure 2.
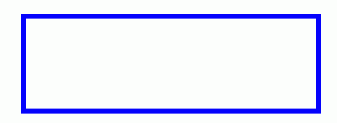
Figure 2. Drawing a rectangle
The Fill attributes fill a rectangle with a color. The following code fills a rectangle with yellow color.
<Rectangle Fill="Yellow" Width="300" Height="100" Stroke="Blue"
StrokeThickness="5">
</Rectangle>
The output looks like Figure 3.
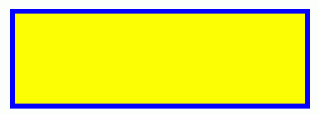
Figure 3. Filling a rectangle
By setting RadiusX and RadiusY attributes, you can also draw a rectangle with rounded corders.
<Rectangle Width="120" Height="100" RadiusX="10" RadiusY="10"
Stroke="Green" StrokeThickness="5" Fill="Black">
</Rectangle>
The output looks like Figure 4.
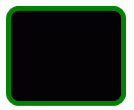
Figure 4. Drawing a rounded rectangle
Drawing and Filling an Ellipse
The Ellipse tag of XAML draws an ellipse and circle (ellipse with equal height and width). The Height and Width attributes represent the height and width of the ellipse. The Stroke and StrokeThickness represents the color and thickness of the ellipse boundary. The Fill attribute fills the ellipse with a color.
The following code draws an ellipse with height 100 and width 300.
<Ellipse Height="100" Width="300" StrokeThickness="5" Stroke="Black" Fill="Gold"/>
The output looks like Figure 5.
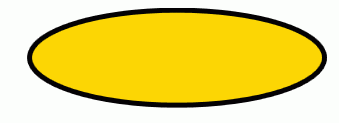
Figure 5. Drawing and Filling an Ellipse
Drawing and Filling a Path
The Path tag of XAML draws a path. The Data attribute of the Path represents various points in the path. Here M represents MoveTo command and C represents the absolute path. Capital H represents the LineTo command.
The following code draws a path.
<Path Data="M 200,40 C 50,90 200,250 200,75 H 480" Stroke="Black" StrokeThickness="4"/>
The output looks like Figure 6.

Figure 6. Drawing a path
Similar to the rectangle and ellipse, the Fill attribute fills a path with a color.
<Path Data="M 200,40 C 50,90 200,250 200,75 H 480" Stroke="Black" StrokeThickness="4" Fill="Yellow"/>
The output looks like Figure 7.
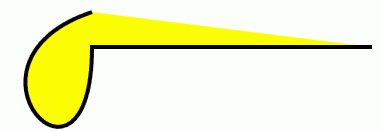
Figure 7. Filling a path
Drawing and Filling a Polygon
The <Polygon /> tag of XAML draws a ploygon. The Points attribute represents various points of the polygon.
The following code draws and fills a polygon.
<Polygon Points="100,50 50,100 150,100 100,50 100,30" Stroke="Green" StrokeThickness="3" Fill="Yellow"/>
The output looks like Figure 8.
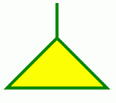
Figure 8. Drawing and filling a polygon
Here is another example of a polygon.
<Grid xmlns="http://schemas.microsoft.com/winfx/2006/xaml/presentation" Width="400" Height="300" >
<Polygon Points="100,0 75,75 100,100 125,75"
Stroke="Black" StrokeThickness="2" Fill="Yellow"/>
<Polygon Points="100,100 125,125 100,200 75,125"
Stroke="Yellow" StrokeThickness="2" Fill="Black"/>
<Polygon Points="100,100 125,75 200,100 125,125"
Stroke="Red" StrokeThickness="2" Fill="Blue"/>
<Polygon Points="100,100 75,125 0,100 75,75"
Stroke="Blue" StrokeThickness="2" Fill="Red"/>
</Grid>
The output looks like Figure 8.1.
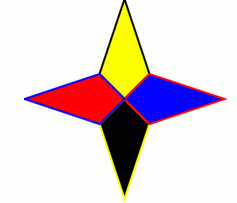
Figure 8.1. Nice looking polygon
Drawing a Polyline
The <Polyline /> tag of XAML draws a ployline, which is a series of connected lines. Unlike a polygon, which is a closed curver, a polyline is usually an open curve. If you want to draw a series of connected lines but closed curve, you might want to use polygon.
Similar to the polygon, a polyline has Points attribute that defines the points of lines draw from and to. The following code draws a ployline.
<Polyline Points="50,100 150,100 100,50 250,50" Stroke="Blue" StrokeThickness="2"/>
The output looks like Figure 9.
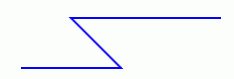
Figure 9. Drawing a polyline
Summary
In this article, I discussed how to draw basic graphics objects using XAML. I will be covering these objects in more depth in my forthcoming articles.