In this article, we will see how to make use of two common API testing utilities JSON Server and Postman. JSON Server helps to host REST Services by feeding JSON data files as the input. This will help us to test REST endpoints for correctness. Another API Testing utility is Postman, which helps to issue AJAX requests from the Browser to test the client API easily.
JSON Server
JSON Server is built on top of Node.js and is an NPM Package, using which we can create mock REST Services. We will be making use of a JSON file, which acts as a backend database to power the REST Service. We can install and set up Node.js and NPM by installing the Node JS LTS version here.
Once we have installed Node JS, we can install JSON Server by running the command given below.
npm install -g json-server
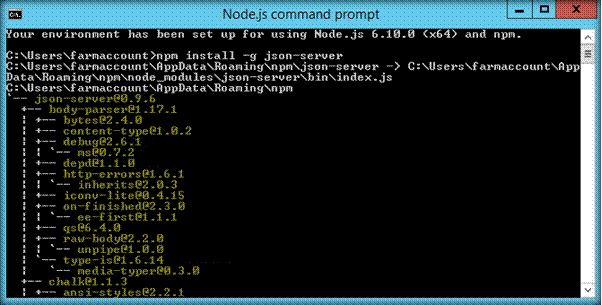
This will install JSON Server in our development environment. We can check the JSON Server version, using the command given below.
json-server –v
Now, we can attach a JSON file, which acts as the database to the JSON Server, using the command given below.
json-server <location of the json file>
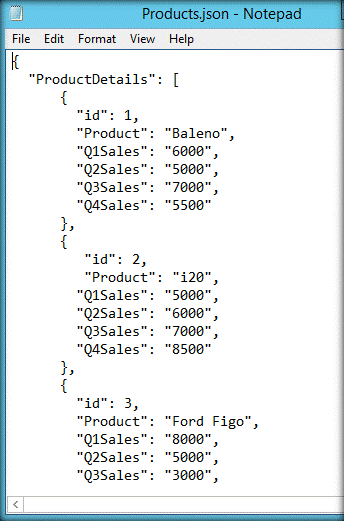
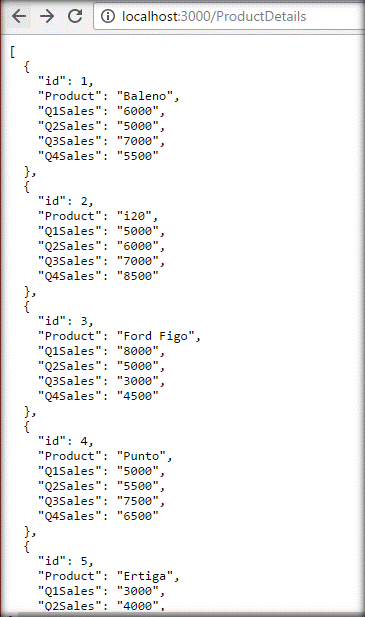
We will be making use of Product.json, which has Q1-Q4 sales data for the cars.
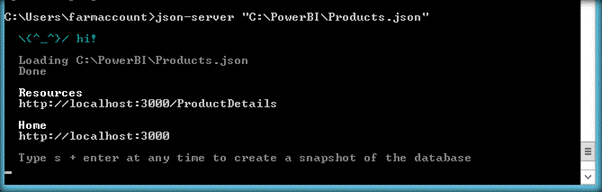
Thus JSON Server has been set up and will be running on the Server port 3000 and the home URL, using which we can access REST service is “http://localhost:3000”.
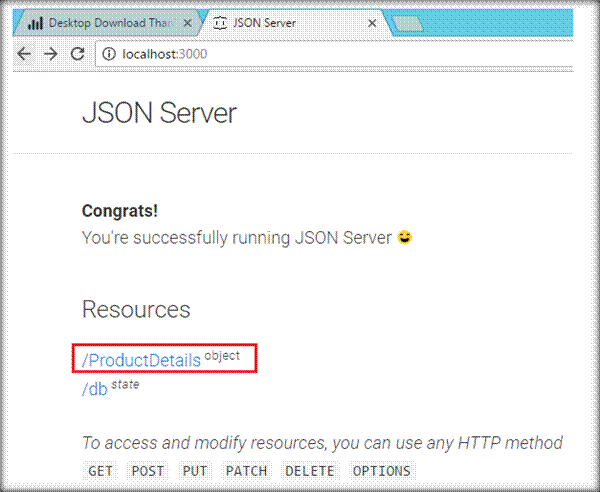
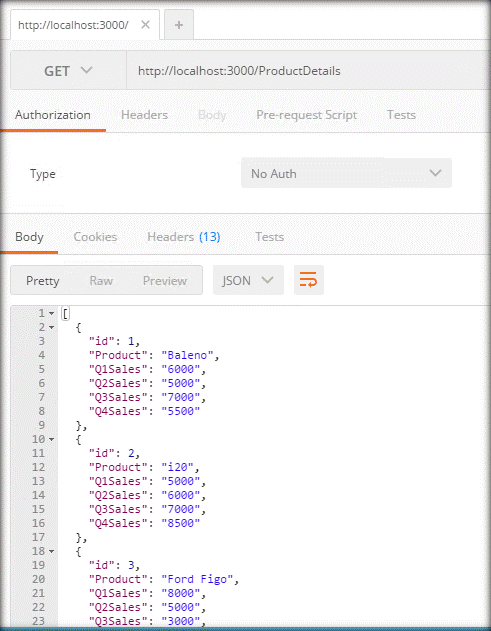
On accessing the home URL, we can see the available resources, which we can access as a REST endpoint. We have the ProductDetails resource, which will be accessible at http://localhost:3000/ProductDetails.
We can see that a successful GET will fetch us the JSON response given below in the Browser.
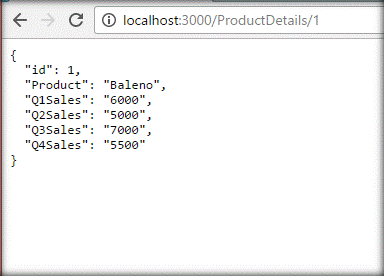
We can also test GET requests for the individual items from the Browser as http://localhost:3000/ProductDetails/1
Test HTTP Requests using Postman
We can get Postman as a Chrome add on app. It helps to test our APIs easily from the Browser.
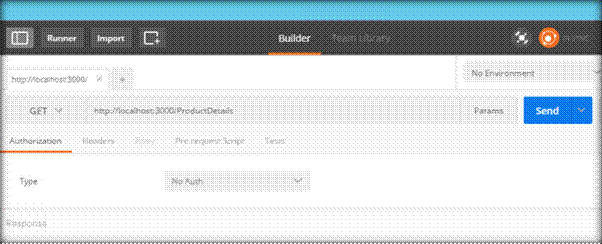
Get Request
We can test JSON Server data by fetching it, using a simple GET request. We will input the URL, set the request as GET, and click Send.
This will fetch all the data from the JSON Server endpoint.
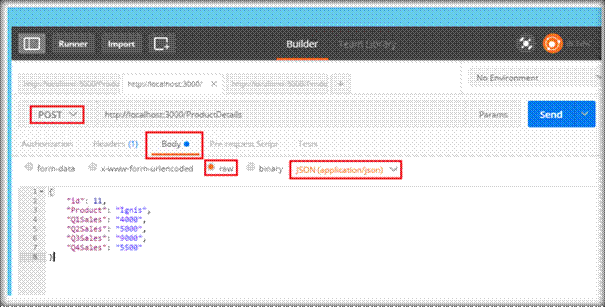
POST Request
We can issue post requests to create new items. To issue a POST request, set the method as POST, and in the body section; specify the key-value pair of the values for the new item to be created. Set the raw data format as JSON and click the Send button.
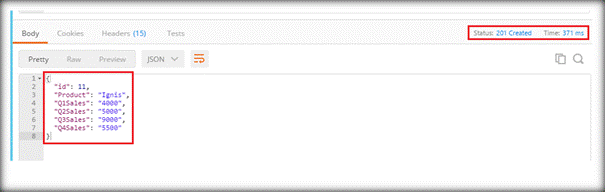
In the bottom section, we can see AJAX status as 201, which indicates that the POST request was successful and the new item has been created.
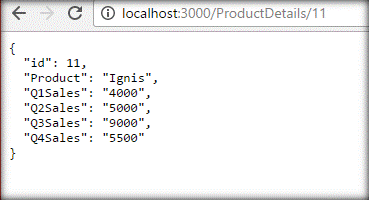
Heading over to the Browser, let's try to get the newly created item by appending the ID to the GET URL, as shown below. We can see the newly created item.
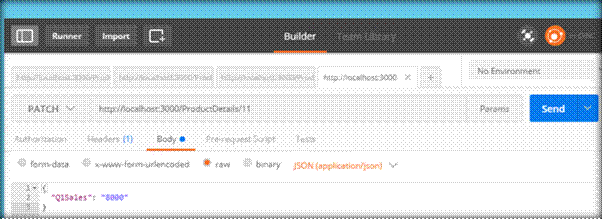
PATCH Request
PATCH request is used to update an existing item. In order to issue the patch request, we will set the method as PATCH, and in the body section, we will set the field value, which has to be updated. Earlier the field value for sales was 4000. We will issue a PATCH request to update it to 8000 by specifying only the Q1 Sales value in the body section, as shown below.
On clicking Send button, we will get the Status 200, which indicates that the update is successful.
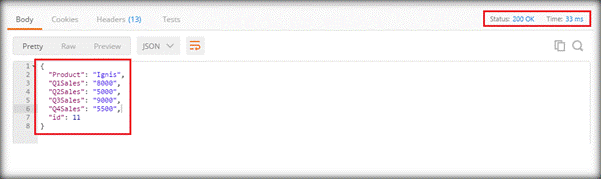
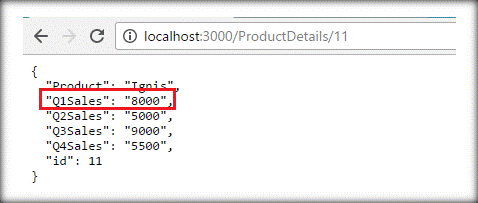
Heading over to the Browser and hitting GET URL for an id 11 will fetch the field values and we can see that the Q1Sales value has been updated. The benefit of the PATCH request is that if there are 5 fields and only 1 field value has to be changed, we just have to mention that specific field value in the body section.
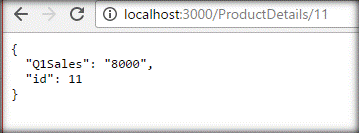
PUT Request
PUT Request performs a similar action as a PATCH request. However, if we have 5 fields and only 1 field value has to be changed, all the field values will have to be specified again in the body section. If we miss out a field value, it will be reset. As shown below, we are updating only the sales value in the body section.

After issuing PUT request, on checking from the Browser, we can see that Q1 sales value which was specified was modified. However, all other fields have been reset. Thus, we have to make a conscious decision between PUT and PATCH Request to avoid an unintended loss of the data.
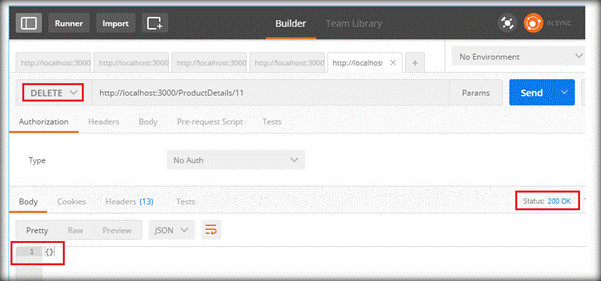
Delete request
Delete request is pretty straightforward. We just have to specify the URL of the specific item, which we have to delete. On clicking the Send button, it will delete the item and show the status as 200 OK.
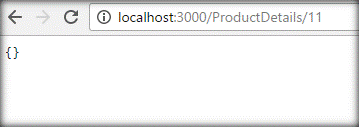
While checking it from the Browser, we can confirm that the item has been deleted.
You can get more details about HTTP status codes here.
Summary
Thus, we saw how to make use of JSON Server and Postman to test out APIs with less effort.