XML data is a good alternative to relational database, especially for web applications. For example, web services commonly use XML to exchange information. And web feeds, which provide frequently updated information such as news stories or blog updates, almost always use XML. The topic that follow introduce you to the use of XML data source with ASP.NET 2.0.
XML files that contain category and product data
The Categories.XML file consisits of two simple elements. The root element, <Categories>, contains one or more <Category> elements. Each <Category> element include two attributes: ID, which provides the category ID, and LongName, which provides the name if category. (To keep this data simple, I omitted the short name, but it could be added as a third attribute.)
The Product.xml file has a slightly more complicated structure. Its root element (Products) contains one or more <Product> element. Then, each <Product> element has four attributes: ID, Category, Name and Image file. In addition each <Product> has four child elements: <ShortDescription>,<LongDiscription>,<UnitPrice> and <OnHand>.
The Categories.xml file
<?xml version = "1.0" encoding = "utf-8" ?>
<Categories>
<Category ID = "costumes" LongName = "Costumes" />
<Category ID = "fx" LongName = "Special Effects" />
<Category ID = "masks" LongName = "masks" />
<Category ID = "props" LongName = "Props" />
</Categories>
A Portion of the Product.xml file
<?xml version="1.0" encoding="utf-8" ?>
<Products>
<Product ID="b101" Category="fx" Name="Black Light (24in)"
ImageFile ="blacklight01.jpg">
<ShortDescription>24-in Black Light</ShortDescription>
<LongDescription>
Create that creepy glow- in- the-dark effect with this powerful black light.
</LongDescription>
<UnitPrice>24.99</UnitPrice>
<OnHand>200</OnHand>
</Product>
<Product ID="cat01" Category="props" Name="Deranged Cat"
ImageFile="cat01.jpg">
<ShortDescription>20" Ugly Cat</ShortDescription>
<LongDescription>
This is one ugly cat.
</LongDescription>
<UnitPrice>19.99</UnitPrice>
<OnHand>45</OnHand>
</Product>
.
.
</Products>
Description
-
The Categories .xml file contains the data for the categories of products sold by the Halloween store. The root element (<Categories>) contains one or more <Category> elements, each of which has attributes named ID and LongName.
-
The Products.xml file contains product data. The root element (<Products>) contains one or more <Products> elements, each of which has attributes elements named, ID Category, Name and ImageFile. In addition, each <Product> element contains <ShortDecsription>, <LongDecsription>, <UnitPrice>, and <OnHand> child elements that provide the short description, long description, unit price, and on-hand data for each product.
How to create an XML data source
As with the SqlDataSource and other data source controls, there are two ways to get started. One is to drag the XmlDataSource control from the Data tab of the Toolbox to the page and proceed from there. The other is to create the control you want to bind the XML data source to, select the Choose Data Source command from that control’s smart tag menu, and proceed from there.
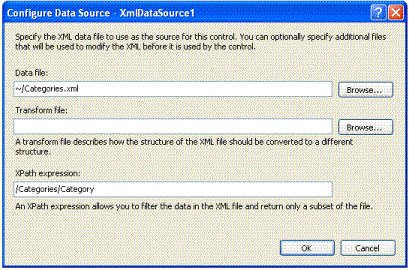
The Data Source Configuration Wizard for an XmlDataSource asks for just three items of information. First, you must use the DataFile attribute to provide a path to the XML data. In this example, the XML data comes from a file in the application’s App_Data folder, but you can also provide a URL for the XML file location. For example, you can create an XML data source that reads the news from reuters.com by specifying http://www.microsite.reuters.com/rss/topNews as the data file.
Second, you can use the TransformFile attribute to provide an optional XML stylesheet file (XST). This lets you change the format of the incoming XML into a format more suitable for your application. For more information, use a web search page for “XML style sheets”.
Third, you can use the XPath attribute to provide an XPath expression that filters the data ion the XML file so only certain elements are retrieved. The most common XPath expression selects the child elements that are immediately beneath the root element, so the root itself isn’t processed. For example, the XPath expression in this figure selects the Category elements. For more information about the XPath expression, see the next figure.
The Configure Data Source dialog box for an XML data source
A typical XmlDataSource control
<asp:XmlDataSource ID=”XmlDataSource1” runat=’server”
DataFile=”~/App-Data/Categories.xml”
XPath=”/Categories/Category”>
</asp:XmlDataSource>
Basic attributes for an XmlDataSource control
Attribute |
Description |
ID |
The ID for the control. |
Runat |
Must specify “server” |
DataFile |
The Path to the XML file. |
TransformFile |
The Path to an optional XST (XML stylesheet file) that’s used to transform the contents of the XML data before it’s processed by the data source. |
XPath |
An XPath expression that filters the data used by the data source. For more information about XPath expression. |
Description
- To create an XML data source, drag the XmlDataSource icon from the Data tab of the Toolbox onto the form, select Configure Data Source from the control’s smart tag menu and proceed from there. Or, use the Choose Data source command in the smart tag menu of a bindable control to display the dialog box in figure, select the XML File icon, and proceed from there.
- Use the DataFile attribute to specify the path to the XML data file. The value of this attribute can be a file path that points to a disk file or a URL that points to any source of XML data.
How to use XPath expression for data sources and data binding
How you can use XPath expressions to filter data in an XML data source. You can specify an XPath expression in the Data Source Configuration Wizard when you create an XML data source. You can also change the XPath expression at runtime by setting the data source’s XPath property. And, finally you can use the XPath method as an alternative to the Eval method in a data binding expression.
The first set of examples in this figures shows how to use XPath expressions in the XPath attribute of an XML data source. The first example selects all of the <Product> elements within the <Products> elements. The next two examples show how you can specify an attribute. In example 2, the <Product> element with an ID attribute equal to “bl01” is selected. In example 3, all of the products with Category attributes equal to “props” are selected.
The second set of examples show how you can use XPath expression for data binding. Here, the expression in example 1 binds to the <OnHand> element. The expression in example 2 binds to the <UnitPrice>element and uses a formatting expression to format the output. And the expression in example 3 binds to an attribute named Name.
Examples of XPath expressions for selecting data
Example 1: Select all <Product> elements
/Products/Product
Example 1: Select a specific <Product> element
/Products/Product [@ID=”bl01”]
Example 1: Select all <Product> elements for the props category
/Products/Product [@Category=”props”]
A method that sets the XPath property of an XML data source
private void SetPath()
{
XmlDataSource2.XPath=”/Products/Product [@Category=’ ”
+ ddlCategory.SelectedValue +” ‘] “;
}
The syntax of an XPath expression for data binding
<%# XPath (XpathString [, FormatString]) %>
Examples of XPath expressions for data binding
Example 1: Bind to element content
<% XPath (“OnHand”) %>
Example 1: Bind to element content with formatting
<% XPath (“UnitPrice”, “ {0:c} “) % >
Example 1: Bind to an attribute value
<% XPath (“@ Name”) %>
Description
-
An XPath expression lets you select elements of an XML file based on either the element name or the value of a specific element or attribute.
-
You can use XPath expression to filter the elements that are processed by the XML data source. To change the XPath expression at runtime, use the XPath property of the data source.
You can also use an XPath expression for binding by calling the XPath method.
An XPath expression that begins with a slash starts at the root of the XML document. (The root of the document is a hypothetical document node that’s immediately above the document’s root element.)
You can use bracket [ ] to add filter expressions that specify element or attribute values.
Attribute names begin with the @ symbol.
The aspx file for the XML version of the Product List application
This version of the application looks exactly like the SqlDataSource version, but it gets its data from the XML files listed in figure rather than from a SQL Server database. As a result, it uses XmlDataSource controls rather than SqlDataSource controls to retrieve the data that’s bound to the drop-down list and Repeater controls.
Because much of this listing is identical to the SqlDataSource version that you saw in the figure, I‘ve highlighted just the differences. First, notice that the drop-down list is bound to an XmlDataSource named XmlDataSource1. In addition the drop-down list include an OnSelectedIndexChanged attribute that specifies an event. This is necessary because unlike the SqlDataSource control the XmlDataSource control doesn’t not support parameters. As a result, you must write some code to cause the application to display just the products for the selected category. You ‘ll see that code in the next figure.
Next the first XmlDataSource control specifies the Categories.xml file as its XML file. Also, its XPath attribute is set to / Categories/Category so just the <Category> elements are selected. As a result, the drop-down list will display the LongName attribute of each <Category> element in the Categories.xml file
The Repeater control requires two changes to work with the XML data source. First the DataSource ID property specifies the name of the second XmlDataSource control. Second the templates use XPath expressions instead of Eval methods to get the required data from the XML data source.
Finally the second XmlDataSource control specifies the Products.xml file as its input file. Its XPath attribute to set to retrieve all of the <Product> elements.
Deafult.aspx (XmlProductList application)
<body>
<form id=" form1" runat="server">
<div>
<img src="Image/banner.jpg" /><br/></br/>Choose a category:
<asp:DropDownList ID="ddlCatgeory" runat="server"
AutoPostBack="True" Width="130px"
DataSourceID="XmlDataSource1"
DataTextField="LongName" DataValueField="ID"
EnableViewState="true"
OnSelectedIndexChanged="ddlCategory_SelectedIndexChanged">
</asp:DropDownList>
<asp:XmlDataSource ID="XmlDataSource1" runat="server"
DataFile="~App_Data/Categories.xml"
XPath="/Categories/Category">
</asp:XmlDataSource>
<br/><br/>
<asp:Repeater="" ID="Repeater1" runat="server"
<DataSourceID="XmlDataSource2">
<HeaderTemplate>
<table cellpadding="0" cellspacing="0">
<tr bgcolor="Black" style="color: white">
<td width="80">
<b>ID</b>
</td>
<td width="150">
<b>Product</b>
</td>
<td width="80" align="right">
<b>Unit Price</b>
</td>
<td width="80" align="right">
<b>On Hand</b>
</td>
</tr>
</HeaderTemplate>
<ItemTemplate>
<tr bgcolor="WhiteSmoke">
<td><%# XPath("@ID") %></td>
<td><% XPath("@Name") %>
</td>
<td align="right">
<% XPath("UnitPrice", " {0:c} " ) %>
</td>
<td align="right">
<% XPath("OnHand") %>
</td>
</tr>
</ItemTemplate>
<AlternatingItemTemplate>
<tr bgcolor="Gainsboro">
<td>
<% XPath("@ID") %>
</td>
<td>
<% XPath("@Name") %>
</td>
<td align="right">
<% XPath("UnitPrice", " {0:c} " ) %>
</td>
<td align="right">
<% XPath("OnHand") %>
</td>
</tr>
</AlternatingItemTemplate>
<FooterTemplate>
</tables>
</FooterTemplate>
</asp:Repeater>
<asp:XmlDataSource ID="XmlDataSource2" runat="server"
DataFile="~App_Data/Products.xml"
XPath=".Products/Product">
</asp:XmlDataSource>
</div>
</form>
</body>
The code-behind file for the XML version of the Product List application
First, the Page_Load method is executed when the page is loaded. The first time this page is loaded, this method calls the DataBind method for the drop-down list to force the drop-down list to bind the to the XML file.
Then, the Page_Load method calls the SetPath method, which sets the XPath property of the second XML data source to filter just the products whose Category attribute matches the CategoryID value selected in the drop-down list. That way, the Repeater control will display the right data first time the page is requested.
Please note that the Page_Load method must bind the drop-down list before it calls the SetPath method. If it didn’t, the drop-down list wouldn’t be populated, so the SelectedValue property that’s used by the SetPath method wouldn’t be set. As a result, the Repeater control would be rendered without any data in it the first time the page is requested.
The ddlCategory_SelectedIndexChanged method is called whenever the user changes the selection in the drop-down list. It just calls the SetPath method to set the XPath property for the second XML data source to the selected category so only the products in that category will be displayed in the Repeater control.
Default aspx.cs (XmlProductList application)
using System;
using System.Data;
using System.Configuration;
using System.Web;
using System.Web.Security;
using System.Web.UI;
using System.Web.UI.WebControls;
using System.Web.UI.WebControls.Webparts;
using System.Web.UI.HtmlControls;
public partial class default_aspx : System.Web.UI.page
{
protected void Page_Load(object sender, EventArgs e)
{
if ( ! IsPostBack)
{
ddlCategory.DataBind();
SetPath();
}
}
protected void ddlCategory_SelectedIndexChanged(object sender, EventArgs e)
{
SetPath();
}
private void SetPath()
{
XmlDataSource2.Xpath = "/Product [@Category= ‘ "
+ ddlCategory.Selectedvalue + " ‘ ] ";
}
}