Building Web Application Using Node.js
Introduction
In this article, we will learn how can we develop a web application, using Node.js. Let's start step by step.
First of all, I am going to create one folder for my project. I am giving my project a name as "nodeproject" and initialize the project.
- Now, open the Command Prompt.
- Go to your project folder. Example - I have created my project in E drive, so I will use the following commands.

- Now, type "npm init" command to initialize the Node.js project and hit Enter.

- Now, it will ask some questions. Just press Enter for all the questions.

Note - npm init was not handling errors returned by package name validation correctly in all the cases. New package names cannot contain capital letters, which are documented in few places.
Well, this problem has been fixed after npm 2.9.0 version.
- The command, mentioned above, will generate "package.json" file in your project folder. When you look at this file, you will find the file, mentioned below.The primary goal of this package.json file is to keep track of all the dependencies in the packages that we have installed for our application.
- contains all the stuffs like the name of the project, version, description and all. {
- "name": "nodeproject",
- "version": "1.0.0",
- "description": "",
- "main": "index.js",
- "scripts": {
- "test": "echo \"Error: no test specified\" && exit 1"
- },
- "author": "",
- "license": "ISC"
- }
Now, let's install Express.
- In the Command Prompt, just type the command, mentioned below.
- npm install express--save

- After installing Express, you will get a new folder inside your project i.e node_modules. In this folder, you can get Express folder where you will get the complete package of Express.

- Now, if you look into your package.json file, you will get the dependency of Express.

In package.json, I am changing the name of main JavaScript file to app.js.
- {
- "name": "nodeproject",
- "version": "1.0.0",
- "description": "",
- "main": "app.js",
- "scripts": {
- "test": "echo \"Error: no test specified\" && exit 1"
- },
- "author": "",
- "license": "ISC",
- "dependencies": {
- "express": "^4.14.0"
- }
- }
- var express = require('express'); //including express
- var app = new express(); // Creating instance
- var port = 3000; // setting port for the application
- //Following function is starts sockets and start listen from particular port. In following code I have given call back which contains err. So when port willbe start and listen function will be fire then this function will be execute.
- app.listen(port, function(err) {
- if (typeof(err) == "undefined") {
- console.log('Your application is running on : ' + port + ' port');
- }
- });

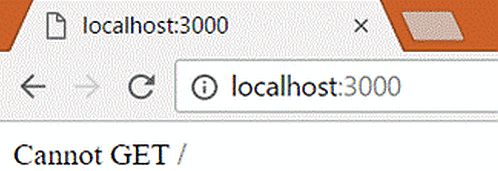
In your Web Browser, you will get the following output.

Now, in the next step, I am going to show you how to set the start point of our project.
Now, to run my application, I fired the command "node app.js", where I am telling my application that I want to run the app.js file. Hence, every time I run my project, I have to tell the compiler that this is the file that needs to be compiled. But a project may contain more than one file, so if I give my project to someone, they have to find which file needs to be executed.
Thus, there should be a standard way. That means, we need to type any file name which is the starting point of the project. To do this, we have to modify our package.json file, as shown below
- Declare the start object in Scripts object.
- "start": "node app.js"

- After changing in package.json file, just save the file. Now, you can run your project, using "npm start" command.
After typing this, you will get the output, as shown below.- npm start

Here, in the figure, mentioned above, you can see that this command explicitly fires, and "node app.js" is the command when we are giving npm start command. Hence, this is a standard way to run the Node project. Thus, we need not to worry about which file needs to be started in order to execute our project.
Before going further, let's understand how to do routing of the application in Node.js.
How to perform routing in Node.js application?
To understand routing in Node application, consider the code, mentioned below.
- app.get('/', function(req, res) {
- res.send('<h1>Hello C# Corner.</h1>');
- });
- app.get('/articles', function(req, res) {
- res.send('<h1>Welcome to C# Corner Articles.</h1>');
- });
You can see my complete code below.
- var express = require('express');
- var app = new express();
- var port = 3000;
- app.listen(port, function(err) {
- if (typeof(err) == "undefined") {
- console.log('Your application is running on : ' + port + ' port');
- }
- });
- app.get('/', function(req, res) {
- res.send('<h1>Hello C# Corner.</h1>');
- });
- app.get('/articles', function(req, res) {
- res.send('<h1>Welcome to C# Corner Articles.</h1>');
- });
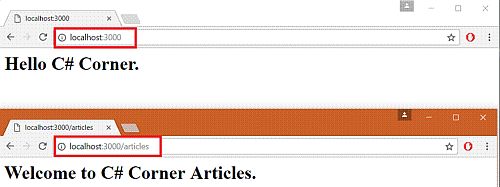
- When you will run this code then you will get following output.

Note - To run this project, always use npm start.
In the example, mentioned above, you can see when I am requesting for localhost:3000, I am getting 'what'; and when I am requesting localhost:3000/articles, I am getting 'what'.
Now, after understanding about routing, I am going to download a template and use it my project. Thus, let's understand how we can add templates in our project.
Adding Template in Project
- Download any template from any website. I have downloaded the template from the link(Click here to download template) .
- My template folder structure is shown below.

- Now, I am creating 2 folders in my project, where folder names are "public" and "src". In public folder, I will keep CSS files, JavaScript files, and Fonts. On the other hand, in src folder, I am creating one more folder i.e. "views". In views folder, I will keep my HTML files. My project folder structure is shown below.

- Now, from the template, I am copying CSS, JavaScript, and Font file in "public" folder, and HTML files inside "src >> views".
After copying these files to the folder, my folder structure looks, as shown below.

- Now, after adding the template, as we know, we have moved our all static files to public, we need to set static file path, so CSS, JavaScript and font file will be loaded from public folder.
To set the path for static files, we have to modify our app.js file. To set the public directory as static directory, we need to write the code, mentioned below, in our app.js file.
The line, mentioned above, will make public directory as static directory. So, whenever a request occurs for any static file, the Node.js file first searches in public directory, then in other folders, if the file is not found.- app.use(express.static('public')); //making public directory as static diectory
- To verify my code, we can run the code and can request any CSS or JavaScript file.

Complete app.js code
- var express = require('express');
- var app = new express();
- var port = 3000;
- app.listen(port, function(err) {
- if (typeof(err) == "undefined") {
- console.log('Your application is running on : ' + port + ' port');
- }
- });
- app.use(express.static('public')); //making public directory as static diectory
- app.get('/', function(req, res) {
- res.send('<h1>Hello C# Corner.</h1>');
- });
- app.get('/articles', function(req, res) {
- res.send('<h1>Welcome to C# Corner Articles.</h1>');
- });
Our index.html file contains Bootstrap and jQuery. So, I want to use the latest version of Bootstrap and jQuery. Here, I am using "Bower" to use the latest version of Bootstrap and jQuery.
What is Bower?
Bower is a Package Manager for the web. npm is also package manager but this is Server-Side package manager. For front-end side, we have Bower. Bower keeps track of all the packages, making sure that they all are up to date. Bower can manage components that contain HTML, CSS, JavaScript, fonts or even image files. Bower doesn’t concatenate or minify the code or do anything else, as it just installs the right versions of the packages, which you need and their dependencies.
Using Bower
To use Bower in our project, you can use the steps, mentioned below.
- Install Bower from npm., using the command, mentioned below.

- After installing Bower in package.json, we will get Bower dependency. The Bower folder will be installed in node_modules folder.

- I am going to install Bower at a global level because Bower command can be accessed, using command prompt. To access Bower from the command prompt, I am installing it at global level.
To install Bower at global level, just use the command, mentioned below.
- npm install bower - g
- After installing Bower as global level, which is similar to package.json, we will create bower.json file. The command will be same like npm, which is similar to using Bower instead of npm,
To create bower.json, just use the command, mentioned below.
Similar to npm init command, this command will also ask some questions. Just press enter and keep it default.- bower init

- Inside bower.json file, you will get the configuration, mentioned below.

- As we have installed Bower, we want to install Bootstrap from bower. So, we will use the following command to download bootstrap
- bower install bootstrap--save

- After installing bootstrap, bower will create a directory named as "bower_components".

You can see that bower has installed jQuery and Bootstrap in bower_components.
Here, jQuery is automatically downloaded because bootstrap has dependency of jQuery.
- But, you can see that Bower installed all files in bower_components folder but our static directory is public. So, we need to specify bower to install files in public directory. To do that, just add a file ".bowerrc" and write the following code inside this file.
Now, save .bowerrc file and delete bower_components. And again, come to command prompt and type the following command.- {
- "directory": "public/lib"
- }
After doing this, all the bower files will be installed in public/lib folder.- bower install bootstrap--save

- Now, I am modifying the Bootstrap and jQuery path from index.html.
Now, for testing purposes, I am also providing static path for src/view folder. The app.js code will be as follows.
app.js code
- var express = require('express');
- var app = new express();
- var port = 3000;
- app.listen(port, function(err) {
- if (typeof(err) == "undefined") {
- console.log('Your application is running on : ' + port + ' port');
- }
- });
- app.use(express.static('public')); //making public directory as static diectory
- app.use(express.static('src/views')); //making public directory as static diectory
- app.get('/', function(req, res) {
- res.send('<h1>Hello C# Corner.</h1>');
- });
- app.get('/articles', function(req, res) {
- res.send('<h1>Welcome to C# Corner Articles.</h1>');
- });
Following is the output for index.html file.

Thanks. In the next part, we will learn about GULP, Templating Engine EJS, Creating pages, Routing, Database connectivity etc.
