This article is a continuation of the article Creating a Plugin Enabled Application : Part 1 of 2. The code samples are the same. In the previous article we have seen how to create the Plugin Container, Plugin Interface and the actual Plugin modules. Here I am going to explain how the plugin modules are written and how they are loaded into the application.
The 3 Components
- Plugin Container
- Plugin Interface
- Plugin
Steps Involved
- The Plugin.Container application is executed
- The MainForm calls the PluginLoader class - LoadPlugins() method
- The LoadPlugins() method searches the given folder for any files with *Plugin.dll in name and loads the Assembly
- The Assembly loaded will be searched for public types implementing interface IPlugin
- The classes which implements IPlugin will be instantiated and returned to the caller as IList
- The MainForm calls the plugin's Text property to display the caption in the form as a button
- On the click of the button the form is instantiated using the plugin's Form property
Class Diagram
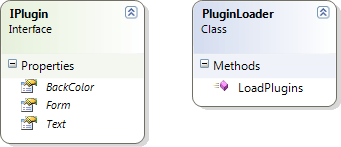
The IPlugin interface shown above contains 3 properties.
- BackColor – Just a color for the form and button
- Form – The actual plugin form
- Text – The text description of the plugin form
The PluginLoader class contains only one method LoadPlugins which searches and loads the plugins.
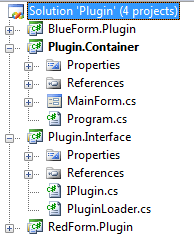
The Solution Explorer with all the projects will look like below:
LoadPlugins()Explained
.Net Reflection is used to load the plugin files. The body of the LoadPlugins() method is given below:
public IList<IPlugin> LoadPlugins(string folder)
{
IList<IPlugin> plugins = new List<IPlugin>();
// Get files in folder
string[] files = Directory.GetFiles(folder, "*Plugin.dll");
foreach (string file in files)
{
Assembly assembly = Assembly.LoadFile(file);
var types = assembly.GetExportedTypes();
foreach (Type type in types)
if (type.GetInterfaces().Contains(typeof(IPlugin)))
{
object instance = Activator.CreateInstance(type);
plugins.Add(instance as IPlugin);
}
}
return plugins;
}
The method will accept a folder path as it's argument. The Directory.GetFiles() method searches on the folder and returns all files with *Plugin.dll in the file name.
The files array will be used in the foreach loop above, and each file item will be used to load the Assembly. The method Assembly.LoadFile() is used for it.
Once loaded as Assembly we can get all the public types inside the assembly using the method GetExportedTypes(). This method will return all the public types inside the assembly. Iterating through each type (or class) we can find the classes which implements the IPlugin interface.
For the classes which implement IPlugin, we instantiate the class and added to the plugins list. The Activator.CreateInstance() method is used to create the instance dynamically. This method on completion of all plugin files check, returns the list of Plugin objects.
MainForm calling LoadPlugins()
The MainForm calls the LoadPlugins() in the Form_Load event. The code is given below.
private void MainForm_Load(object sender, EventArgs e)
{
string path = GetExecutionFolder();
var plugins = _pluginLoader.LoadPlugins(path);
if (plugins.Count == 0)
MessageBox.Show("No Plugins found!");
else
{
foreach (IPlugin plugin in plugins)
{
Button button = new Button() { Width = 200, Height = 40, Left = 2, Top = PluginsPanel.Controls.Count * 40};
button.Text = plugin.Text;
button.BackColor = plugin.BackColor;
button.Tag = plugin;
button.Click += new EventHandler(button_Click);
PluginsPanel.Controls.Add(button);
}
}
}
If no plugins are found, a message box is shown. If plugins are found, each plugin instance will be iterated and a button is created to represent the plugin. The button is given backcolor based on the plugin's BackColor property. The button's tag will be set with the plugin instance for future use.
The button created will have a Click event which is described below.
void button_Click(object sender, EventArgs e)
{
IPlugin plugin = (sender as Button).Tag as IPlugin;
plugin.Form.Show();
}
From the button click method above, we can see the tag property of the button is used to get the exact Plugin instance and the plugin's Form.Show() method is called.
Adding a New Plugin
For creating a new plugin the following steps are needed.
-
Create a new project with name ending with *Plugin.dll. For the time being I am using a project named GreenForm.Plugin class library project. Make sure you add reference to System.Windows.Forms and System.Drawing and Plugin.Interface project.
-
Add a class named GreenFormPlugin implementing interface IPlugin. The code will look like below.
namespace GreenForm.Plugin
{
public class GreenFormPlugin : IPlugin
{
public string Text
{
get { return "A Green Form"; }
}
public Form Form
{
get
{
return new Form() { Text = this.Text,
BackColor = Color.Green };
}
}
public Color BackColor
{
get { return Color.Green; }
}
}
}
-
Build the project and copy the Green.Plugin.dll to bin\debug folder of the Plugin.Container project.
-
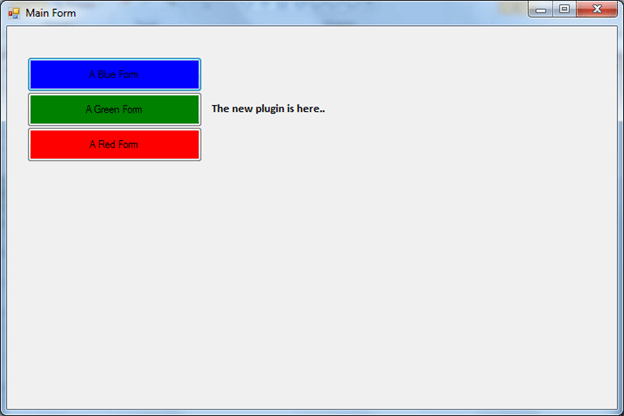
Run the Plugin.Container.exe from the same folder and you should see the button listed there:
Note
In the current example, we are loading the plugin by directly parsing the application folder. In real-world applications, we should be able to locate plugins in a different folder. A configuration file with various plugin locations could be apt for this case.
Summary
In this article we have discussed the implementation part of a Plugin loader as well as adding a new plugin. For real business applications we can reduce the deployment package size by including only the required plugin files chosen by the customer. Still the customer has the flexibility to choose additional plugins and we need to only deploy the needed file.