Configuring Claims-Based Web Applications by Using ASP.NET SQL Membership and Role Providers in SharePoint 2010


In this article I am demonstrating how to create a claims-based web application using a Microsoft ASP.NET membership and a role provider as the authentication provider. Forms-based authentication provides custom identity management in Microsoft SharePoint 2010 by implementing a membership provider, which defines interfaces for identifying and authenticating individual users, and a role manager, which defines interfaces for grouping individual users into logical groups. I found an article in the internet for the same purpose; most of the authors are explaining with IIS configuration wizard to create a connection, providers etc. But here I am following a very manual approach.

At a high level we have to follow the steps below:

  1. Create a new web application
  2. Configure support for FBA in central admin, our new web app, and a new thing in SharePoint 2010 called the STS web service
  3. Add a User Policy to our web app that will grant an FBA user rights to the site
  4. Login to the site and start using it.

Step 1: Creating a SharePoint Web Application

To create a SharePoint Web application
  1. Browse to the SharePoint 2010 Central Administration page.
  2. In the Application Management section, click Manage web applications.
  3. On the ribbon, click New.
  4. In the Create New Web Application dialog box, under Authentication, click Claims Based Authentication.
  5. In the IIS Web Site section, under Create a new IIS web site, change the Name field to SharePoint - SQL FBA.
  6. Change the Port number to 200.
  7. In the Claims Authentication Types section, do the following:

    • Select Enable Forms Based Authentication (FBA).
    • I recommended to keep Windows so you get multiple authentication
     
  8. In the membership provider and role manager fields, enter the following names:

    • ASP.NET membership provider name: SqlMember
    • ASP.NET role manager name: SqlRole
     
  9. In the Database Name and Authentication section, change the database name to be WSS_Content_200.
  10. Leave other settings as their defaults.
  11. Click OK to create the web application

    Sharepoint1.gif
     
  12. Go to Central Administration
  13. Go to Application Management
  14. Click Create site collections
  15. Select the newly created web application
  16. Fill in a name and select a template

    Step 2: Preparing the Database to Use an ASP.NET Membership and Role Provider for the Web Application
     
  17. First, we'll have to setup our user/role repository. For this we can use a tool called "aspnet_regsql" provided by the framework. This tool can be found in the path: C:\Windows\Microsoft.NET\Framework\v2.0.50727 on the server. Below are the steps we need to perform:
     
  18. Go to the same folder and double click on Aspnet_regsql.exe

    Sharepoint2.gif
     
  19. Click Next

    Sharepoint3.gif

    Sharepoint4.gif
     
  20. Give your Database name and and DB server name then click next

    Sharepoint5.gif
     
  21. Click next and click Finish to create your Database

    To add users and roles to the membership and role provider database

    declare @now datetime
    set @now= GETDATE()
    exec aspnet_Membership_CreateUser 'MyAppName','Sudhish','password@123',
    '','[email protected]','','',1,@now,@now,0,0,null
     
  22. Run the following query to add the user admin1 to the Admin role, as shown in Figure 8.

    EXEC aspnet_Roles_CreateRole 'MyAppName', 'Admin'
    EXEC aspnet_UsersInRoles_AddUsersToRoles 'MyAppName', 'Sudhish', 'Admin', 8

Step 3: Configuring a Membership and Role Provider for the SharePoint Web Application

There are three web.config files that you must modify:
  • Central Administration: To allow picking for site collections.
  • Security Token Service: To allow sign in, and for issuing tokens.

    <connectionStrings>

       <clear />

       <add name="AspNetSqlMembershipProvider"
     connectionString="data source=Database name Security=SSPI;Initial Catalog=DB Name"
     providerName="System.Data.SqlClient" />
    </connectionStrings>

  • FBA Web Application: To allow picking on the local web application.
  1. Open the Central Administration site's web.config file
  2. Find the </configSections> entry
  3. Paste the following XML directly below it
  4. Find the <system.web> entry
  5. Paste the following XML directly below it
     

       <roleManager enabled="true"

       cacheRolesInCookie="false"

       cookieName=".ASPXROLES"

       cookieTimeout="30"

       cookiePath="/"

       cookieRequireSSL="false"

       cookieSlidingExpiration="true"

       cookieProtection="All"

       defaultProvider="AspNetWindowsTokenRoleProvider"

       createPersistentCookie="false"

       maxCachedResults="25">

          <providers>

            <clear />

            <add connectionStringName="AspNetSqlMembershipProvider"

               applicationName="/"

               name="SqlRole"

               type="System.Web.Security.SqlRoleProvider, System.Web, Version=2.0.0.0, Culture=neutral, PublicKeyToken=b03f5f7f11d50a3a" />

            <add applicationName="/"

               name="AspNetWindowsTokenRoleProvider"

               type="System.Web.Security.WindowsTokenRoleProvider, System.Web, Version=2.0.0.0, Culture=neutral, PublicKeyToken=b03f5f7f11d50a3a" />

          </providers>

        </roleManager>


        <membership defaultProvider="SqlMember"

           userIsOnlineTimeWindow="15" hashAlgorithmType="">

          <providers>

            <clear />

            <add connectionStringName="AspNetSqlMembershipProvider"

               enablePasswordRetrieval="false"

               enablePasswordReset="true"

               requiresQuestionAndAnswer="true"

               passwordAttemptWindow="10"

               applicationName="/"

               requiresUniqueEmail="false"

               passwordFormat="Hashed"

               name="SqlMember"

               type="System.Web.Security.SqlMembershipProvider, System.Web, Version=2.0.0.0, Culture=neutral, PublicKeyToken=b03f5f7f11d50a3a" />

          </providers>

        </membership>
     

  6. You have to check whether the <membership> and <rolemanager> entries only exist once. Delete any double entries.
     
  7. Paste the following XML below the <PeoplePickerWildcards> entry.

    <clear />
    <add key="AspNetSqlMembershipProvider" value="%" />
    <add key="SqlMember" value="%"/>
    <add key="SqlRole" value="%"/>

    Adjust the web.config of the Security Token Service (STS) virtual directory

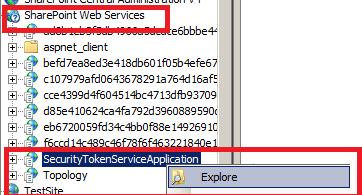
    The SecurityTokenServiceApplication website is located under the SharePoint Web Services website, as shown in Figure. Go to your IIS and find the SecurityTokenServiceApplication and open it.

    Sharepoint6.gif
     
  8. Open the Security Token Service (STS) virtual directory's web.config file
  9. Find the </system.net> entry
  10. Paste the following XML directly below it

    <connectionStrings>
       <clear />
       <add name="AspNetSqlMembershipProviderconnectionString="data source=Database name Security=SSPI;Initial Catalog=DB Name"
     providerName="System.Data.SqlClient" />
    </connectionStrings>
     
  11. Add a <system.web> entry directly below the </connectionStrings>
     
  12. Paste the following XML directly below the <system.web> entry


    <roleManager enabled="true"

         cacheRolesInCookie="false"

         cookieName=".ASPXROLES"

         cookieTimeout="30"

         cookiePath="/"

         cookieRequireSSL="false"

         cookieSlidingExpiration="true"

         cookieProtection="All"

         defaultProvider="AspNetWindowsTokenRoleProvider"

         createPersistentCookie="false"

         maxCachedResults="25">

            <providers>

              <clear />

              <add connectionStringName="AspNetSqlMembershipProvider"

                 applicationName="/"

                 name="SqlRole"

                 type="System.Web.Security.SqlRoleProvider, System.Web, Version=2.0.0.0, Culture=neutral, PublicKeyToken=b03f5f7f11d50a3a" />

              <add applicationName="/"

                 name="AspNetWindowsTokenRoleProvider"

                 type="System.Web.Security.WindowsTokenRoleProvider, System.Web, Version=2.0.0.0, Culture=neutral, PublicKeyToken=b03f5f7f11d50a3a" />

            </providers>

          </roleManager>


          <membership defaultProvider="SqlMember"

             userIsOnlineTimeWindow="15" hashAlgorithmType="">

            <providers>

              <clear />

              <add connectionStringName="AspNetSqlMembershipProvider"

                 enablePasswordRetrieval="false"

                 enablePasswordReset="true"

                 requiresQuestionAndAnswer="true"

                 passwordAttemptWindow="10"

                 applicationName="/"

                 requiresUniqueEmail="false"

                 passwordFormat="Hashed"

                 name="SqlMember"

                 type="System.Web.Security.SqlMembershipProvider, System.Web, Version=2.0.0.0, Culture=neutral, PublicKeyToken=b03f5f7f11d50a3a" />

            </providers>

          </membership>
     

  13. Add a </system.web> entry directly below it

    Adjust the web.config of the claims based web application
     
  14. Open the claims based web application's web.config file
  15. Find the </configSections> entry
  16. Paste the following XML directly below it

    <connectionStrings>

       <clear />

       <add name="AspNetSqlMembershipProvider"
     connectionString="data source=Database name Security=SSPI;Initial Catalog=DB Name"
     providerName="System.Data.SqlClient" />
    </connectionStrings>
     

  17. Locate the <membership> entry
  18. Replace everything from <membership> to </membership> with the following XML
     
    <membership defaultProvider="i" 
       userIsOnlineTimeWindow="15" 
       hashAlgorithmType=""> 
       <providers> 
          <clear /> 
          <add connectionStringName="AspNetSqlMemberShipProvider" 
             enablePasswordRetrieval="false" 
             enablePasswordReset="true" 
             requiresQuestionAndAnswer="true" 
             passwordAttemptWindow="10" 
             applicationName="/" 
             requiresUniqueEmail="false" 
             passwordFormat="Hashed" 
             name="SqlMember" 
             type="System.Web.Security.SqlMembershipProvider, System.Web, Version=2.0.0.0, 
    Culture=neutral, PublicKeyToken=b03f5f7f11d50a3a" /> 
         <add name="i" 
            type="Microsoft.SharePoint.Administration.Claims.SPClaimsAuthMembershipProvider, 
    Microsoft.SharePoint, Version=14.0.0.0, Culture=neutral, PublicKeyToken=71e9bce111e9429c" /> 
       </providers> 
    </membership>
  19. Locate the <roleManager> entry
  20. Replace everything from <roleManager> to </roleManager> with the following XML:
     
    <roleManager enabled="true" 
       cacheRolesInCookie="false" 
       cookieName=".ASPXROLES" 
       cookieTimeout="30" 
       cookiePath="/" 
       cookieRequireSSL="false" 
       cookieSlidingExpiration="true" 
       cookieProtection="All" 
       defaultProvider="c" 
       createPersistentCookie="false" 
       maxCachedResults="25"> 
          <providers> 
             <clear /> 
             <add connectionStringName="AspNetSqlMemberShipProvider" 
                applicationName="/" 
                name="AspNetSqlRoleProvider" 
                type="System.Web.Security.SqlRoleProvider, System.Web, Version=2.0.0.0, 
    Culture=neutral, PublicKeyToken=b03f5f7f11d50a3a" /> 
             <add applicationName="/" 
                name="SqlRole" 
                type="System.Web.Security.WindowsTokenRoleProvider, System.Web, Version=2.0.0.0, 
    Culture=neutral, PublicKeyToken=b03f5f7f11d50a3a" /> 
             <add name="c" type="Microsoft.SharePoint.Administration.Claims.SPClaimsAuthRoleProvider, 
    Microsoft.SharePoint, Version=14.0.0.0, Culture=neutral, PublicKeyToken=71e9bce111e9429c" /> 
       </providers> 
    </roleManager>
     
  21. Locate the <roleManager> entry
  22. Replace everything from <roleManager> to </roleManager> with the following XML:
     
    <roleManager enabled="true" 
       cacheRolesInCookie="false" 
       cookieName=".ASPXROLES" 
       cookieTimeout="30" 
       cookiePath="/" 
       cookieRequireSSL="false" 
       cookieSlidingExpiration="true" 
       cookieProtection="All" 
       defaultProvider="c" 
       createPersistentCookie="false" 
       maxCachedResults="25"> 
          <providers> 
             <clear /> 
             <add connectionStringName="AspNetSqlMemberShipProvider" 
                applicationName="/" 
                name="AspNetSqlRoleProvider" 
                type="System.Web.Security.SqlRoleProvider, System.Web, Version=2.0.0.0, 
    Culture=neutral, PublicKeyToken=b03f5f7f11d50a3a" /> 
             <add applicationName="/" 
                name="SqlRole" 
                type="System.Web.Security.WindowsTokenRoleProvider, System.Web, Version=2.0.0.0, 
    Culture=neutral, PublicKeyToken=b03f5f7f11d50a3a" /> 
             <add name="c" type="Microsoft.SharePoint.Administration.Claims.SPClaimsAuthRoleProvider, 
    Microsoft.SharePoint, Version=14.0.0.0, Culture=neutral, PublicKeyToken=71e9bce111e9429c" /> 
       </providers> 
    </roleManager>
     
  23. Paste the following XML below the PeoplePickerWildcards entry
     
    <clear />
    <add key="AspNetSqlMembershipProvider" value="%" />
    <add key="SqlMember" value="%"/>
    <add key="SqlRole" value="%"/>

Add a user policy to the web application
  1. Go to Central Administration
  2. Go to Application Management
  3. Click on Manage Web Applications
  4. Select the claims based web application
  5. Click on User Policy
  6. Click on the Add Users link
  7. Click the Next button.
  8. Click the Address Book icon.
  9. Type in the NT login name or account name and click the search button. If it's working correctly you should see at least two entries for the account - one that is for the user's Active Directory account, and one that is for that same account but which was found using the LDAP provider.
  10. Select the account in the User section and click the Add button
  11. Click the OK button
  12. Check the Full Control checkbox, then click the Finish button
  13. If you have configured dual mode, you can even go to your claim based web application and add SQL user directly there

    Sharepoint7.gif
     
  14. You have added your user; then open your claims web application in Forms mode

    Sharepoint8.gif
     
  15. Type your user ID and password. You are able to login.

    Sharepoint9.gif

Troubleshooting Configuration and Unhandled Exception Errors

I got the following errors while configuring the case, so you may also get the same. If you get any of these errors you have to ensure that the connection name, membership and role provider names are correct in all the three web.config files.

Sharepoint10.gif

Sharepoint11.gif

Another issue I faced is that while trying to select users in people picker, I didn't get the users from SQL server. This issue occurs because your application pool service account doesn't have admin privilege in SQL database that we configured in the first step.

Feel free to mail me if you face any problem while configuring FBA with SharePoint 2010.
 

Next Recommended Readings