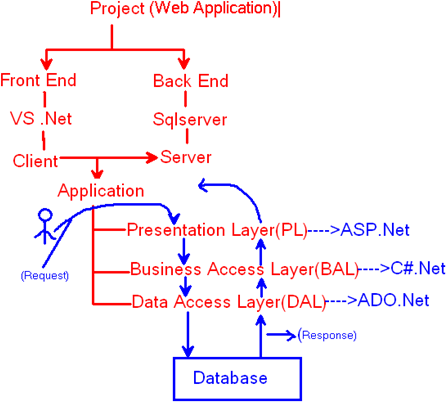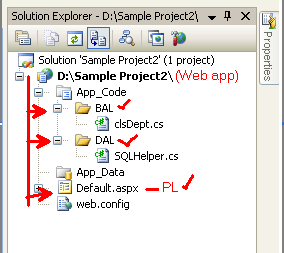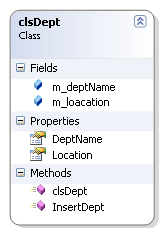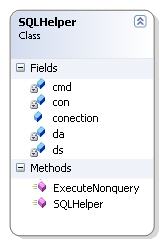
- If we want to develop a web project, we need "Front End" and "Back End".
- Front End is Microsoft Visual Studio (MS .NET 3.5/4.0).
- Back End is Microsoft SQL Server 2005/2008 (Database).
- Front End is also called the "Client". That means that .Net is the client.
- Back End is also called the "Server". That means that SQL Server 2005/2008 is the server.
- If we want to establish a connection between the client and the server, we need an "Application/Program".
- The application is divided into 3-Layers.
- Presentation layer
- Business Access Layer
- Data Access Layer
Presentation Layer (PL):
Presentation layer contains ASP.Net.
ASP.Net:
By using ASP.Net we can develop a web application. Web applications are universal applications. A universal application can be accessed anywhere in the world. By using ASP.Net we can design the web forms. Total web form designs under Presentation layer.
Business Access layer (BAL):
The Business Access Layer has C# .Net. By using C# .Net we can write coding. The BAL contains classes.
Data Access Layer (DAL):
The Data Access Later has ADO.Net. ADO.Net is used to establish the connection with the database/server.
Back end:
1. Create database:
Create database dept
use dept
2. Create table:
Create table dptment
(
DeptId int identity(1,1) primary key,
DeptName varchar(25),
Location varchar(25)
)
3. Create Stored procedure for inserting data into the database:
Create Proc SP_Insert
(
@DeptName varchar(25),
@Location varchar(25)
)
As
Begin
if not exists(select DeptName from dptment where DeptName=@DeptName)
begin
insert into dptment(DeptName,Location) values(@DeptName,@Location)
end
end
Front end:

--->open web.config file.
---->In that web.config file, go to connection string tag.
---->And Change it to:
1) datasource(your systemname/server name)
2)Intial Catalog(Database name)
3) User Id(Sqlserver Login Id)
4) Password(Sqlserver password)

Presentation layer:

Code behind:
using System;
using System.Configuration;
using System.Data;
using System.Linq;
using System.Web;
using System.Web.Security;
using System.Web.UI;
using System.Web.UI.HtmlControls;
using System.Web.UI.WebControls;
using System.Web.UI.WebControls.WebParts;
using System.Xml.Linq;
public partial class _Default : System.Web.UI.Page
{
clsDept obj = new clsDept();
protected void Page_Load(object sender, EventArgs e)
{
}
protected void btnDept_Click(object sender, EventArgs e)
{
obj.m_deptName = Convert.ToString(txtDeptName.Text);
obj.m_loacation = Convert.ToString(txtDeptLocation.Text);
int result = obj.InsertDept();
if (result > 0)
{
Label1.Text = "Succefully added";
}
else
{
Label1.Text = "not added";
}
}
}
Business access layer:

using System;
using System.Data;
using System.Configuration;
using System.Linq;
using System.Web;
using System.Web.Security;
using System.Web.UI;
using System.Web.UI.HtmlControls;
using System.Web.UI.WebControls;
using System.Web.UI.WebControls.WebParts;
using System.Xml.Linq;
using System.Data.SqlClient;
/// <summary>
/// Summary description for clsDept
/// </summary>
public class clsDept
{
public clsDept()
{
//
// TODO: Add constructor logic here
//
}
//Fields
public string m_deptName, m_loacation;
//Properties
public string DeptName
{
get { return m_deptName; }
set { m_deptName = value; }
}
public string Location
{
get { return m_loacation; }
set { m_loacation = value; }
}
//Method
public int InsertDept()
{
SqlParameter[] p = new SqlParameter[2];
p[0] = new SqlParameter("@DeptName",DeptName);
p[1] = new SqlParameter("@Location",Location);
int res = SQLHelper.ExecuteNonquery(SQLHelper.conection,CommandType.StoredProcedure,"SP_Insert",p);
return res;
}
}
Data access layer:
-
Create a class named SQLHelper.
-
Write ExecuteNonquery() in that class.
-
By ExecuteNonquery() method insert data into database.

using System;
using System.Data;
using System.Configuration;
using System.Linq;
using System.Web;
using System.Web.Security;
using System.Web.UI;
using System.Web.UI.HtmlControls;
using System.Web.UI.WebControls;
using System.Web.UI.WebControls.WebParts;
using System.Xml.Linq;
using System.Data.SqlClient;
/// <summary>
/// Summary description for SQLHelper
/// </summary>
public class SQLHelper
{
static SqlConnection con;
static SqlCommand cmd;
static SqlDataAdapter da;
static DataSet ds;
public SQLHelper()
{
//
// TODO: Add constructor logic here
//
}
public static string conection = ConfigurationManager.ConnectionStrings["SqlCon"].ConnectionString;
public static int ExecuteNonquery(string connectionString, CommandType commandType, string commandText, SqlParameter[] parameters)|
{
try
{
con = new SqlConnection(connectionString);
cmd = new SqlCommand(commandText, con);
cmd.CommandType = commandType;
foreach (SqlParameter p in parameters)
{
if (p.Value == null)
{
}
cmd.Parameters.Add(p);
}
con.Open();
return cmd.ExecuteNonQuery();
}
catch (Exception ex)
{
throw new ArgumentException(ex.Message);
}
finally
{
con.Close();
}
}
}