ADO.NET Entity Framework is an object-relationship management (ORM) tool like Hibernate in java or N Hibernate for .net. ADO.NET Entity Framework is included with .NET Framework 3.5 Service Pack 1 and Visual Studio 2008 Service Pack 1. Please make sure you have and Visual Studio 2008 Service Pack 1 installed in your system. For more information about ADO.NET Entity Framework you can refer to Microsoft site.
One practical is worth more than a thousand words. So let us start with creating a very simple example.
Step 1: Create a database table.
Create a database in SQL Server 2005 and name it as Payroll.
On the payroll database create an Employee table as follows.
USE [Payroll]
GO
SET ANSI_NULLS ON
GO
SET QUOTED_IDENTIFIER ON
GO
CREATE TABLE [dbo].[Employee](
[EmployeeID] [int] IDENTITY(1,1) NOT NULL,
[Name] [nvarchar](50) NOT NULL,
[Title] [nvarchar](50) NOT NULL,
[BirthDate] [datetime] NOT NULL,
[MaritalStatus] [nchar](1) NOT NULL,
[Gender] [nchar](1) NOT NULL,
[HireDate] [datetime] NOT NULL,
CONSTRAINT [PK_Employee] PRIMARY KEY CLUSTERED
(
[EmployeeID] ASC
)WITH (PAD_INDEX = OFF, STATISTICS_NORECOMPUTE = OFF, IGNORE_DUP_KEY = OFF, ALLOW_ROW_LOCKS = ON, ALLOW_PAGE_LOCKS = ON) ON [PRIMARY]
) ON [PRIMARY]
Step 2: Data Layer
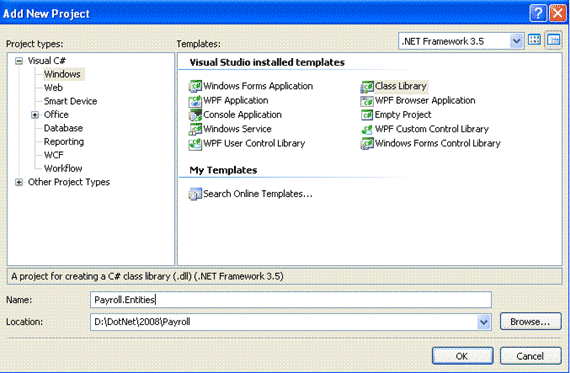
In the visual studio 2008 Make a new Blank solution and name it as Payroll. In the solution add a new class library project. Name it as Payroll.Entities as shown in following image.
Remove the class1.cs from project. Add a new item to project a select. ADO.NET Entity data Model.
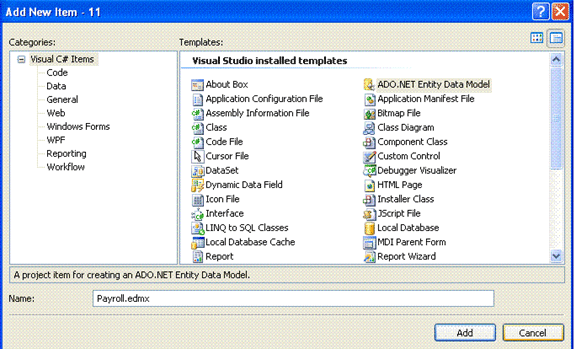
Rename it as Payroll.edmx. Click on add. Select generate from the database and click on next choose database connection and the given textbox for connection string rename it with PayrollDAO
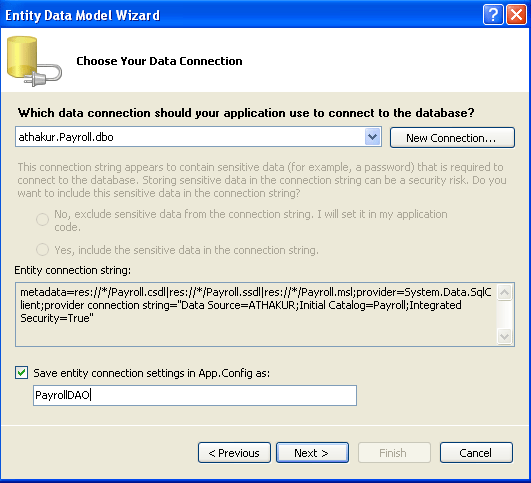
From the next screen select the employee table and click on finish. Compile the project. Now data layer is ready for you.
Step 3: Business/Service Layer
In the solution Payroll add a new class library project. Name it as Payroll.Service. Rename the class1.cs as EmployeeService.cs. Make the reference to System.Data.Entity. and also add the refrence to Payroll.Entities project we have created. Now add two methods GetEmployee and AddEmployee. Your class should look like this
using System;
using System.Collections.Generic;
using System.Linq;
using System.Text;
using Payroll.Entities;
using System.Data.Objects;
using System.Data.Objects.DataClasses;
namespace Payroll.Service
{
public class EmployeeService
{
public List<Employee> GetEmployee()
{
PayrollDAO payrollDAO = new PayrollDAO();
ObjectQuery<Employee> employeeQuery = payrollDAO.Employee;
return employeeQuery.ToList();
}
public string AddEmpoyee(Payroll.Entities.Employee e1)
{
PayrollDAO payrollDAO = new PayrollDAO();
payrollDAO.AddToEmployee(e1);
payrollDAO.SaveChanges();
return "SUCCESS";
}
}
}
Compile the project. Service layer is ready for you.
Step 4: Presentation Layer
Add a new web site with name "WebApp" to the payroll solution and set it as startup project. In the default.aspx add a gridview and button as shown in following figure
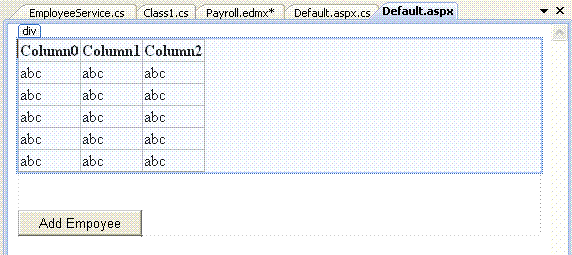
Set button text to Add Employee. Make the reference to System.Data.Entity and also add the refrence to Payroll.Service project we have created in step 3.
Add the code on page load and buttion1_click, Default.aspx.cs should look like this
using System;
using System.Collections.Generic;
using System.Linq;
using System.Web;
using System.Web.UI;
using System.Web.UI.WebControls;
using Payroll.Service;
public partial class _Default : System.Web.UI.Page
{
protected void Page_Load(object sender, EventArgs e)
{
EmployeeService es= new EmployeeService();
GridView1.DataSource = es.GetEmployee();
GridView1.DataBind();
}
protected void Button1_Click(object sender, EventArgs e)
{
EmployeeService es = new EmployeeService();
DateTime dt = new DateTime(2008, 12, 12);
Payroll.Entities.Employee e1 = Payroll.Entities.Employee.CreateEmployee(0, "Anand", "Thakur", dt, "M", "M", dt);
es.AddEmpoyee(e1);
}
}
Copy the connectionStrings from App.config of Data Layer(Payroll.Entities) project and paste in web.config of web application
<connectionStrings>
<add name="PayrollDAO" connectionString="metadata=res://*/Payroll.csdl|res://*/Payroll.ssdl|res://*/Payroll.msl;provider=System.Data.SqlClient;provider connection string="Data Source=ATHAKUR;Initial Catalog=Payroll;Integrated Security=True;MultipleActiveResultSets=True"" providerName="System.Data.EntityClient" />
</connectionStrings>
Now build and run the web application.
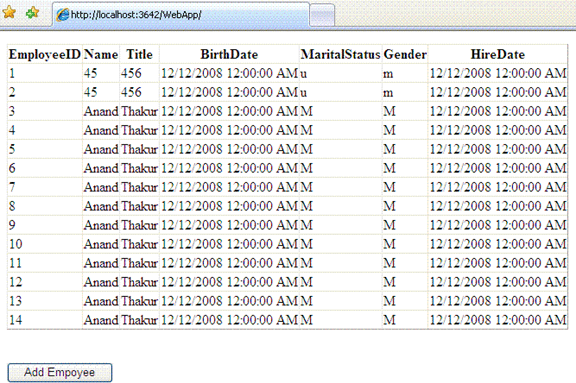
Click on add employee, new employee should be added to database.
Conclusion:
This is a very basic example with single table. In the next part, I will try to include more tables with CRUD operations.