Introduction
All of the web applications developed usually have more than one page and they are usually interconnected via some mechanism. In ASP.Net 1.x, navigation was made possible by using hyperlinks with the help of include file or user controls. They are pretty handy but not so much when the pages are moved around or their names change.
So in order to overcome this drawback, ASP.Net 2.0 introduces the new Site Navigation System. Site navigation uses the layered architecture. Controls such as Menu and TreeView provide the navigation UIs. Classes such as SiteMap and SiteMapNode provide the API that the controls rely on and also constitute an API you can use yourself if you wish. Site navigation is provider-based, and the one site map provider that comes with ASP.NET 2.0 -> XmlSiteMapProvider -> reads site maps from XML data files. By default, those files are named Web.sitemap. In the providers' lab, students write a custom site map provider that reads site maps from a SQL Server database.
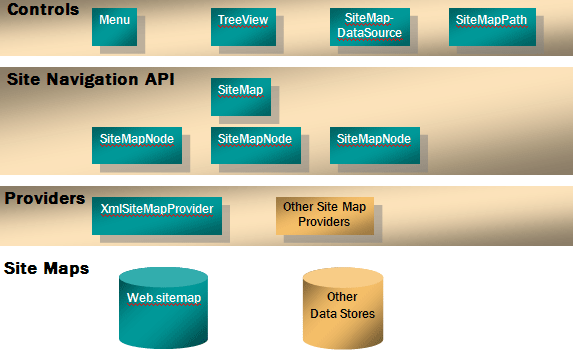
Lets us discuss each on of them one at a time.
Site Map in ASP.Net 2.0
Site Maps help us define the layout of all the pages in the application and their inherent relation with each other. For this, one could either use the SiteMap Class or the SiteMapDataSource control.
SiteMapDataSource controls use site map providers to read site maps. They then provide the site map data to the controls they're bound to. Binding a TreeView to a SiteMapDataSource transforms each node in the site map into a TreeView node; binding a Menu to a SiteMapDataSource transforms each node in the site map into a menu item. The only site map provider that comes with ASP.NET 2.0 is XmlSiteMapProvider. It enables site maps to be read from XML files that conform to a predefined schema.
Take up the following steps to create a site map ->
-
Start Visual Studio 2005 IDE.
-
Create a new ASP.Net website using C# as language on file system.
-
Right Click on solution and add a new item. From the Add item Wizard, add a new site map. Let the name be Web.sitemap (default name)
-
Add the following code to it:-
<?xml version="1.0" encoding="utf-8" ?>
<siteMap xmlns="http://schemas.microsoft.com/AspNet/SiteMap-File-1.0">
<siteMapNode title="Home" description="Login Page" url="Home.aspx">
<siteMapNode title="Admin" description="Administration Functionalities" url="Admin/AdminHome.aspx">
<siteMapNode title="Create User" description="Create User" url="Admin/CreateUser.aspx"/>
<siteMapNode title="Manage Roles" description="Create/Delete Roles" url="Admin/CreateRoles.aspx"/>
<siteMapNode title="Assign Roles" description="Re-Assign Roles" url="Admin/ManageRoles.aspx"/>
</siteMapNode>
<siteMapNode roles="" title="Search" description="Search Employee" url="Personal/Search.aspx"/>
</siteMapNode>
</siteMap>
Only one <sitemap> element can be there in the site map file and there can be multiple <siteMapNode > element within the root node i.e. <sitemap>
Within the <siteMapNode> element, we have following attributes->
-
Title -> This is actual description which appears as a hyperlink.
-
Description -> Tool Tip which comes up when we hover over that particular siteMapNode.
-
url -> this is the file located within the solution. It can be located within the root folder or within a sub-folder created within the solution.
-
Role -> the roles to which the links should be accessible.
"Security trimming" refers to SiteMapDataSource's ability to hide nodes from users who lack proper authorization. Authorization is role-based and is enacted by including roles attributes in <siteMapNode> elements. Of course, you can use ASP.NET 2.0 Role Management service to define roles and map users to roles. Security trimming is disabled by default in XmlSiteMapProvider. You can enable it by including these statements in Web.config.
<configuration>
<system.web>
<siteMap>
<providers>
<remove name="AspNetXmlSiteMapProvider" />
<add name="AspNetXmlSiteMapProvider"
type="System.Web.XmlSiteMapProvider, System.Web, ..."
securityTrimmingEnabled="true"
siteMapFile="web.sitemap" />
</providers>
</siteMap>
</system.web>
</configuration>
Tree View Server control
This is a new server control that has been added to ASP.Net 2.0. It can be used to display the hierarchy of the links contained within the site map file. Once, the Web.sitemap is created, drag and drop a SiteMapDataSource control on the form. It automatically binds it self to web.sitemap file. Then, drop a treeView control on the form and set the DataSource id to SiteMapDataSource1 as shown in the figure below ->
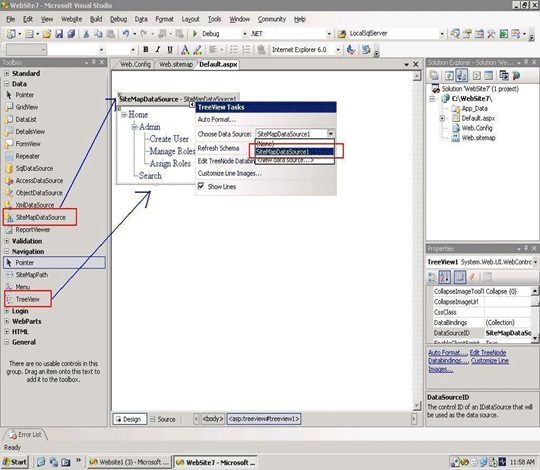
As soon as you specify the data source id, the structure gets populated in the tree view control. One can go about changing the look and the feel of the tree view control using Auto Format and from the property window of the control.
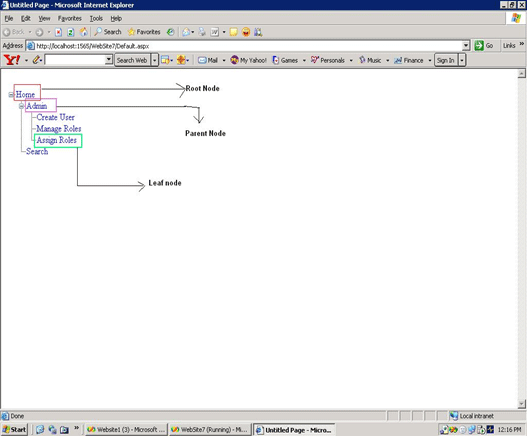
Every element that appears as a part of tree view control is called as a node. The top-most element or node is called as the root node and any nodes that appear under the root node as referred to as child nodes. The node that does not have any elements under it is called as the leaf node.
XMLDataSource Control
It is also possible to bind a Tree View control to an XML file. For this, you need to create an XML file and populate the tree view control from the XML file.
As an example, let's create an XML file having a structure something below:-
<?xml version="1.0" encoding="utf-8" ?>
<Controls>
<Item Category="Server Controls">
<Option Choice="Tree view"/>
<Option Choice="Menu Control"/>
</Item>
</Controls>
Then, drag and drop an XmlDataSource control on the form and set the data source to the xml file you just created. Click on Ok once done.
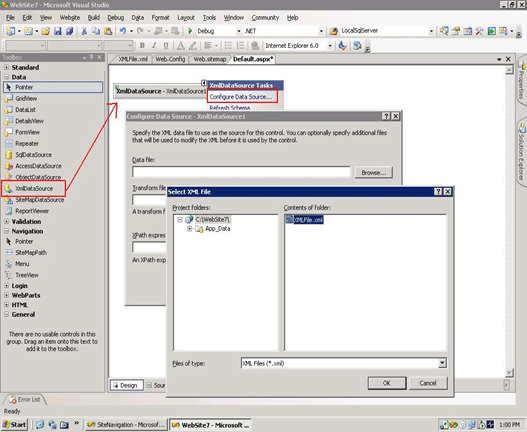
Then, drag and drop a tree view control on the form and specify the data source id to be the XmlDataSource1 that you have placed on the form configured to use xml file.
If you notice, the tree view control gets populated and renders something below:-
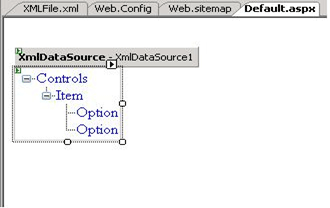
If you look at the above results, nodes display names of the actual XML elements from the file itself. You need to specify how to bind to the XML file with the use of the <DataBindings> element within the tree view control.
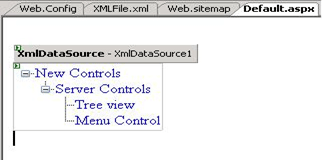
The < DataBindings>, element encapsulates one or more TreeNodeBinding objects. DataMember and TextField are two important properties available within the TreeNodeBinding object. The DataMember refers to the name of the XML element that control should look for and the TextField specifies the XML attribute within the particular XML element. So it should be ->
<asp:TreeView ID="TreeView1" runat="server" DataSourceID="XmlDataSource1" ShowLines="True">
<DataBindings>
<asp:TreeNodeBinding DataMember="Controls" Text="New Controls"/>
<asp:TreeNodeBinding DataMember="Item" TextField="Category" />
<asp:TreeNodeBinding DataMember="Option" TextField="Choice" />
</DataBindings> </asp:TreeView>
By default, when you run the above application the tree view controls renders the data elements as expanded. If you wish that they should appear collapsed on the page load event, and should be expanded on user action, then add the DataBound event wired up with the Tree View control as
protected void TreeView1_DataBound(object sender, EventArgs e)
{
TreeView1.CollapseAll();
}
Once collapsed, you can expand it back on the click of the button having the following code:-
protected void Button1_Click(object sender, EventArgs e)
{
TreeView1.ExpandAll();
}
It is also liley possible that you might not only be using the TreeView control for navigation, but also for making certain user selection. For this, the TreeView control provides a functionality where-in the check boxes can be put up against the items. All you need to do for this, is to go to the properties of the tree View control and set the ShowCheckBoxes property to leaf. By default, it is set to none
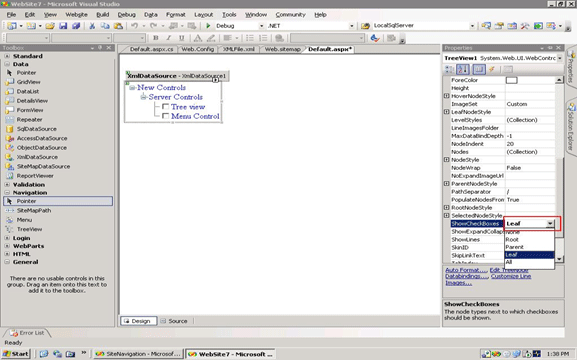
This could also be done programmatically by simple code of line ->
TreeView1.ShowCheckBoxes = TreeNodeTypes.Leaf;
Once done, you can loop through the TreeView to return the items that have been selected by the user as stated below:-
foreach (TreeNode node in TreeView1.CheckedNodes)
{
Label1.Text += node.Text ;
}
Site Map API
The SiteMap and SiteMapNode classes provide the API used by SiteMapPath controls. If desired, you can use this API yourself to manually read site maps or even to build site map path controls of your own. System.Web.SiteMap represents site maps ->
-
RootNode property identifies root node
-
CurrentNode property identifies current node
-
SiteMapNode represents nodes
// Write the title of the current node to a Label control
Label1.Text = SiteMap.CurrentNode.Title;
// Write the path to the current node to a Label control
SiteMapNode node = SiteMap.CurrentNode;
StringBuilder builder = new StringBuilder(node.Title);
while (node.ParentNode != null)
{
node = node.ParentNode;
builder.Insert(0, " > ");
builder.Insert(0, node.Title);
}
Label1.Text = builder.ToString();
The first statement in this example retrieves the text of the current node from SiteMap.CurrentNode.Title and displays it by writing it to a Label control. The remaining statements output the path to the current node. Each node in the path is separated by a greater-than sign.
Other Server Controls
a. Menu Server Control
Using the Menu server control is very similar to Tree View control. All you need to do is to drag and drop a SiteMapDataSource control on the form and bind the menu server control to the SiteMapDataSource. One can apply styles via the property window associated with the menu server control.
This control should be used when there are a lot of options to select from. It could be navigation points or the selections that the user can make.
b. SiteMapPath Control
This control creates a navigation hierarchy what is sometimes referred to as Bread crumb navigation. The SiteMapPath control does not need a data source. All one needs is to drag and drop a SiteMap path control onto the page and you all have the results at your disposal. You can change the properties such as the depth of the hierarchy and styles.
Conclusion
Site Navigation is a feature that you further exploit upon owing to great functionality that it offers. The article does not delve deeply into the menu server control for site navigation but underlying mechanism is the same as the tree view control.