There may be requirements for your project where you want to display your DropDownList with some specific value. For that binding data from a database is too costly.
You can add the value into a DropDownList. But the problem is that if there are any more items then you have to go to the .aspx file or .cs file and you have to add the new item(s).
So the best practice is to add your DropDownList item data into a separate XML file. So whereever you use the DropDownList you can bind the XML file. If any change is required then you just add the new item into the XML file. That's it. All the DropDownList controls that use the XML file gets the new item data.
So you don't have to go to change the separate DropDownList data.
Now I am going to tell you the process of binding the XML file to the DropDownList.
Step 1:
Create a new Web project in your Visual Studio.
Step 2:
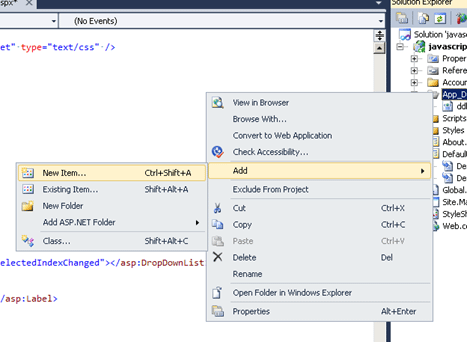
Now we have to create the XML file. So right-click the "App_Data" then click Add->NewItem.

Step 3:
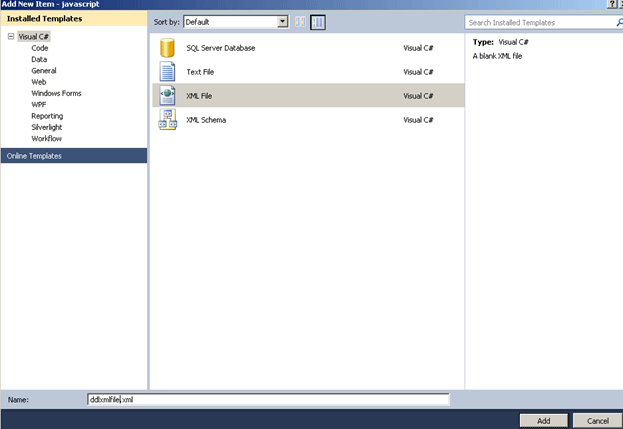
Now click on XML file and give the file name "ddlxmlfile.xml". After that click the "Add" Button.

Step 4:
Now in the XML file paste the following code:
<ListItems>
<ListItem text="--SELECT--" value="0"></ListItem>
<ListItem text="Pen" value="1"></ListItem>
<ListItem text="Watch" value="2"></ListItem>
<ListItem text="Rice" value="3"></ListItem>
<ListItem text="Powder" value="4"></ListItem>
<ListItem text="DeoDrant" value="5"></ListItem>
</ListItems>
See here I have written all my items under my root "<ListItem>".
Step 5:
Now go to the "Default.aspx" file.
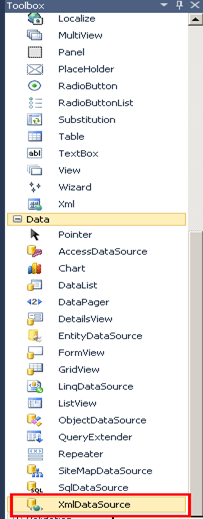
After that you have to attach the "xmldatasource" from the tool box.

Step 6:
Now we have to add some properties into the "xmldatasouce" for binding the XML file.
<asp:XmlDataSource ID="XmlDataSource1" runat="server"
DataFile="~/App_Data/ddlxmlFile.xml"
XPath="ListItems/ListItem">
</asp:XmlDataSource>


See here the "Datafile" properties provides the XML file name.
And the "xpath" property provides the root node and the child node for the bindingxml file.
Step 7:
Now to attach the DropDownList and to bind it to the XML datasource.
For that see the code:
<asp:DropDownList ID="DropDownList1"
runat="server"
DataSourceID="XmlDataSource1"
DataTextField="text"
DataValueField="value"
AutoPostBack="True"
OnSelectedIndexChanged="DropDownList1_SelectedIndexChanged"></asp:DropDownList>
Fig:
See in the DropDownList the "DatasourceID" property is for providing the DataSourceID. For this we specify "XmlDataSource1".
The properties DataTextField and DataValueField give the "text" and "value" which are in the XmlFile.
Also add a label in the aspx file. So when you click on the DropDownList it will display the selected item and the selected text.
<asp:Label ID="Label1" runat="server"></asp:Label>
So the whole code for the "default.aspx" is:
<%@ Page Title="Home Page" Language="C#" MasterPageFile="~/Site.master" AutoEventWireup="true"
CodeBehind="Default.aspx.cs" Inherits="javascript._Default" %>
<asp:Content ID="HeaderContent" runat="server" ContentPlaceHolderID="HeadContent">
</asp:Content>
<asp:Content ID="BodyContent" runat="server" ContentPlaceHolderID="MainContent">
<h2>
Welcome To the MAtrix World..
</h2>
<link href="StyleSheet1.css" rel="stylesheet" type="text/css" />
<script type="text/javascript">
</script>
<table >
<tr>
<td>
<asp:DropDownList ID="DropDownList1"
runat="server"
DataSourceID="XmlDataSource1"
DataTextField="text"
DataValueField="value"
AutoPostBack="True"
OnSelectedIndexChanged="DropDownList1_SelectedIndexChanged"></asp:DropDownList>
</td>
<td>
<asp:Label ID="Label1" runat="server"></asp:Label>
</td>
</tr>
</table>
<asp:XmlDataSource ID="XmlDataSource1" runat="server"
DataFile="~/App_Data/ddlxmlFile.xml"
XPath="ListItems/ListItem">
</asp:XmlDataSource>
</asp:Content>
Step 8:
Now the defalt.aspx.cs file code is:
using System;
using System.Collections.Generic;
using System.Linq;
using System.Web;
using System.Web.UI;
using System.Web.UI.WebControls;
namespace javascript
{
public partial class _Default : System.Web.UI.Page
{
protected void Page_Load(object sender, EventArgs e)
{
}
protected void DropDownList1_SelectedIndexChanged(object sender, EventArgs e)
{
Label1.Text = "Selected Item text = <b>" + DropDownList1.SelectedItem.Text + "</b><br />";
Label1.Text += "Selected Item Value = <b>" + DropDownList1.SelectedItem.Value + "</b>";
}
}
}
See in the above code we are gerring the selected item and also the selected item order number.
Step 9:
Now run the code. It will look like:

See the DropDownList is bound to the XML file where we put these items.
Now when you click any item it will look like:

See I select the item "pen" so it will show the selected Item text="pen" and the selected value=1.
Conclusion: So in this article we have seen how to bind the XML datasource to a DropDownList.