Introduction:
In this article, we will see how to use COM in a Silverlight OOB Application.
Creating Silverlight OOB Application:
Fire up the VS 2010, create Silverlight Application and Name it SLOOBAppWithWindowsLib.
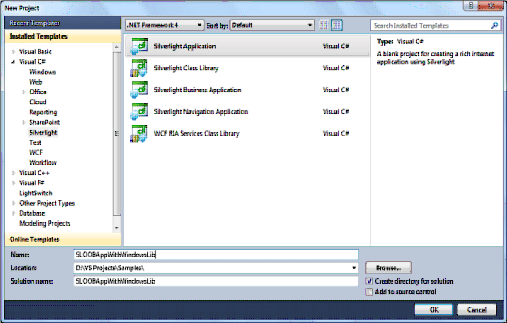
The important thing to have in mind while creating an OOB Application is to enable the OutOfBrowser checkbox in Silverlight application properties window.

In Window 1, the left side arrow shows the checkbox to be unchecked to enable the Silverlight application as OOB application. The next arrow indicates the button to be clicked which pop ups the Window 2.
In Window 2, the Red Rectangular has two checkboxes. The first one enables the Silverlight application to have an option to install menu on application Right-Click.
If the second checkbox is enabled, then the Silverlight gives some functionality to your application such as accessing MyDocument Root path.
Creating Windows Class Library Project:
Right-Click the solution and choose Add -> New Project.
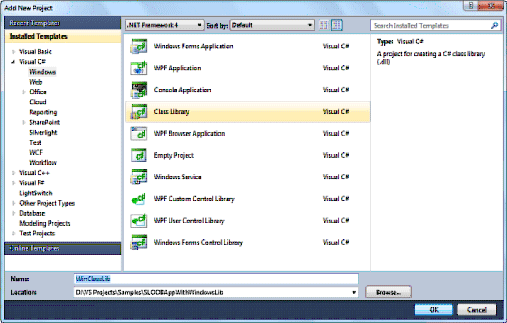
In this project, we could have our COM do something, which cannot be done in Silverlight application. However, as a simple application, we are writing a simple COM object that returns a string.
Creating COM:
The image below shows the Class and Method used in the COM.
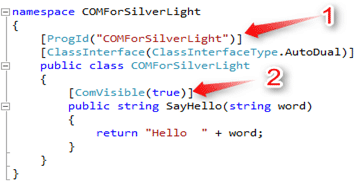
In the COMForSilverLight project, create a class COMForSilverLight. In the figure above, Note 1 shows the [ProgId ("COMForSilverlight")], which is the programmatic identifier for the COM.
The following list shows a few common ProgId values:
- Office Automation: Outlook.Application, Excel.Application, PowerPoint.Application
- System Automation: Scripting.FileSystemObject, WScript.Shell, Shell.Application
- Windows Management Instrumentation: WbemScripting.SWbemLocator
In our application, we are using our own sample COM so the ProgId for our COM [Automation Server] is COMForSilverLight.
The Note 2 shows the visibility of the method. This should be true.
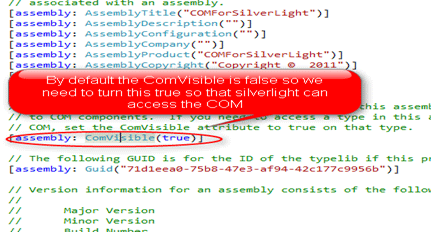
Important thing to do is that we have to make the ComVisibe as true in the AssemblyInfo.cs file because by default it is false.
Registering COM:
To register the COM, run the VS Command Prompt. In addition, execute the RegAsm.exe with the arguments as /codebase <COM path>. The COM is nothing but our Windows Class Library dll. So provide the full name of the dll file as argument for RegAsm.

After writing the code for COM, just build it. Then we have to register the COM to access the Silverlight application.
AutomationFactory Class to access the COM:
Automation is a Windows-based technology that applications use to expose functionality to scripting tools and other applications. For example, you can use Automation to add Office features to your Silverlight-based applications.
An application or component exposing functionality is called an Automation server; an application accessing the functionality is called an Automation client. Because Automation servers must be preinstalled and run in full trust, Silverlight enables only trusted applications to serve as Automation clients.
To know more about AutomationFactory visit the site.
The AutomationFactory class is used to initiate the Automation Server i.e. COM.

In this piece of code first of all we are checking that whether this application has the elevated trust or not and automation factory specialty.
Here we are using the dynamic keyword as the AutomationFactory.CreateObject () will be resolved in runtime.
We are getting the string from user via text box and passing that to COM. The COM will return the string with Hello.
Simple UI for this Application:
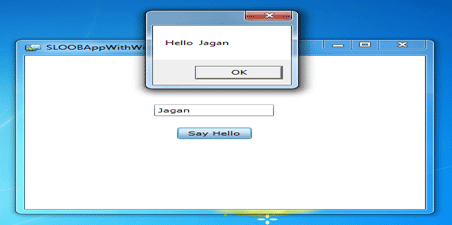
Using the COM, we can access the entire system as we can directly access the drives and can get the information about the system etc.
Summary:
In this article, we discussed about that how to use the COM and AutomationFactory in Silverlight.
Thanks for spending your precious time here. Please provide your valuable feedbacks and comments, which motivaters me to give a better article next time.