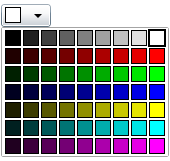
Creating a ColorSelector Control
The ColorSelector element represents a ColorSelector control in XAML.
<liquid:ColorSelector />
The Background property represents a Background color of the ColorSelector. The BorderBrush Propoerty represents a Border of the ColorSelector, X:Name property represents a name of the ColorSelector.
The code snippet creates a ColorSelector control and sets the Background, BorderBrush and X:Name Property.
<liquid:ColorSelector Background="Black" BorderBrush="Blue" x:Name="selectColor" SelectionChanged="selectColor_SelectionChanged" />
SilverlightColorSelector.xaml
<UserControl x:Class="SilverlightColorSelector.Page"
xmlns="http://schemas.microsoft.com/winfx/2006/xaml/presentation"
xmlns:x="http://schemas.microsoft.com/winfx/2006/xaml"
xmlns:liquid="clr-namespace:Liquid;assembly=Liquid"
Width="400" Height="300">
<Grid x:Name="LayoutRoot">
<liquid:ColorSelector Background="Blue" BorderBrush="Green" x:Name="selectColor" SelectionChanged="selectColor_SelectionChanged" />
</Grid>
</UserControl>
SilverlightColorSelector.xaml.CS
using System;
using System.Collections.Generic;
using System.Linq;
using System.Net;
using System.Windows;
using System.Windows.Controls;
using System.Windows.Documents;
using System.Windows.Input;
using System.Windows.Media;
using System.Windows.Media.Animation;
using System.Windows.Shapes;
namespace SilverlightColorSelector
{
public partial class Page : UserControl
{
public Page()
{
InitializeComponent();
}
private void selectColor_SelectionChanged(object sender, EventArgs e)
{
LayoutRoot.Background = new SolidColorBrush(selectColor.Selected);
}
}
}
The output is :

Figure 1
If you select any color like Blue the Result is :

Figure 2
Summary
In this article, I discussed how we can use a silverlight color selector control.