Opacity masks allow us to make portions of an object transparent or semi transparent. The OpacityMask property of an element (defined in the UIElement class) is used to apply an opacity mask on an object such as a Rectangle or an Image.
The following XAML code snippet uses an Image object to display an image.
<Image Source="Waterfall.jpg"
Width="300" Height="300">
The output looks like Figure 1.

Figure 1
The XAML code in Listing 1 sets the Image.OpacityMask property to the Image object to a LinearGradientBrush with three stops.
<Image Source="Waterfall.jpg" Width="300"
Height="300">
<Image.OpacityMask>
<LinearGradientBrush >
<GradientStop Color="Transparent" Offset="0"/>
<GradientStop Color="Black" Offset="0.25"/>
<GradientStop Color="Transparent" Offset="1"/>
</LinearGradientBrush>
</Image.OpacityMask>
</Image>
Listing 1.
The new output looks like Figure 2.

Figure 2. An opacity masked image
Since the OpacityMask property is defined in the UIElement, it can be applied to any element. For example, the following code generates a rectangle looks like Figure 3.
<Rectangle Width="300" Height="200"
Stroke="Black" StrokeThickness="4"
Fill="Yellow">
</Rectangle>
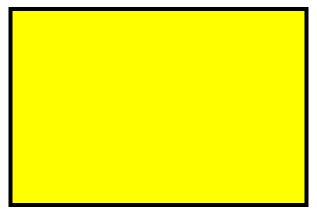
Figure 3. A rectangle
Now we can apply opacity mask on the rectangle and the new output looks like Figure 4 with the following code.
<Rectangle Width="300" Height="200"
Stroke="Black" StrokeThickness="4"
Fill="Yellow">
<Rectangle.OpacityMask>
<LinearGradientBrush >
<GradientStop Color="Transparent" Offset="0"/>
<GradientStop Color="Black" Offset="0.25"/>
<GradientStop Color="Transparent" Offset="1"/>
</LinearGradientBrush>
</Rectangle.OpacityMask>
</Rectangle>
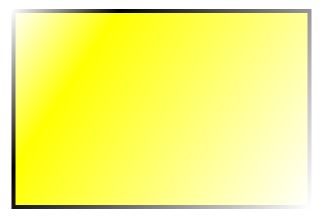
Figure 4. An opacity masked rectangle