Objective
In this article , I will show how to work with Silverlight Navigation framework.
Create a Silverlight Application by selecting Silverlight application from project template. And follow below steps.
Step 1: Adding references
Add below references to Silverlight application.
System.Windows.Control
System.Windos.Control.Data
System.Windows.Control.Navigation

Step 2 : Adding namespaces
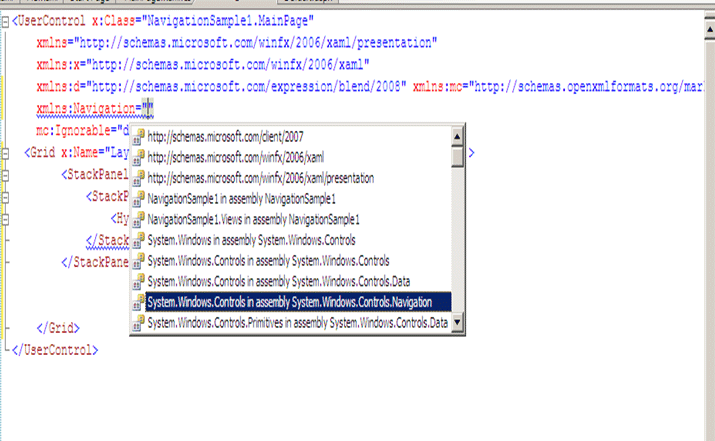
Open MainPage.Xaml and add the namespace. Give name of the namespace as Navigation and add System.Windows.Control.Navigation. See the image below.
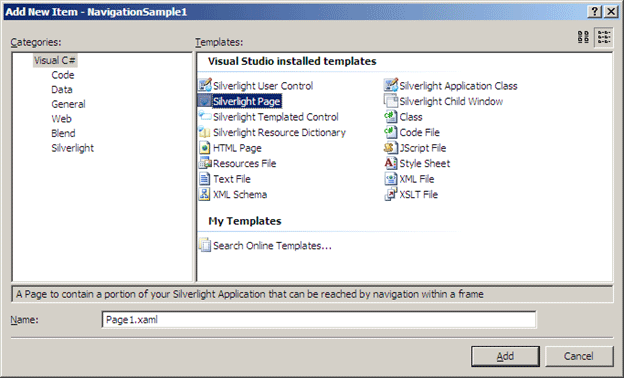
Step 3: Creating Silverlight Page for navigation
Now I am constructing the pages to navigate. Right click on Silverlight project and add a new folder. You can give any name to folder of your choice. I am giving name here View. Add two Silverlight pages inside this folder. To add right click on folder and add new Item then select Silverlight page. Page I am adding is
- Image.Xaml
- Me.Xaml
Me.Xaml
- Title of the page can be amending in Title tag. See the tag in bold.
- New added Silverlight page is navigation page.
- I have added a simple text block with some static text on the page for the demo purpose.
<navigation:Page x:Class="NavigationSample1.Views.Me"
xmlns="http://schemas.microsoft.com/winfx/2006/xaml/presentation"
xmlns:x="http://schemas.microsoft.com/winfx/2006/xaml"
xmlns:d=http://schemas.microsoft.com/expression/blend/2008
xmlns:mc=http://schemas.openxmlformats.org/markup-compatibility/2006
mc:Ignorable="d"
xmlns:navigation="clr-namespace:System.Windows.Controls;assembly=System.Windows.Controls.Navigation"
d:DesignWidth="640" d:DesignHeight="480"
Title="This Page is About Me">
<Grid x:Name="LayoutRoot">
<TextBlock Text="This Site is about me " FontSize="100" VerticalAlignment="Center" Foreground="Red" />
</Grid>
</navigation:Page>
Image.Xaml
- Title of the page can be amending in Title tag. See the tag in bold.
- New added Silverlight page is navigation page.
- One image is added for the demo purpose.
<navigation:Page x:Class="NavigationSample1.Views.Image"
xmlns="http://schemas.microsoft.com/winfx/2006/xaml/presentation"
xmlns:x="http://schemas.microsoft.com/winfx/2006/xaml"
xmlns:d=http://schemas.microsoft.com/expression/blend/2008
xmlns:mc=http://schemas.openxmlformats.org/markup-compatibility/2006
mc:Ignorable="d"
xmlns:navigation="clr-namespace:System.Windows.Controls;assembly=System.Windows.Controls.Navigation"
d:DesignWidth="640" d:DesignHeight="480"
Title="My Image">
<Grid x:Name="LayoutRoot">
<Image Height="auto" Width="auto" Source="a.jpg" />
</Grid>
</navigation:Page>
Step 4: Designing for navigation
Now it is time to design main page for navigation.
- I am adding two HyperLinkButtons. On clicking of buttons, we will navigate to other pages.
- There is TAG property of hyperlink, which says where hyperlink will navigate. Views are folder we added and Me.Xaml is Silverlight page to navigate.
Tag="/Views/Me.Xaml"
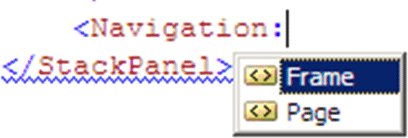
- Add either a frame or page to where navigated page will be open. There are two options either Page or Frame. Navigation is the name of the namespace we added. See the image below.
- Navigation framework can have many properties. I am setting few of them. See below.
<Navigation:Frame x:Name="MyFrame" HorizontalAlignment="Stretch" VerticalAlignment="Stretch" Margin="20" />
MainPage.Xaml
<UserControl x:Class="NavigationSample1.MainPage"
xmlns="http://schemas.microsoft.com/winfx/2006/xaml/presentation"
xmlns:x=http://schemas.microsoft.com/winfx/2006/xaml
xmlns:d="http://schemas.microsoft.com/expression/blend/2008" xmlns:mc="http://schemas.openxmlformats.org/markup-compatibility/2006"
xmlns:Navigation="clr-namespace:System.Windows.Controls;assembly=System.Windows.Controls.Navigation"
mc:Ignorable="d" d:DesignWidth="640" d:DesignHeight="480">
<Grid x:Name="LayoutRoot" Width="auto" Height="auto" Background="Wheat" >
<StackPanel Orientation="Horizontal" VerticalAlignment="Top" >
<StackPanel Orientation="Vertical" Width=" 250">
<HyperlinkButton x:Name="btnAbt" Tag="/Views/Me.Xaml" Content="About Me" FontSize="24" />
<HyperlinkButton x:Name="btnImg" Tag="/Views/Image.Xaml" Content="My Images" FontSize="24" />
</StackPanel>
<Navigation:Frame x:Name="MyFrame" HorizontalAlignment="Stretch" VerticalAlignment="Stretch" Margin="20" />
</StackPanel>
</Grid>
</UserControl>
Step 5: Writing code behind to navigate
- Add click event to hyperlinkbuttons.
btnAbt.Click += new RoutedEventHandler(NavigateToLink);
btnImg.Click +=new RoutedEventHandler(NavigateToLink);
- Handle the click event
void NavigateToLink(object sender, RoutedEventArgs e)
{
HyperlinkButton buttonToNavigate = sender as HyperlinkButton;
string urlToNavigate = buttonToNavigate.Tag.ToString();
this.MyFrame.Navigate(new Uri(urlToNavigate, UriKind.Relative));
}
MainPage.Xaml.cs
using System;
using System.Collections.Generic;
using System.Linq;
using System.Net;
using System.Windows;
using System.Windows.Controls;
using System.Windows.Documents;
using System.Windows.Input;
using System.Windows.Media;
using System.Windows.Media.Animation;
using System.Windows.Shapes;
namespace NavigationSample1
{
public partial class MainPage : UserControl
{
public MainPage()
{
InitializeComponent();
btnAbt.Click += new RoutedEventHandler(NavigateToLink);
btnImg.Click +=new RoutedEventHandler(NavigateToLink);
}
void NavigateToLink(object sender, RoutedEventArgs e)
{
HyperlinkButton buttonToNavigate = sender as HyperlinkButton;
string urlToNavigate = buttonToNavigate.Tag.ToString();
this.MyFrame.Navigate(new Uri(urlToNavigate, UriKind.Relative));
}
}
}
Step 6: Run the application.
You can see while clicking on the hyperlinks, we are able to navigate in the frame.
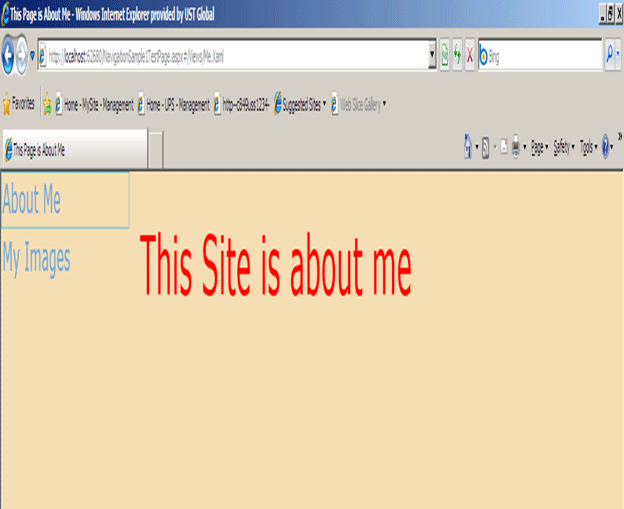
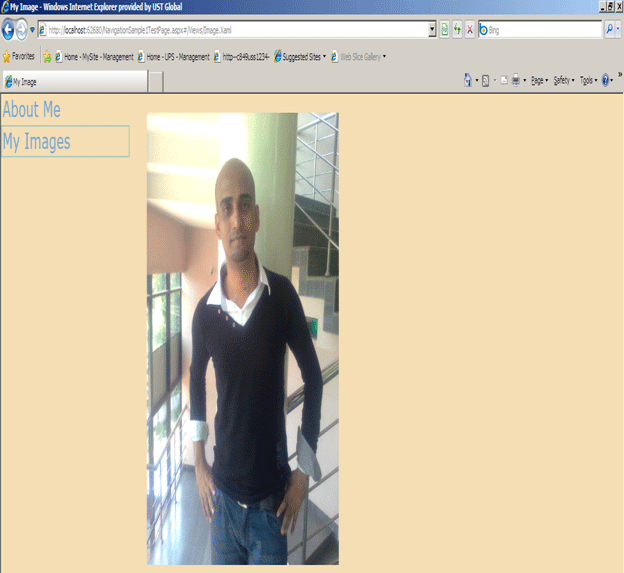
So, we are able to navigate through pages using navigation framework.
Conclusion
We saw how to work with navigation framework in this article. Thanks for reading