Objective:
This article will show, How to navigate between two SilverLight pages in silverLight2.0. This article is giving step by step illustration on how to navigate and pass values between two SilverLight pages.
In this SilverLight application user will input her name and two numbers in one Silverlight page and user will get greeting message and summation of input number in other SilverLight page.
Follow the steps:
Step 1:
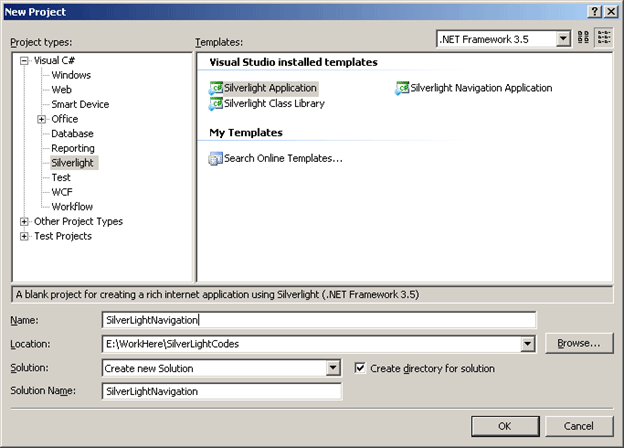
Create a Silver Light application.
a. Open visual studio
b. Select File->New ->Project -> Web
c. Navigate to Silver Light tab.
d. Select Silver Light application.
e. Give any meaningful name. I am giving name here, SilverLightNavigation.
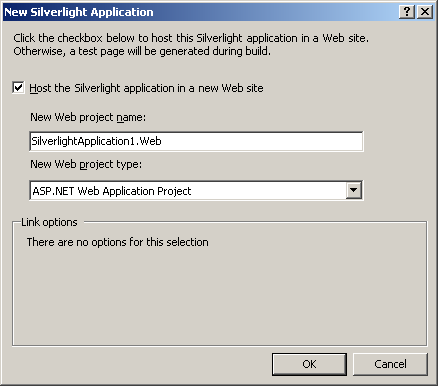
f. Select hosting the application into web project.
Step 2:
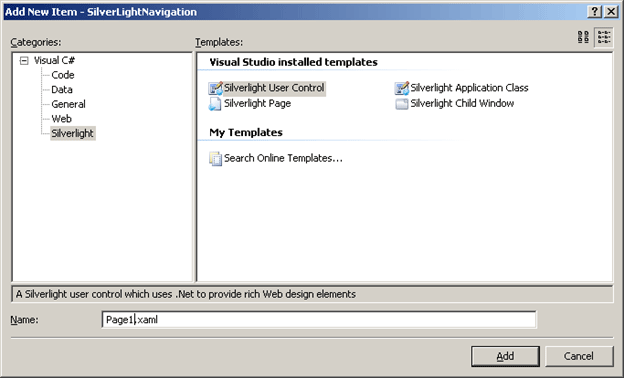
a. Delete MainPage.Xmal from Silver Light project.
b. Add two new user controls to Silver Light project. To do so Right click on Silver Light project and add new Item. Navigate to Silver Light tab. Then select Silverlight user control. Give name of the user controls as Page1 and Page2.
Step 3:
Open App.Xaml.cs file.
a. Declare a container element.
Grid navigationUI = new Grid();
b. Add the page, which is to be navigating as the child of the container we just created.
this.RootVisual = navigationUI;
navigationUI.Children.Add(new Page1());
c. Now we will take three private variables inside App.Xaml.cs. one for username as string and two for two inegers to be added.
private string name;
private int number1;
private int number2;
public string Name
{
get
{
return name;
}
set
{
name = value;
}
}
public int Number1
{
get
{
return number1;
}
set
{
number1 = value;
}
}
public int Number2
{
get
{
return number2 ;
}
set
{
number2 = value;
}
}
d. Now we will add a static method, which will navigate the pages.
public static void NavigateToPage(UserControl page)
{
App application = (App)Application.Current;
application.navigationUI.Children.Clear();
application.navigationUI.Children.Add(page);
}
So, the entire App.Xaml.cs file will look like below. Codes in red rectangle are added by us.
App.Xaml.cs
using System;
using System.Collections.Generic;
using System.Linq;
using System.Net;
using System.Windows;
using System.Windows.Controls;
using System.Windows.Documents;
using System.Windows.Input;
using System.Windows.Media;
using System.Windows.Media.Animation;
using System.Windows.Shapes;
namespace SilverLightNavigation
{
public partial class App : Application
{
private string name;
private int number1;
private int number2;
public string Name
{
get
{
return name;
}
set
{
name = value;
}
}
public int Number1
{
get
{
return number1;
}
set
{
number1 = value;
}
}
public int Number2
{
get
{
return number2 ;
}
set
{
number2 = value;
}
}
Grid navigationUI = new Grid();
public App()
{
this.Startup += this.Application_Startup;
this.Exit += this.Application_Exit;
this.UnhandledException += this.Application_UnhandledException;
InitializeComponent();
}
private void Application_Startup(object sender, StartupEventArgs e)
{
this.RootVisual = navigationUI;
navigationUI.Children.Add(new Page1());
}
private void Application_Exit(object sender, EventArgs e)
{
}
private void Application_UnhandledException(object sender, ApplicationUnhandledExceptionEventArgs e)
{
// If the app is running outside of the debugger then report the exception using
// the browser's exception mechanism. On IE this will display it a yellow alert
// icon in the status bar and Firefox will display a script error.
if (!System.Diagnostics.Debugger.IsAttached)
{
// NOTE: This will allow the application to continue running after an exception has been thrown
// but not handled.
// For production applications this error handling should be replaced with something that will
// report the error to the website and stop the application.
e.Handled = true;
Deployment.Current.Dispatcher.BeginInvoke(delegate { ReportErrorToDOM(e); });
}
}
private void ReportErrorToDOM(ApplicationUnhandledExceptionEventArgs e)
{
try
{
string errorMsg = e.ExceptionObject.Message + e.ExceptionObject.StackTrace;
errorMsg = errorMsg.Replace('"', '\'').Replace("\r\n", @"\n");
System.Windows.Browser.HtmlPage.Window.Eval("throw new Error(\"Unhandled Error in Silverlight Application " + errorMsg + "\");");
}
catch (Exception)
{
}
}
public static void NavigateToPage(UserControl page)
{
App application = (App) Application.Current;
application.navigationUI.Children.Clear();
application.navigationUI.Children.Add(page);
}
}
}
Step 4:
Now create or customize the XAML of Page1 for user interface. It contains three text boxes to get user input. And one Button to navigate to other page.
Page1.Xaml
<UserControl x:Class="SilverLightNavigation.Page1"
xmlns="http://schemas.microsoft.com/winfx/2006/xaml/presentation"
xmlns:x="http://schemas.microsoft.com/winfx/2006/xaml"
Width="auto" Height="auto">
<Grid x:Name="LayoutRoot" Background="White" Height="600" Width="600">
<Grid.ColumnDefinitions>
<ColumnDefinition Width="*" />
<ColumnDefinition Width="*" />
</Grid.ColumnDefinitions>
<Grid.RowDefinitions>
<RowDefinition Height="*" />
<RowDefinition Height="*" />
<RowDefinition Height="*" />
<RowDefinition Height="*" />
</Grid.RowDefinitions>
<TextBlock x:Name="lblUname" Grid.Column="0" Grid.Row="0" Text="UserName" />
<TextBox x:Name="txtUname" Grid.Column="1" Grid.Row="0" Height="50" Width="150" />
<TextBlock x:Name="lblNum1" Grid.Column="0" Grid.Row="1" Text="Number1" />
<TextBox x:Name="txtNum1" Grid.Column="1" Grid.Row="1" Height="50" Width="150" />
<TextBlock x:Name="lblNum2" Grid.Column="0" Grid.Row="2" Text="Number2" />
<TextBox x:Name="txtNum2" Grid.Column="1" Grid.Row="2" Height="50" Width="150" />
<Button x:Name="btnNavigate" Content="Click me For Navigation and Result" Height="100" Width="300" Grid.Column="0" Grid.Row="3" Click="btnNavigate_Click" />
</Grid>
</UserControl>
Step 5:
On the click event of button
a. Create instance of current application
b. Call the static method to navigate to other page.
private void btnNavigate_Click(object sender, RoutedEventArgs e)
{
App application = (App)Application.Current;
application.Name = txtUname.Text;
application.Number1 = Convert.ToInt32(txtNum1.Text);
application.Number2 = Convert.ToInt32(txtNum2.Text);
App.NavigateToPage(new Page2());
}
The entire code is as below
Page1.Xaml.cs
using System;
using System.Collections.Generic;
using System.Linq;
using System.Net;
using System.Windows;
using System.Windows.Controls;
using System.Windows.Documents;
using System.Windows.Input;
using System.Windows.Media;
using System.Windows.Media.Animation;
using System.Windows.Shapes;
namespace SilverLightNavigation
{
public partial class Page1 : UserControl
{
public Page1()
{
InitializeComponent();
}
private void btnNavigate_Click(object sender, RoutedEventArgs e)
{
App application = (App)Application.Current;
application.Name = txtUname.Text;
application.Number1 = Convert.ToInt32(txtNum1.Text);
application.Number2 = Convert.ToInt32(txtNum2.Text);
App.NavigateToPage(new Page2());
}
}
}
Step 6:
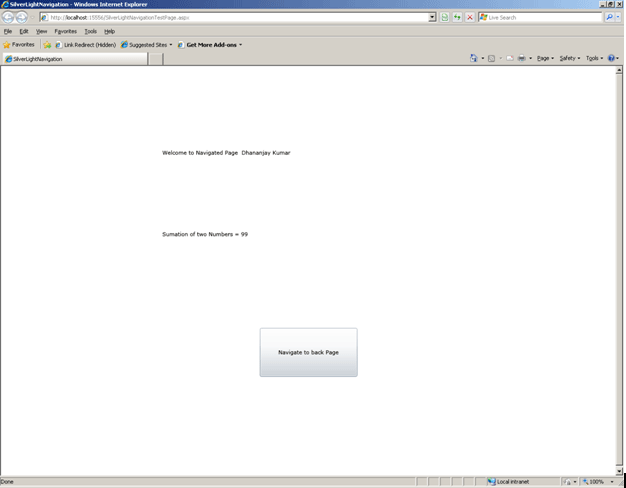
Now create or customize the XAML of Page2 to display the result and User name. it contains two labels. One to display user name, and other two display sum of two numbers. This page also contains one Button to navigate to previous page.
Page2.Xaml
<UserControl x:Class="SilverLightNavigation.Page2"
xmlns="http://schemas.microsoft.com/winfx/2006/xaml/presentation"
xmlns:x="http://schemas.microsoft.com/winfx/2006/xaml"
Width="auto" Height="auto">
<Grid x:Name="LayoutRoot" Background="White" Height="500" Width="600">
<Grid.RowDefinitions>
<RowDefinition Height="*" />
<RowDefinition Height="*" />
<RowDefinition Height="*" />
</Grid.RowDefinitions>
<TextBlock x:Name="txtUserDisplay" Grid.Row="0" Text="Welcome to Navigated Page " />
<TextBlock x:Name="txtResult" Grid.Row="1" Text="Sumation of two Numbers = " />
<Button x:Name="btnNavigateback" Grid.Row="2" Height="100" Width="200" Content="Navigate to back Page" Click="btnNavigateback_Click" />
</Grid>
</UserControl>
Step 7:
Add below code in code behind to display user name and summation of two numbers. Also add below code to navigate to previous page.
Page2.Xaml.cs
using System;
using System.Collections.Generic;
using System.Linq;
using System.Net;
using System.Windows;
using System.Windows.Controls;
using System.Windows.Documents;
using System.Windows.Input;
using System.Windows.Media;
using System.Windows.Media.Animation;
using System.Windows.Shapes;
namespace SilverLightNavigation
{
public partial class Page2 : UserControl
{
public Page2()
{
InitializeComponent();
App application = (App)Application.Current;
txtUserDisplay.Text = txtUserDisplay.Text + application.Name;
int res = application.Number1 + application.Number2 ;
txtResult.Text = txtResult.Text + res.ToString();
}
private void btnNavigateback_Click(object sender, RoutedEventArgs e)
{
App.NavigateToPage(new Page1());
}
}
}
Step 8:
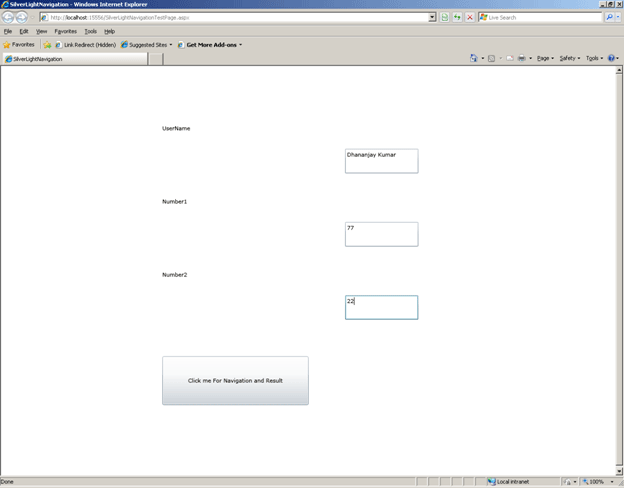
Press F5 to run with debugging and test your application.

Conclusion:
In this article, we saw how to navigate between two Silver Light pages and pass value in between them.