Objective :
This article is step by step illustrated explanation of How to use ADO.Net data service ( Project Astoria ) for CRUD operations on a database . After that we will see how to consume that in Window application client.
For introduction of ADO.NET Data service see here.
Step 1:
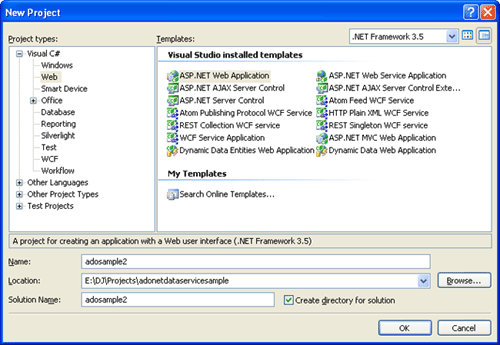
Create the project
Create a New Project as Web application and give it name as desired. Here name is adosample2
Step 2:
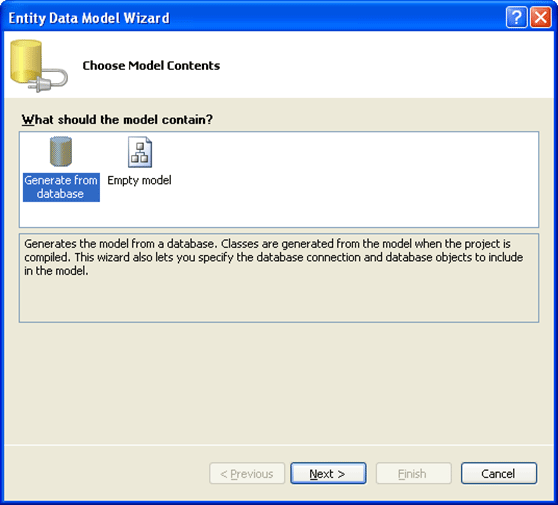
Create entity data model of database
Right click on Project and add new Item. Click on Data tab and then select ADO.NET Entity Model.
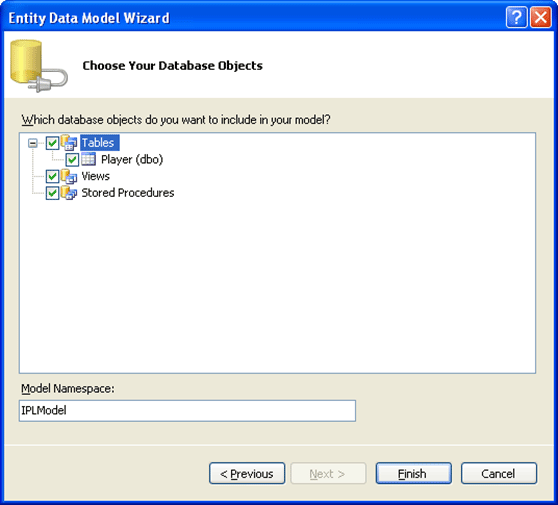
Give any name, here name is IPL.edmx.
Here, we are selecting IPL database, which is already in our SQL Server.
Note: So either make IPL data base in SQL Server to go along with this sample else select any data base of your desire.
Proceed according to images given below. If not required, don't change default name of Connection string and model.


Check for the error and warning messages. If there is none, it means we have successfully created entity model. IPL.edmx file must be there in Solution explorer.
On clicking of IPL.Edmx, you will get the below table image.


Up to these steps entity model with IPL database has been created.
Step 3:
Create Ado.Net data service
Right click on project and add new item. Select ADO.NET Data Service from Web tab. Give name as of wish. Name of service here is IPLService.

ILPService.svc.cs file will get open. The default generated code will look like below.

In highlighted code above, we need to give data source class name there. In our case, data source class name is IPLEntities. (Check out step 2 for more, if you have not changed any default name during entity model creation, then it would be your database name appended with Entities)
public class IPLService : DataService<IPLEntities>
We need to change access rule also here.
config.SetEntitySetAccessRule("*", EntitySetRights.All);
So the complete code of service class will look like
using System;
using System.Collections.Generic;
using System.Data.Services;
using System.Linq;
using System.ServiceModel.Web;
using System.Web;
namespace adosample2
{
public class IPLService : DataService<IPLEntities>
{
// This method is called only once to initialize service-wide policies.
public static void InitializeService(IDataServiceConfiguration config)
{
// TODO: set rules to indicate which entity sets and service operations are visible, updatable, etc.
// Examples:
config.SetEntitySetAccessRule("*", EntitySetRights.All);
// config.SetServiceOperationAccessRule("MyServiceOperation", ServiceOperationRights.All);
}
}
}
Step 4:
Run the code by pressing F5.
We could see that each entity of database is exposed as URI.
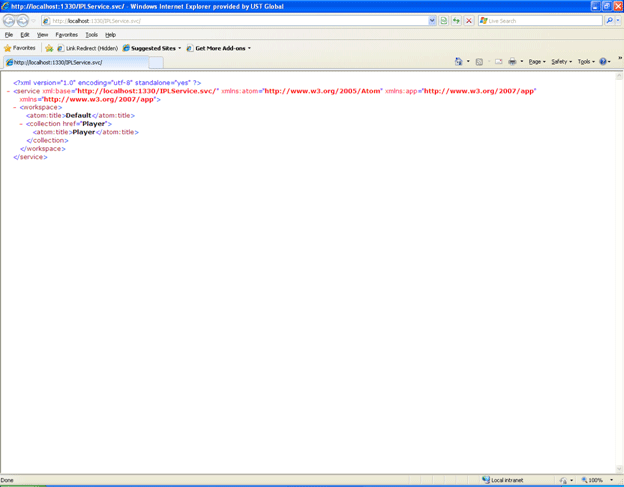
We are having only one table in Database. So only one atom element is there.
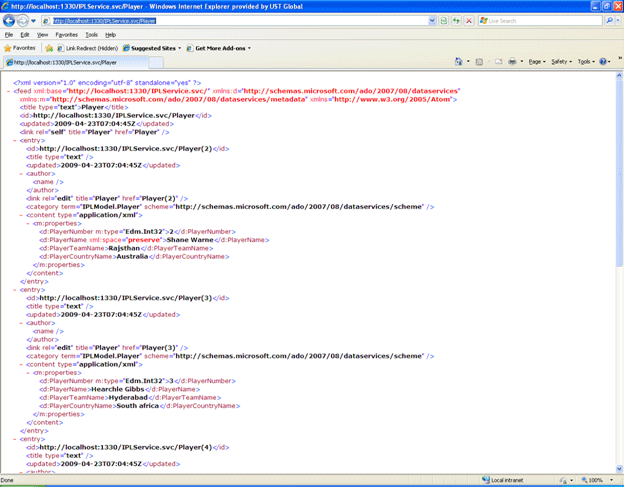
To view all the records of Player table, we need to append Player in URI like below
http://localhost:1330/IPLService.svc/Player
Output would be
Creating Client
We could consume ADO.Net data service in any type of client. For example
-
Window application
-
Ajax enabled application
-
Web application
-
Silver Light application.
Here we will consume this service in a Window application.
Step 5:
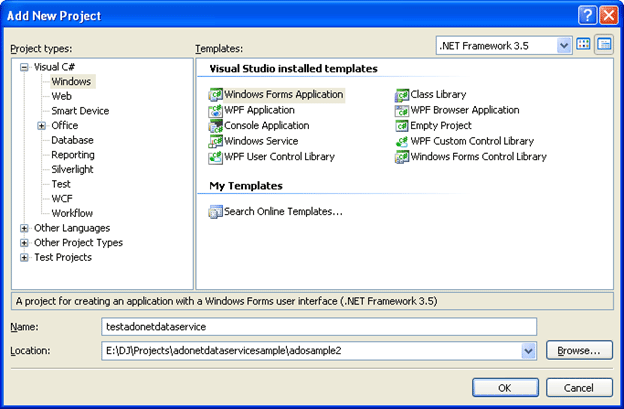
Right click on Solution and add a new Project.

Select a window application from Windows tab. Give name as of wish. Name of the project here is testadonetdataservice.
Step 6:
Add service reference to window application.
To do so Right click on Window project (testadonetdataservice) and select Add Service Reference. After that click on Discover, it will automatically discover the service reference from the solution. The other way is to do is copy and paste URL from browser while running the ADO Net Data service.

-
Make object of DataServiceContext and IPLEntities.
Note : Here entity class is IPLEntities , in your case it would be name of the Connection string , you given while creating entity model.
DataServiceContext _context = new DataServiceContext(new Uri(http://localhost:1330/IPLService.svc/))
IPLEntities _entity = new IPLEntities(new Uri("http://localhost:1330/IPLService.svc/"));
In URI , give URI of the service. To get it Right clcik on Service and click View in Browser.
-
Displaying using LINQ and ado.net data service
var res = from r in _entity.Player select r;
bindingSource1.DataSource = res;
rdbUpdate.DataSource = bindingSource1;
Here rdbUpdate is name of the DataGridView source.
Note: we could use LINQ query to query against database.
- Inserting into Database
string pName = txtName.Text;
string cName = txtCountry.Text;
string tName = txtTeam.Text;
Player _obj = new Player();
_obj.PlayerCountryName = cName;
_obj.PlayerName = pName;
_obj.PlayerTeamName = tName;
_context.AddObject("Player", _obj);
_context.SaveChanges();
MessageBox.Show(" Inserted Successfully ");
Player class is exposed to client, since we added service reference.
Player is entity class for table Player in database.
- Updating into Database
var delobj = (from r in _entity.Player where r.PlayerName == “Sachin Tendulakr” select r).First();
txtName.Text = delobj.PlayerName;
txtTeam.Text = delobj.PlayerTeamName;
txtCountry.Text = delobj.PlayerCountryName;
string pName = txtName.Text;
string cName = txtCountry.Text;
string tName = txtTeam.Text;
//Player _obj = new Player();
delobj.PlayerName = pName;
delobj.PlayerTeamName = tName;
delobj.PlayerCountryName = cName;
_entity.UpdateObject(delobj);
_entity.SaveChanges();
Here, first we will query for the record on criteria. Here we are going to update Record of Player sachin Tendulkar.
- Deleting From Database
var delobj = (from r in _entity.Player where r.PlayerName == “Sachin Tendulkar” select r).First();
_entity.DeleteObject(delobj);
_entity.SaveChanges();
MessageBox.Show("Record Deleted");