Objective
In this article, I will explain couple of things step by step
- How to work with Radio Button control of Silverlight 3.0
- How to Rotate Image in Silverlight
Expected Output

On selecting Radio Button Image will rotate in some angle.


Procedure
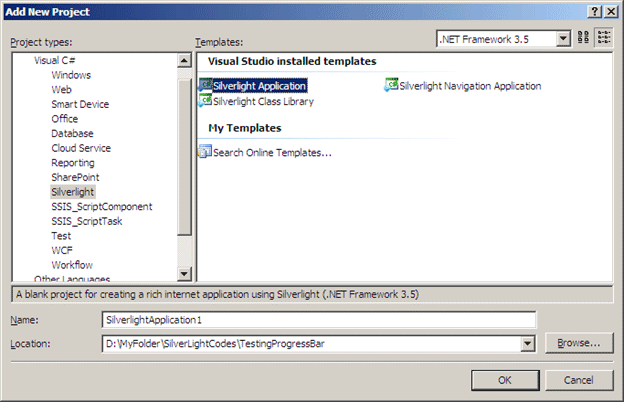
Create a Silverlight application by File -> New -> Project -> SilverLight then selecting Silverlight Application project template.
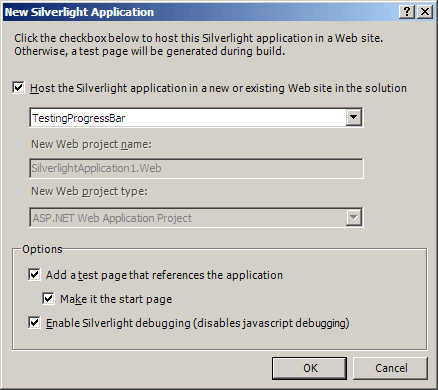
Host the SilverLightApplication1 in Web Application
Design the Silverlight page. Add Radio Buttons as shown below
MainPage.Xaml
<UserControl xmlns:data="clr-namespace:System.Windows.Controls;assembly=System.Windows.Controls.Data" x:Class="SilverlightApplication1.MainPage"
xmlns="http://schemas.microsoft.com/winfx/2006/xaml/presentation"
xmlns:x="http://schemas.microsoft.com/winfx/2006/xaml"
xmlns:d="http://schemas.microsoft.com/expression/blend/2008" xmlns:mc="http://schemas.openxmlformats.org/markup-compatibility/2006"
mc:Ignorable="d" d:DesignWidth="640" d:DesignHeight="480">
<Grid x:Name="LayoutRoot" Background="Azure">
<Grid.RowDefinitions>
<RowDefinition Height="400"/>
<RowDefinition Height="*" />
</Grid.RowDefinitions>
<Image x:Name="imgToDisplay" Height="400" Width="300" Source="a.jpg" Grid.Row="0"/>
<StackPanel Orientation="Horizontal" Grid.Row="1">
<RadioButton x:Name="rdBtnLeft" Content="Left" Click="rdBtnName_Click" HorizontalAlignment="Right" />
<RadioButton x:Name="rdBtnRight" Content=" Right" Click="rdBtnName_Click" HorizontalAlignment="Right"/>
<RadioButton x:Name="rdBtnUp" Content="Up" Click="rdBtnName_Click" HorizontalAlignment="Right"/>
<RadioButton x:Name="rdBtndown" Content="Down" Click="rdBtnName_Click" HorizontalAlignment="Right" />
<Button x:Name="btnRotate" Content=" Rotate" Click="btnRotate_Click" HorizontalAlignment="Center" Height="65" Width="100" />
</StackPanel>
</Grid>
</UserControl>
Code Behind
- Add same event for click on all radio buttons.
- In the click event of radio buttons, I am assigning sender's name and checking it in a switch case.
string radioButton = ((FrameworkElement)sender).Name;
switch (radioButton)
{
}
- Rotation of image is being performed by RotateTransform class.
RotateTransform rotate = new RotateTransform();
- In click event of Button we are checking radio button's isChecked property. If IsChecked is true for a radio button it means that radio button is selected.
if (rdBtnLeft.IsChecked == true)
{
}
MainPage.Xaml.cs
using System;
using System.Collections.Generic;
using System.Linq;
using System.Net;
using System.Windows;
using System.Windows.Controls;
using System.Windows.Documents;
using System.Windows.Input;
using System.Windows.Media;
using System.Windows.Media.Animation;
using System.Windows.Shapes;
namespace SilverlightApplication1
{
public partial class MainPage : UserControl
{
int parameter = 0;
public MainPage()
{
InitializeComponent();
}
private void rdBtnName_Click(object sender, RoutedEventArgs e)
{
RotateTransform rotate = new RotateTransform();
string radioButton = ((FrameworkElement)sender).Name;
switch (radioButton)
{
case "rdBtnLeft":
rotate.Angle = 30;
imgToDisplay.RenderTransform = rotate;
break;
case "rdBtnRight":
rotate.Angle = 45;
imgToDisplay.RenderTransform = rotate;
break;
case "rdBtnUp":
rotate.Angle = 60;
imgToDisplay.RenderTransform = rotate;
break;
case "rdBtndown" :
rotate.Angle = 360;
imgToDisplay.RenderTransform = rotate;
break;
}
}
private void btnRotate_Click(object sender, RoutedEventArgs e)
{
RotateTransform rotate = new RotateTransform();
if (rdBtnLeft.IsChecked == true)
{
rotate.Angle = 30;
imgToDisplay.RenderTransform = rotate;
}
else if (rdBtnRight.IsChecked == true)
{
rotate.Angle = 45;
imgToDisplay.RenderTransform = rotate;
}
else if (rdBtnUp.IsChecked == true)
{
rotate.Angle = 60;
imgToDisplay.RenderTransform = rotate;
}
else
{
rotate.Angle = 90;
imgToDisplay.RenderTransform = rotate;
}
}
}
}
Conclusion
In this article, I explained how to work with Radio Button control of Silverlight. I also explained how to rotate image in silverlight. Thanks for reading .