The Entity Data Model (EDM) is an Entity-Relationship data model. The key concepts introduced by the EDM are:
-
Entity: entities are instances of Entity Types (e.g. Employee, SalesOrder), which are richly structured records with a key. Entities are grouped in Entity-Sets.
-
Relationship: relationships associate entities, and are instances of Relationship Types (e.g. SalesOrder posted-by SalesPerson). Relationships are grouped in Relationship-Sets.
The EDM is a conceptual data model that can be used to model the data of a given domain. However, at some point the data needs to be stored in an actual database, typically in a relational database.
In order to provide a mechanism for storing data modeled using the EDM in relational databases, the ADO.NET Entity Framework provides a powerful client-views infrastructure designed to manage the transformations between the logical database schema that's present in the relational store and the conceptual EDM schema used by the application.
The following example will combine the following skills:
- Using Entity Framework and retrieve data that our Silverlight Application can use
- Connecting to a WCF Web Service.
- Using DataGrid control to display data.
Add a New Item to the Web Project and select Data and then select ADO.NET Entity Data Model. Give an appropriate file name (<Filename>.edmx).
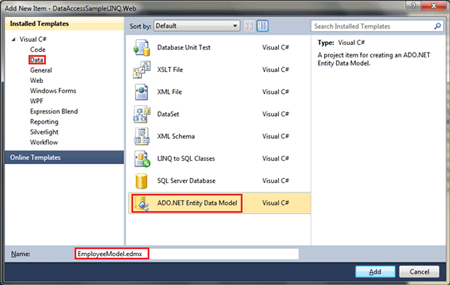
Figure 1
After clicking on the Add Button in the figure above, the following Entity Data Model Wizard will appear. There are two options provided; "Generate from database" and "Empty Model".
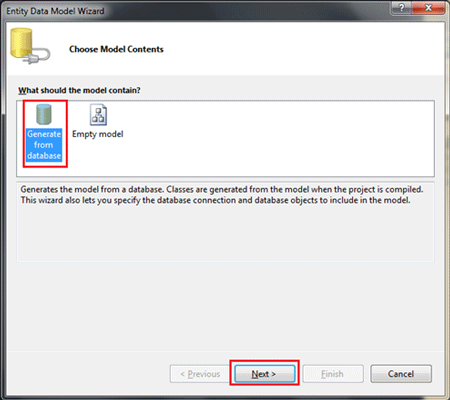
Figure 2
In our case we would select the first choice, and select Next to continue. Now we need to provide our Connection settings, if you do not see any value in the dropdown that means there are no connections made yet to Visual Studio. To create a new connection, select "New Connection".
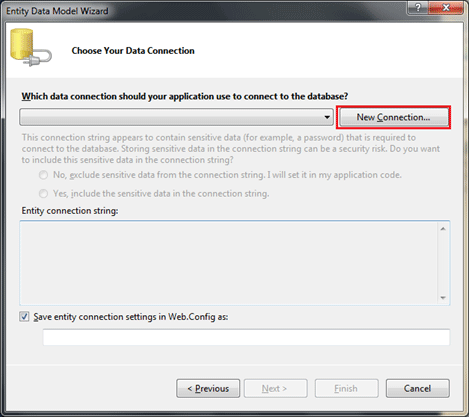
Figure 3
After selecting the "New Connection", the "Add Connection" dialog box will appear. We need to do exactly what we did for LINQ to SQL connection. After providing the details of the connection test the connection and select a database to perform the operation.
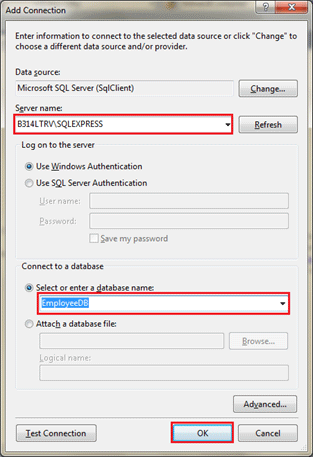
Figure 4
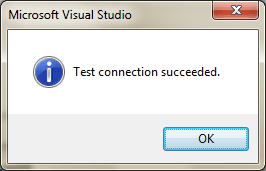
Figure 5
Press "OK" in the Add Connection dialog box and we will return back to the wizard; you will see that the connection details are specified in the dropdown. You will see additional connection string entries to the web.config file too. Give an appropriate name for the Entity and select Next.
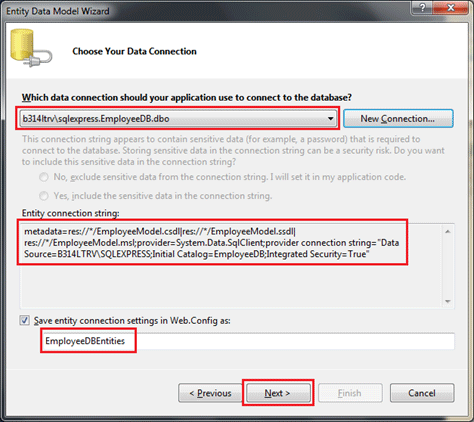
Figure 6
After selecting Next from the above figure, we need to choose Database objects in the next screen of the wizard. Select the Tables, Views or Stored Procedures you need to operate on.
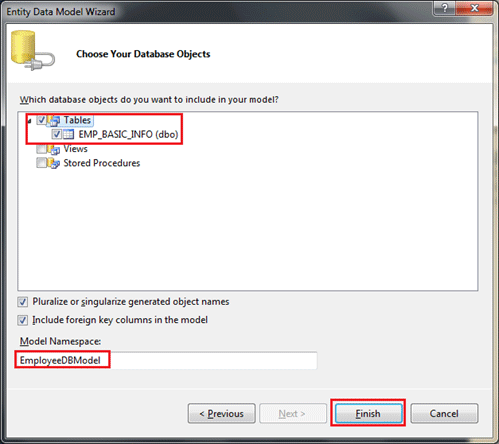
Figure 7
Click on Finish to finish the wizard with the given settings and preferences. After you have added the Entity Data Model you can see the details in the Model Browser pane.
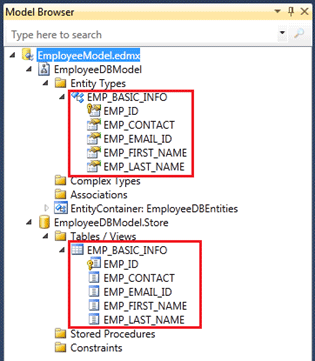
Figure 8
As you see in the figure above, we have two instances of the Model, one from Entity Model and another from database.
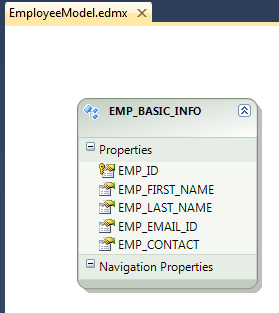
Figure 9
As we have experienced earlier we would have the same name as used in the database. To change it manually we need to select each one and change according to our preference.
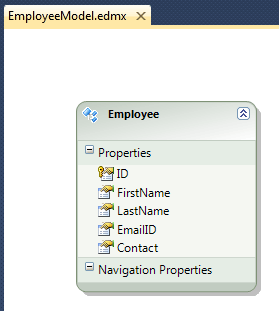
Figure 10
After you change the Class and Properties names it would be reflected once you are done with the changes.
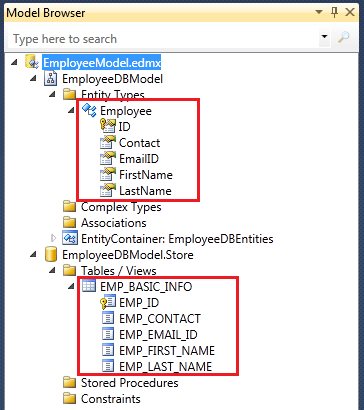
Figure 11
Now you can identify between the Entity Model and Database. See the figure above. The following pane called the Mapping Details pane would display the column mappings; see the following figure.
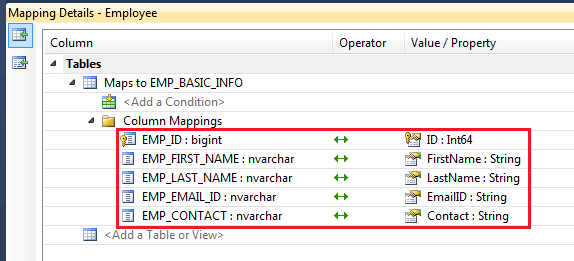
Figure 12
Now we can see the web.config file of the web project to see the changes made by the addition of the Entity Model.
<configuration>
<system.web>
<compilation debug="true">
<assemblies>
<add assembly="System.Data.Entity, Version=4.0.0.0, Culture=neutral, PublicKeyToken=b77a5c561934e089" />
</assemblies>
</compilation>
</system.web>
<connectionStrings>
<add name="EmployeeDBEntities"
connectionString="metadata=res://*/EmployeeModel.csdl|res://*/EmployeeModel.ssdl|res://*/EmployeeModel.msl;provider=System.Data.SqlClient;provider connection string="Data Source=B314LTRV\SQLEXPRESS;Initial Catalog=EmployeeDB;Integrated Security=True;MultipleActiveResultSets=True""
providerName="System.Data.EntityClient" />
</connectionStrings>
</configuration>
Listing
Now we will add a Service that will fetch data from the Entity Model and display it in the Silverlight application. Create a Silverlight enabled WCF Service and give it a proper name.
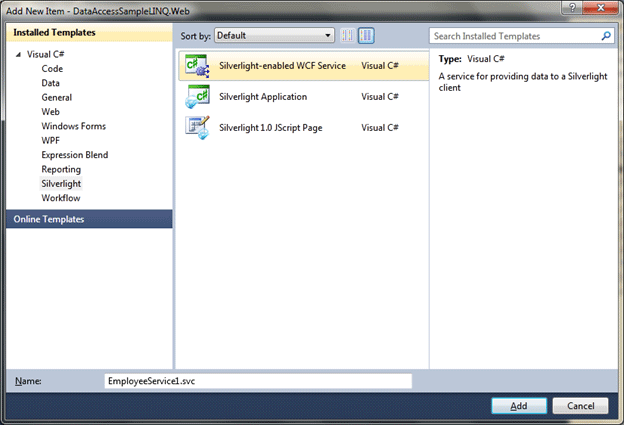
Figure 13
After you have added the Service you can see the updated web.config file in the Web Project. The Service model settings are added here in the web.config file.
<?xml version="1.0" encoding="utf-8"?>
<configuration>
<system.web>
<compilation debug="true">
<assemblies>
<add assembly="System.Data.Entity, Version=4.0.0.0, Culture=neutral, PublicKeyToken=b77a5c561934e089" />
</assemblies>
</compilation>
</system.web>
<connectionStrings>
<add name="EmployeeDBEntities"
connectionString="metadata=res://*/EmployeeModel.csdl|res://*/EmployeeModel.ssdl|res://*/EmployeeModel.msl;provider=System.Data.SqlClient;provider connection string="Data Source=B314LTRV\SQLEXPRESS;Initial Catalog=EmployeeDB;Integrated Security=True;MultipleActiveResultSets=True""
providerName="System.Data.EntityClient" />
</connectionStrings>
<system.serviceModel>
<behaviors>
<serviceBehaviors>
<behavior name="">
<serviceMetadata httpGetEnabled="true" />
<serviceDebug includeExceptionDetailInFaults="false" />
</behavior>
</serviceBehaviors>
</behaviors>
<bindings>
<customBinding>
<binding name="DataAccessSampleLINQ.Web.EmployeeService1.customBinding0">
<binaryMessageEncoding />
<httpTransport />
</binding>
</customBinding>
</bindings>
<serviceHostingEnvironment aspNetCompatibilityEnabled="true" />
<services>
<service name="DataAccessSampleLINQ.Web.EmployeeService1">
<endpoint address="" binding="customBinding" bindingConfiguration="DataAccessSampleLINQ.Web.EmployeeService1.customBinding0"
contract="DataAccessSampleLINQ.Web.EmployeeService1" />
<endpoint address="mex" binding="mexHttpBinding" contract="IMetadataExchange" />
</service>
</services>
</system.serviceModel>
</configuration>
Listing
Now we will do the same thing that we did earlier and that is to display all the Employees in the client. So let's add an Operation Contract and name it GetAllEmployees(), which will return a List of type Employee. Again this Employee is the same as we are having the Class in Entity Model.
[ServiceContract(Namespace = "")]
[AspNetCompatibilityRequirements(RequirementsMode = AspNetCompatibilityRequirementsMode.Allowed)]
public class EmployeeService1
{
[OperationContract]
List<Employee> GetAllEmployees()
{
EmployeeDBEntities entity = new EmployeeDBEntities();
var result = from emp in entity.Employees
select emp;
return result.ToList();
}
}
Listing
As you see in the preceding listing, in the basic change from LINQ to SQL we are using EmployeeDBEntities instead of DataContext. The remaining code is the same. Now we will add a service reference to the Silverlight client project.
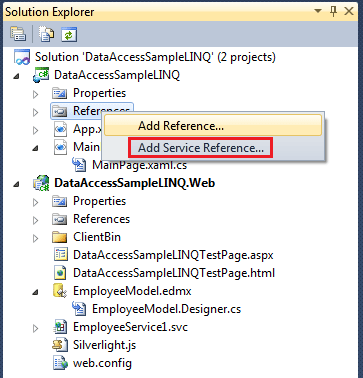
Figure 14
We need to discover to find out what Services are available; after you see one you can actually see the methods exposed in the service too, the following figure shows the GetEmployees method.
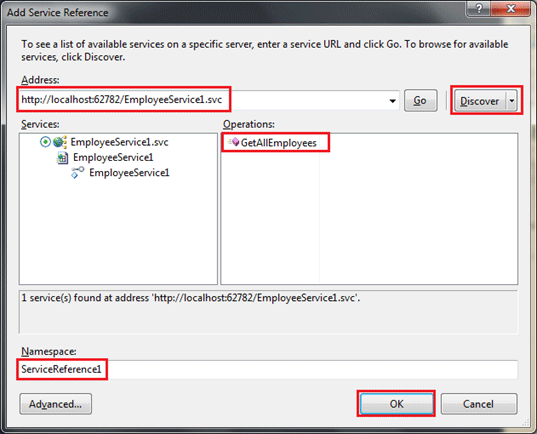
Figure 15
As you see in the image above, give a name to the namespace or we can use the default name. After you press the OK button the service is referenced and a ServiceReference.ClientConfig file is created.
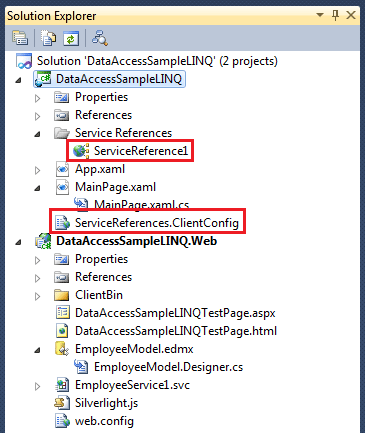
Figure 16
After you have added the service you will see the following error message saying "Failed to generate code for the service reference 'ServiceReference1'".
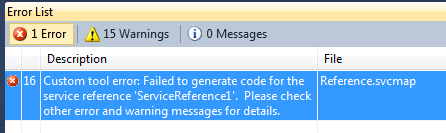
Figure 17
To generate the code automatically we need to configure the Service Reference.
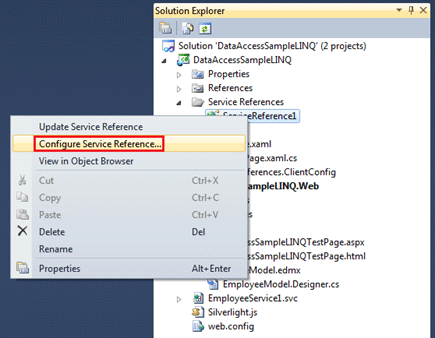
Figure 18
On selecting Configure Service Reference you will see a dialog for Service Reference Settings. Uncheck "Reuse types in referenced assemblies"
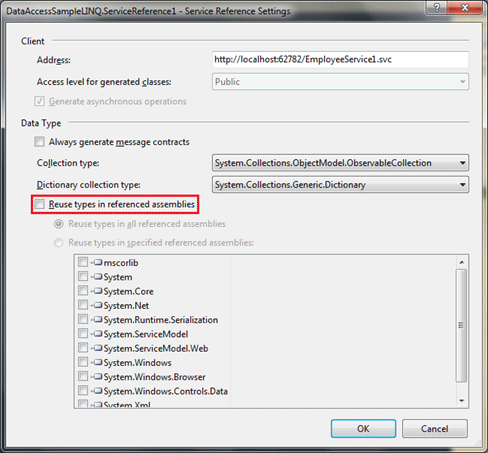
Figure 19
Now update the Service Reference and you will see no errors and the ServiceReference.ClientConfig file is successfully auto generated.
<configuration>
<system.serviceModel>
<bindings>
<customBinding>
<binding name="CustomBinding_EmployeeService1">
<binaryMessageEncoding />
<httpTransport
maxReceivedMessageSize="2147483647"
maxBufferSize="2147483647" />
</binding>
</customBinding>
</bindings>
<client>
<endpoint address="http://localhost:62782/EmployeeService1.svc"
binding="customBinding"
bindingConfiguration="CustomBinding_EmployeeService1"
contract="ServiceReference1.EmployeeService1"
name="CustomBinding_EmployeeService1" />
</client>
</system.serviceModel>
</configuration>
Listing
As we have added a DataGrid to our MainPage.xaml for displaying data from the service, and we have changed to show the Columns properly according to our preference, now we will write code to create an instance of ServiceReference and bind data to the DataGrid.
public MainPage()
{
InitializeComponent();
EmployeeService1Client serviceClient = new EmployeeService1Client();
serviceClient.GetAllEmployeesCompleted += new EventHandler<GetAllEmployeesCompletedEventArgs>(service_GetAllEmployeesCompleted);
serviceClient.GetAllEmployeesAsync();
}
void service_GetAllEmployeesCompleted(object sender, GetAllEmployeesCompletedEventArgs e)
{
dgEmployee.ItemsSource = e.Result;
}
Listing
Now run the application and you will see the same result as we saw in the case of LINQ to SQL.
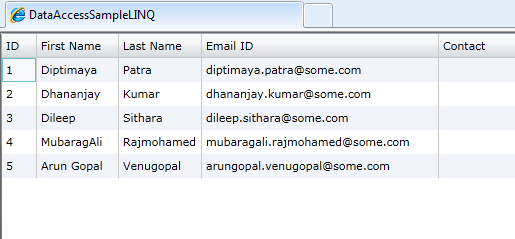
Figure 20