IntroductionIn my previous article on Navigation Application In Silverlight 3, we discussed about the features of it. There is no animation (or transition effect) while you load pages. Actually we can do this by adding TransitionalContentPresenter. In this article we will be seeing how can we make that effect.Creating Silverlight ApplicationOpen Visual Studio 2008 and Create a Silverlight Navigation Application. Open the Solution in Blend 3.
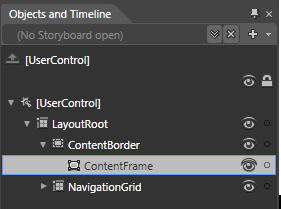
Navigation in Silverlight 3 Navigation Application is handled by Navigation: Frame. After opening in Blend you can find the Frame in Object and Timeline pane.In Silverlight 3 a TransitioningContentControl is available. If we can use the control then we can achieve the transition effects. Select the ContentFrame in Object and Timeline Pane and Edit the Template and select Edit A Copy.Now you will be redirected to the Editing Template Workspace. You will find a Content Presenter, which presents the content of the Page. Now go ahead and delete this ContentPresenter from the Border. Search TransitionalContentPresenter from the Asset Library and add it to the Border. Remember to change the width and height of this control.For your reference the following figure will help you deciding the Layout of this TransitionalContentPresenter. Change the Content of TransitionalContentPresenter to "TemplateBinding Content" minus quotes. Now go ahead and change the content of the related pages of your application to see the real transition effect.The default Transition Effect is of Fade In and Fade Out. You can customize it by making TransitionalContentControl as a new Template. We will discuss about this in my coming articles. Enjoy Coding.Here is the XAML for your reference.<UserControl.Resources><ControlTemplate x:Key="MyFrameControlTemplate" TargetType="navigation:Frame"> <Border Background="{TemplateBinding Background}" BorderBrush="{TemplateBinding BorderBrush}" BorderThickness="{TemplateBinding BorderThickness}" HorizontalAlignment="{TemplateBinding HorizontalContentAlignment}" VerticalAlignment="{TemplateBinding VerticalContentAlignment}"> <layoutToolkit:TransitioningContentControl Margin="0" Content="{TemplateBinding Content}" Width="522" Height="403" HorizontalAlignment="Center" VerticalAlignment="Center"/> </Border> </ControlTemplate></UserControl.Resources>
Now go ahead and change the content of the related pages of your application to see the real transition effect.The default Transition Effect is of Fade In and Fade Out. You can customize it by making TransitionalContentControl as a new Template. We will discuss about this in my coming articles. Enjoy Coding.Here is the XAML for your reference.
You need to be a premium member to use this feature. To access it, you'll have to upgrade your membership.
Become a sharper developer and jumpstart your career.
$0
$
. 00
monthly
For Basic members:
$20
For Premium members:
$45
For Elite members: