Introduction
In this article, I will explain how to implement data binding techniques in Web applications using Language Integrated Query (Linq) and LinqDataSource control shipped with ASP.NET 3.5 (the same way that ObjectDataSource and SqlDataSource objects in the framework 2.0) which makes declaratively data binding of UI ASP.NET controls to Linq to SQL data model very easy. LINQ to SQL is a new built-in component of Microsoft.NET Framework 3.5 which enables to match relational data to objects in your business domail. You can use LINQ expressions to query, filter, update, insert and delete data. The gateway to access to your data source using Linq to SQL is through the DataContext-based objects created using the Linq to SQL designer referring to the underlying data model. Once the DataContext-based class is defined, you can attach the LinqDataSource control directly to it enabling to access Linq objects without writing any code. LinqDataSource (as other data sources controls) is the interface to UI ASP.NET controls such as GridView and so on.
Getting started with the solution
For this example, we're going to create a Web application to display a list of products. The information for the product entities is stored in the Production.Product table on the AdventureWorks database shipped with SQL Server 2005/2008.
The first step is to open Visual Studio.NET 2008 and make a new website using ASP.NET for the front-end and a class library for the LINQ data model. Then add a Linq to SQL Classes artifact to the library (see Figure 1).
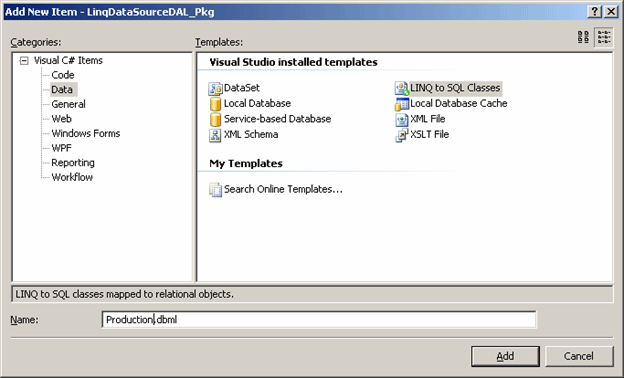
Figure 1
Next step is to drag and drop the Production.Product table within the AdventureWorks from Server Explorer on to the Linq to SQL designer (see Figure 2).
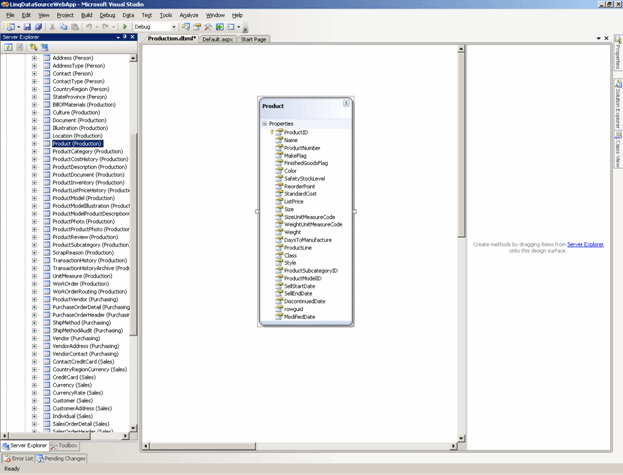
Figure 2
Now we need to compile the library and add a reference to it in the Web application (see Figure 3).
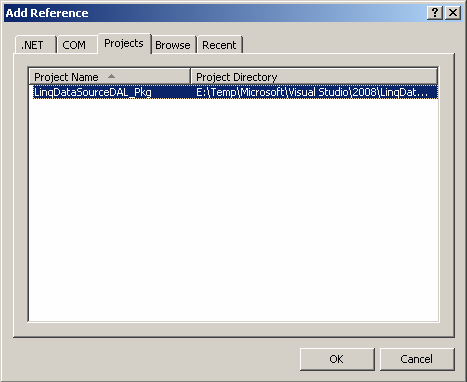
Figure 3
Next step is drag and drop a LinqDataSource and a GridView control from the toolbox onto the Default.aspx page.
Now it's time to configure the controls. Click on the smart tag of the LinqDataSource control and select the Configure Data Source option. In the Choose a Context Object page, you need to reference the previously created data context and click on the Next button (see Figure 4).
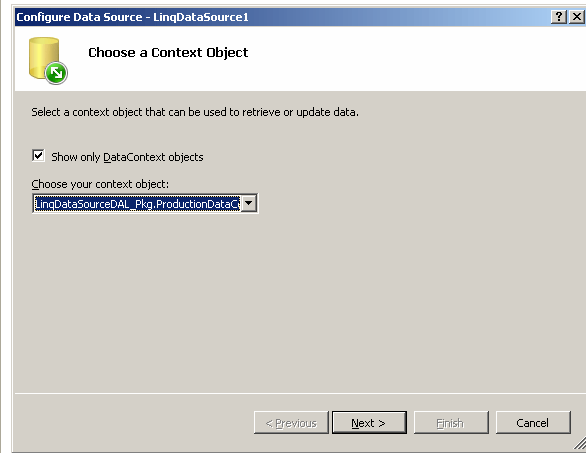
Figure 4
In the Configure Data Selection page, you need to select tables and columns to display and click on the Finish button.
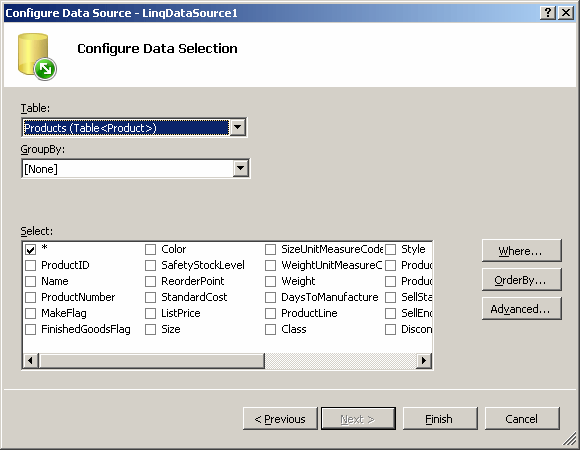
Figure 5
After that, you need to check the Enable Delete, Enable Insert and Enable Update options in the LinqDataSource (see Figure 6).
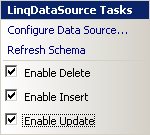
Figure 6
In order to bind the GridView control to the LinqDataSource, you need to click on the smart tag of the GridView control and add a reference to the LinqDataSource and enable the options for paging, editing and deleting (see Figure 7).
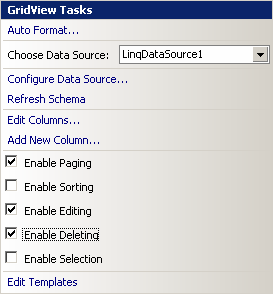
Figure 7
The LinqDataSource control is an ASP.NET control that implements the DataSourceControl design pattern introduced with ASP.NET 2.0. It is similar to the ObjectDataSource and SqlDataSource controls in that it can be used to declaratively bind other ASP.NET controls on a page to a data source. The main benefit of using the Linqdatasource control is that it leverages the flexibility that the ORM technologies provide. You don't need to define custom query/insert/update/delete methods, all these dynamic SQL statements are automatically created by the LinqDataSource.
After all the steps are done, now you can push on the F5 key to run the application listing the products with full paging support.
Now let's do some cosmetics changes to the data grid such as deleting the column for the ProductID, and changing the foreign-key integer value in the ProductSubcategoryID (this isn't very friendly) for the name of the product subcategory and provide a drop-down list in the Edit mode to enable the users easy change the new values.
The first step is to extend the data model in the Linq ORM to include the ProductSubcategory entity (see Figure 8).
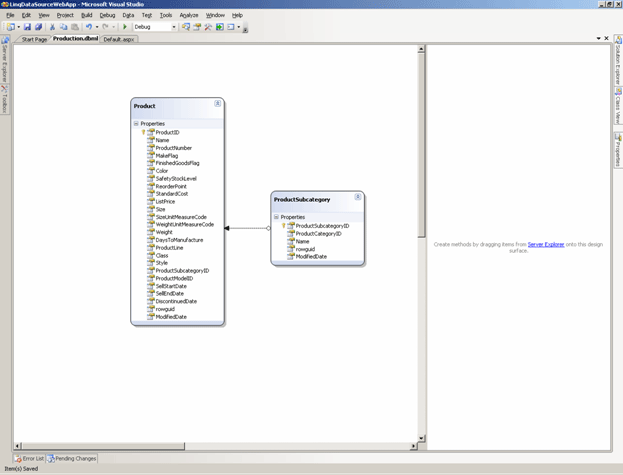
Figure 8
Next step is to replace the BoundField in the GridView control to TemplateField, so we can code to customize the look and feel of the column. Then click on the smart tag of the GridView control and click on the Edit Columns option. Select the ProductSubcategoryID field in the Selected Fields list and the click on the Convert this field into a TemplateField link (see Figure 9).
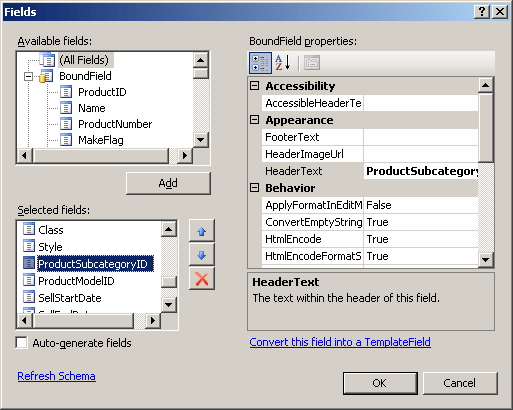
Figure 9
And finally click on the Edit Templates option of the GridView smart tag and select the ProductSubcategoryID field (see Figure 10).
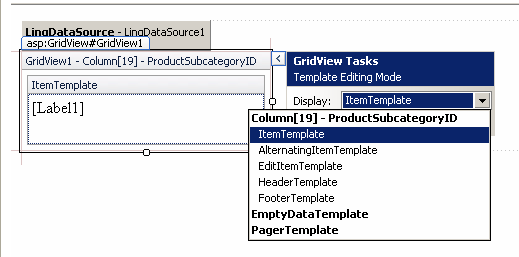
Figure 10
Then click on smart tag of the Label1 control, and click on the Edit DataBindings option. In the Label1 Databindings window, enter the custom binding Eval("ProductSubcategory.Name") (see Figure 11).
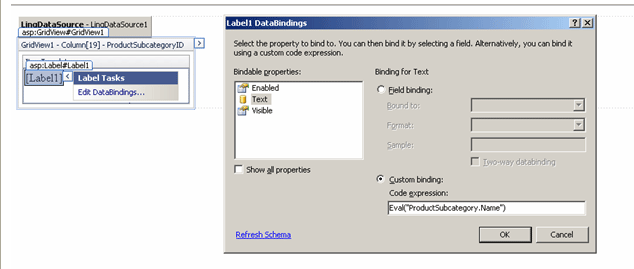
Figure 11
In order to get a drop-down list for the list of product subcategory in the Edit mode of the GridView, we first need to add an additional LinqDataSource to the page and link this data source to the ProductSubcategory entity (see Figure 12).
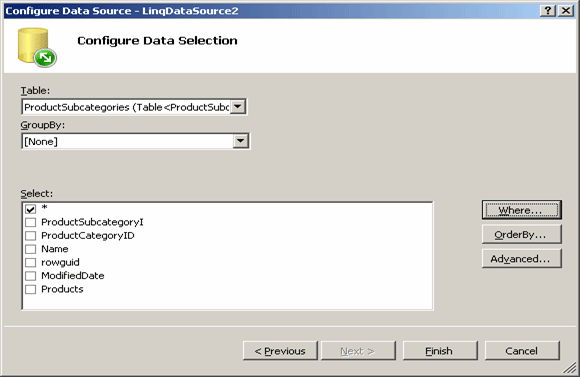
Figure 12
Then, we need to go back to the Edit mode of the ProductSubcategory field in the template edition (see Figure 13).
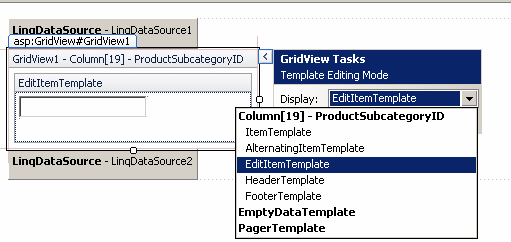
Figure 13
We're going to customize the column to have a dropdownlist control when in edit mode, where the available values in the dropdownlists are pulled from the product subcategories data source, and where we two-way databind the selected value to the Product's ProductSubcategoryID foreign key.
Then delete the Textbox control, and add drop-down list. Next step is to click on the smart tag of this new drop-down list and select the Choose a Data Source option. In the configuration dialog box, select the last data source, Name field for the display value and ProductSubcategoryID field for the data value (see Figure 14).
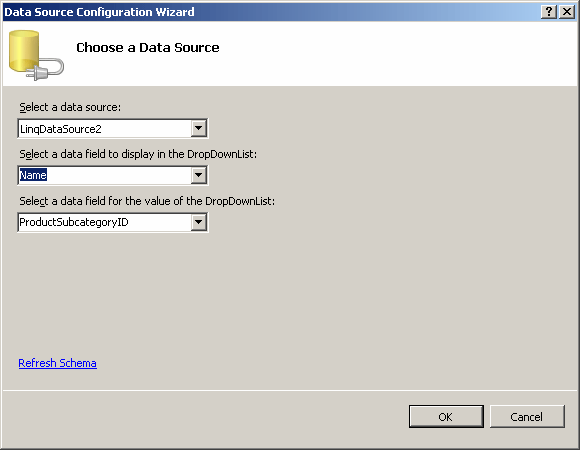
Figure 14
And to assign the new value to the current Product entity, we need to set a two-way binding using the Bind command (not the Eval command as the previous example). Then click on the drop-down list smart tag, and click on the Edit DataBindings option, and in the DropDownList1 DataBinding window, you need to type the custom binding show in the Figure 15.
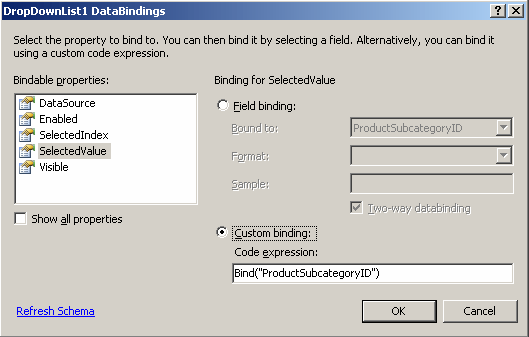
Figure 15
Next example is to filter the products by the underlying product subcategory. So, we're going to add a drop-down list on the top of the page to enable the users to filter the list of products displayed in the GridView control. We need to do the same operation of the previous drop-down list in the Edit mode of the GridView control (see Listing 1).
<div>
<b>Pick up a product subcategory:</b>
<asp:DropDownList ID="DropDownList2" runat="server"
DataSourceID="LinqDataSource2" DataTextField="Name"
DataValueField="ProductSubcategoryID">
</asp:DropDownList>
</div>
Listing 1
Next step is to define filtering option on the Product data source by clicking on the underlying LinqDataSource.
In the Configure Data Selection page, you have to click on the Where button (see Figure 16).
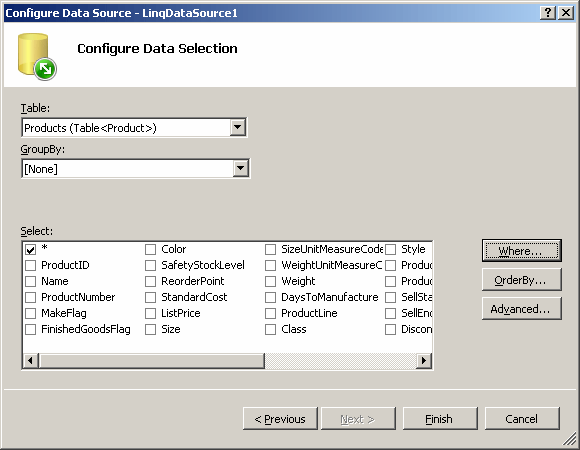
Figure 16
And the link this new drop-down list (with the list of product subcategory) to the ProductSubcategoryID field in this data source (see Figure 17).
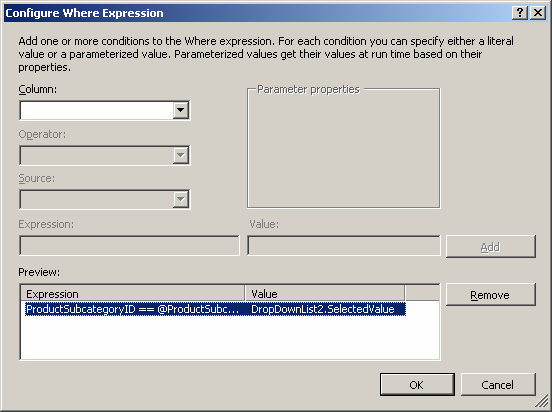
Figure 17
The last step in the filtering operations is to enable the autopostback option in the drop-down list (see Figure 18).
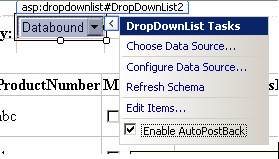
Figure 18
Conclusion
In this article, I've explained how to implement data binding techniques in Web applications using Language Integrated Query (Linq) and LinqDataSource control which makes declaratively data binding of UI ASP.NET controls to Linq to SQL data model very easy. Now you can apply this solution to your own business problems.