Introduction
This article is intended to illustrate how to customize GridView controls for data modification. We're going to change the standard BoundFields and CheckBoxFields (which don't offer customization features) for alternative extensible Web controls. We're going to walk through a common business scenario where we want to display a list of products using a GridView control, and allow the user change the associated product subcategory rendered by DropDownList control and using TemplateField techniques.
Developing the solution
In order to illustrate this data presentation technique, we're going to use the tables Production.Product (representing business entity Product) and Production.ProductSubcategory (representing the subcategories associated to products) in the database AdventureWorks shipped with SQL Server 2005. In our solution, we're going to display a list of the master data (data from the Production.ProductSubcategory) in a DropDownList Web control and inside a GridView control which displays a list of products.
The first step is to create a Web application by opening Visual Studio.NET 2005 and select File | New | Web Site as the front-end project. Let's create a Class Library project for the data access layer components. This separation of objects (concerning their responsibilities) follows the best practices of enterprise applications development.
Let's add a strongly typed DataSet item to the Class Library project (see Figure 1).
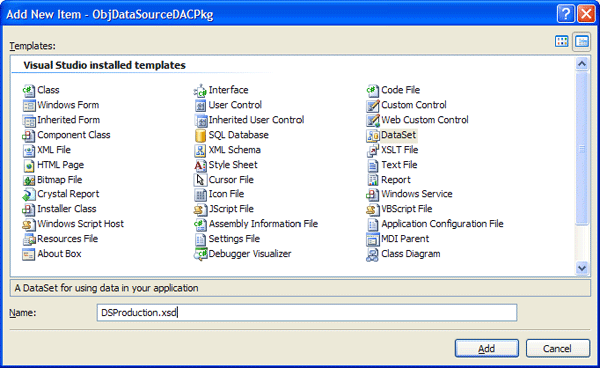
Figure 1
Let's define a TableAdapter item representing the logic to access the Production.Product table in the database AdventureWorks by using a SQL statement (see Figure 2).
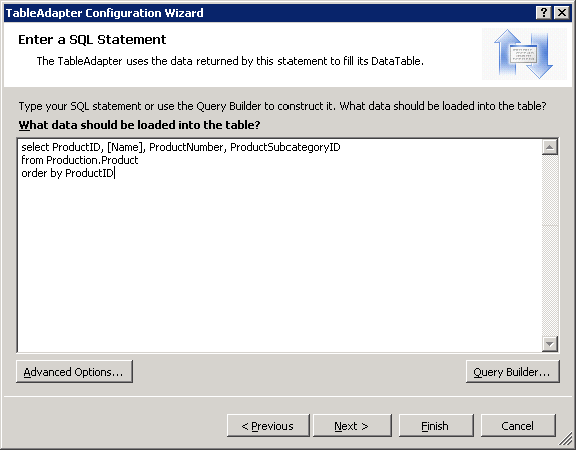
Figure 2
As well as let's define a TableAdapter item representing the logic to access the Production.ProductSubcategory table in the database AdventureWorks by using a SQL statement (see Figure 3).
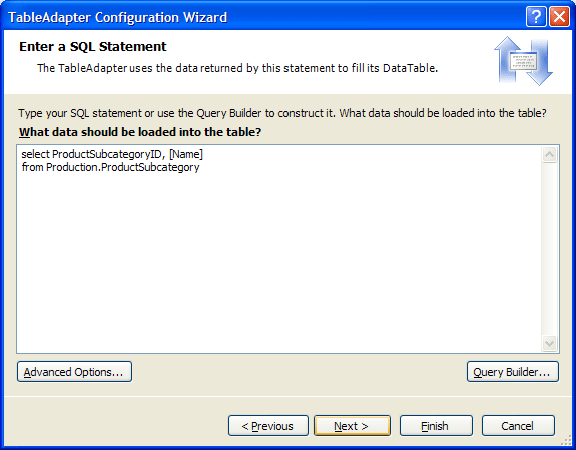
Figure 3
We need to add an UPDATE SQL statement to the product table adapter in order to update the underlying product subcategory (see Figure 4).
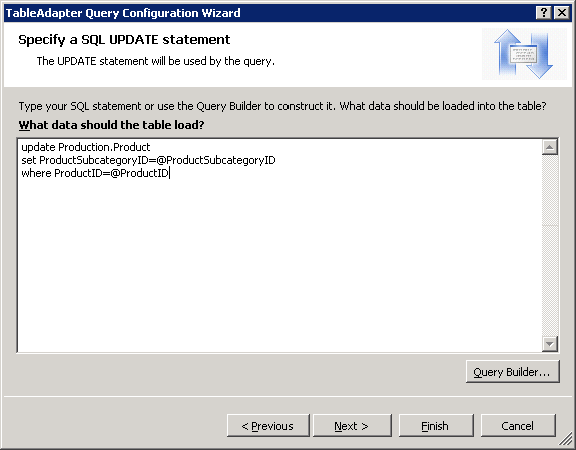
Figure 4
The result schema for the data access objects is shown in Figure 5.
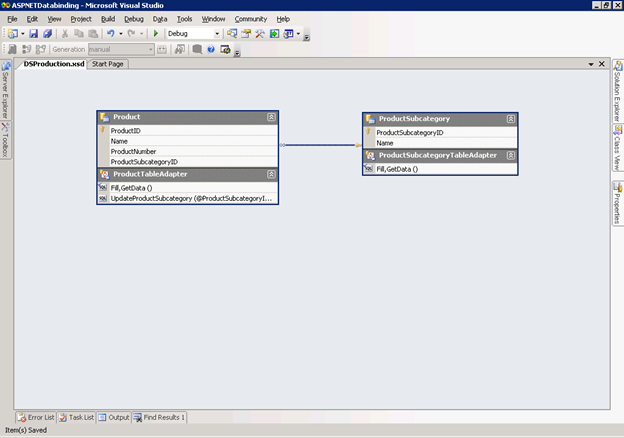
Figure 5
Now let's go to the Web front-end project and add a reference to the data access project (the Class Library project created before) and then add Web form to the project named CustomizingGridView.aspx.
Now let's drag and drop a GridView control from the Toolbox onto the Web form, and set the ID property to gvProducts.
Next drag and drop an ObjectDataSource from the Toolbox onto the Web form, set the ID property to odtProducts,click on the smart tag and select the Configure Data Source option in order to launch the data source configuration wizard. In the first page (Choose a Business Object) you must select the ProductTableAdapter (see Figure 6).
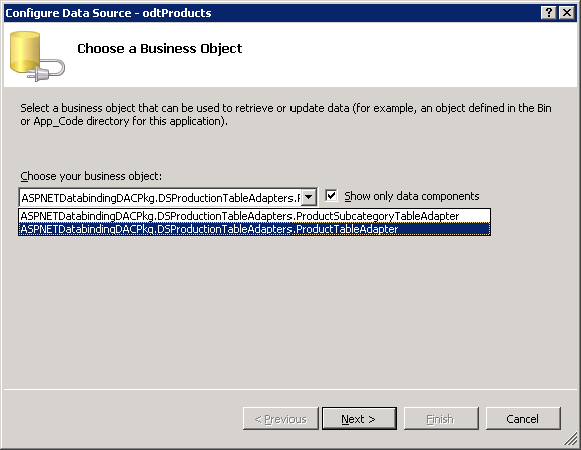
Figure 6
Click on the Next button and in the Define Data Methods page; we select the GetData method (see Figure 7).
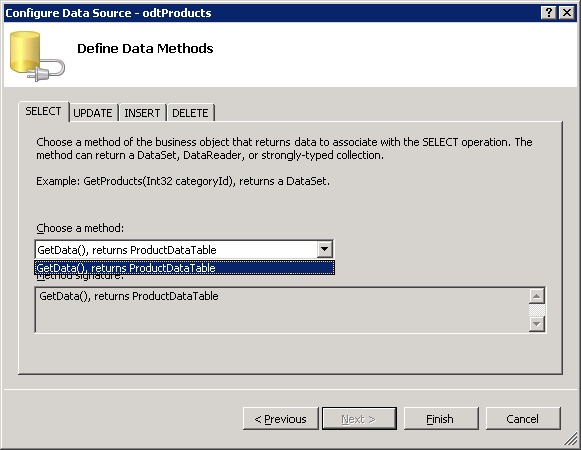
Figure 7
Go to the Update tab and select the UpdateProductSubcategory method created before (see Figure 8).
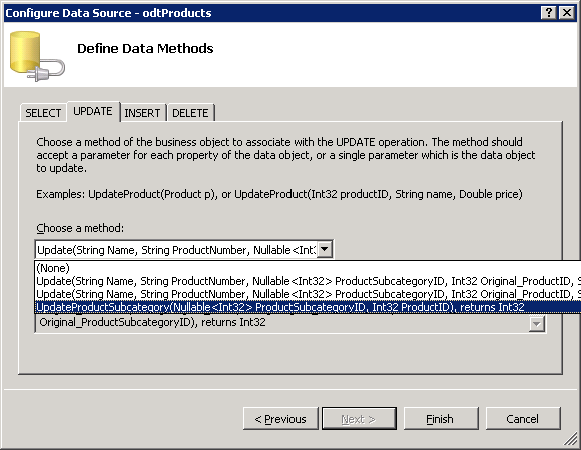
Figure 8
Click on the Finish button to finish the wizard. Go to the Property windows, and set the OldValuesParametersFormatString to {0}. Now let's bind the gvProducts GridView control to the odsProducts ObjectDataSource by clicking on the smart tag on the dgProducts GridView control and selecting the Choose Data Source option and setting the fields in the wizard. You must enable paging and editing features (see Figure 9).
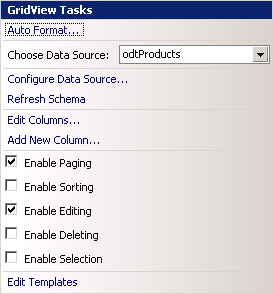
Figure 9
If you go to the code generated for the ObjectDataSource, you can see that the Update method expects two parameters: one is the product identifier and the other is the product subcategory identifier (see Listing 1).
<asp:ObjectDataSource ID="odtProducts" runat="server" DeleteMethod="Delete" SelectMethod="GetData"
TypeName="ASPNETDatabindingDACPkg.DSProductionTableAdapters.ProductTableAdapter"
UpdateMethod="UpdateProductSubcategory">
<DeleteParameters>
<asp:Parameter Name="Original_ProductID" Type="Int32" />
<asp:Parameter Name="Original_Name" Type="String" />
<asp:Parameter Name="Original_ProductNumber" Type="String" />
<asp:Parameter Name="Original_ProductSubcategoryID" Type="Int32" />
</DeleteParameters>
<UpdateParameters>
<asp:Parameter Name="ProductSubcategoryID" Type="Int32" />
<asp:Parameter Name="ProductID" Type="Int32" />
</UpdateParameters>
</asp:ObjectDataSource>
Listing 1
So, we have to set the ReadOnly property to True to all the columns in the GridView but the ProductSubcategoryID by clicking on the smart tag of the GridView control and selecting Edit Columns option (for the case of the ProductNumber column see Figure 10).
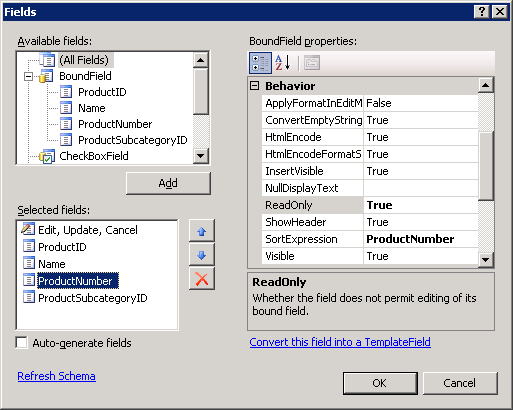
Figure 10
Now you can update the product subcategory identifier value using a Textbox control. The drawback with this solution is that you need to remember the map from the product subcategory name and its identifier. The solution is to provide a DropDownList control with the list of product subcategory name and enable the user to choose one from the list (not having to remember every name in the list).
To provide this behavior, we need to convert the ProductSubcategoryID BoundField into a TemplateFields. Go to the GridView control's smart tag and click on it, then select the Edit Columsn option. In the Field windows, go to the ProductSubcategoryID in the Selected Fields list and click on the “Convert this field into a TemplateField” link on the lower right side. This conversion will create a TemplateField with an ItemTemplate and an EditTemplate (see Listing 2).
<asp:TemplateField HeaderText="ProductSubcategoryID" SortExpression="ProductSubcategoryID">
<EditItemTemplate>
<asp:TextBox ID="TextBox1" runat="server" Text='<%# Bind("ProductSubcategoryID") %>'></asp:TextBox>
</EditItemTemplate>
<ItemTemplate>
<asp:Label ID="Label1" runat="server" Text='<%# Bind("ProductSubcategoryID") %>'></asp:Label>
</ItemTemplate>
</asp:TemplateField>
Listing 2
In order to the change TextBox control for a DropDownList control, you have to go the GridView control's smart tag, click on it and select the Edit Templates option. Then choose to work with EditTemplate of the ProductSubcategoryID field (see Figure 11).
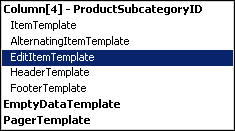
Figure 11
Delete the TextBox control and drag and drop a DropDownList control from the Toolbox onto the EditTemplate (see Figure 12).

Figure 12
Then click on the DropDownList control's smart tag and select Edit DataBindings option and set the Field Binding of the SelectedValue bindable property to ProductSubcategoryID (see Figure 13).
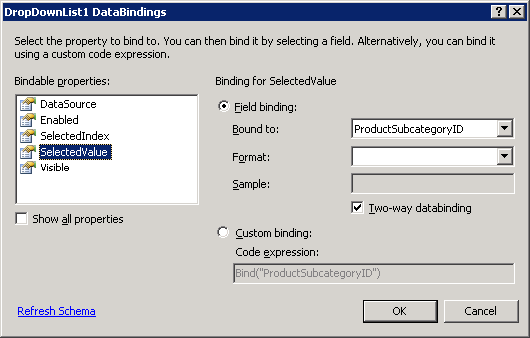
Figure 13
Now we have to define a data source to fill in the DropDownList with the list of names of subcategories and the underlying identifier. Click on the DropDownList control's smart tag and select the Choose Data Source option. In the Data Source Configuration Wizard, click on the “Select a data source” list and select the option <New data source> (see Figure 14).
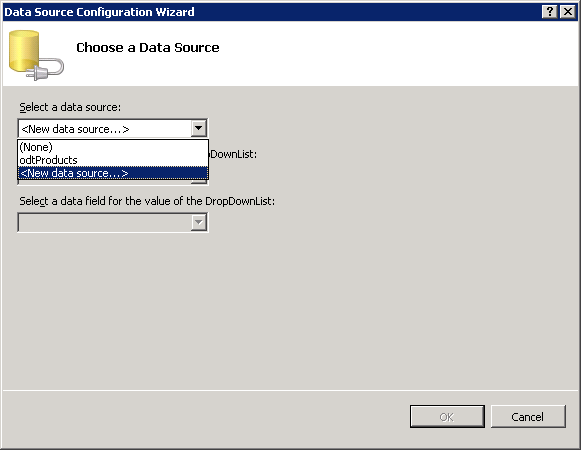
Figure 14
When the wizard is launched, in the first page, you select the type of data source (Object in this case) and the name (see Figure 15).
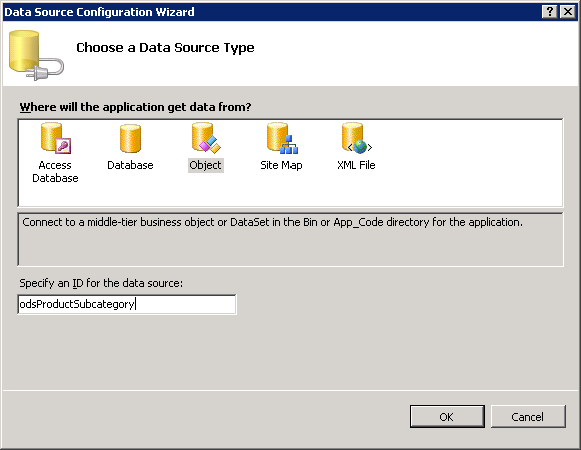
Figure 15
Click OK button and go the Choose a Business Object page and select ProductSubcategoryTableAdapter (see Figure 16).
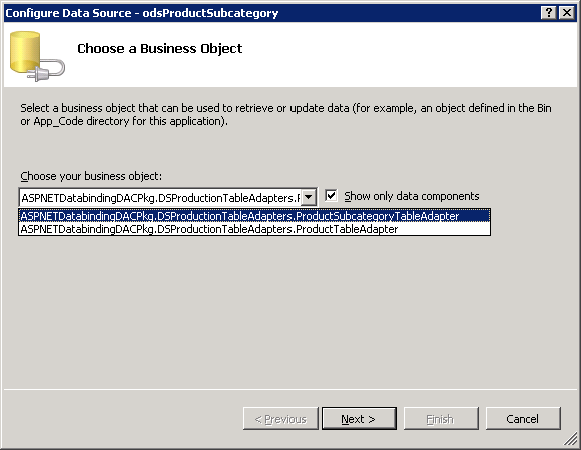
Figure 16
Click on the Next button and go to the Define Data Methods page and in the Select tab, you have to choose the GetData option (see Figure 17).
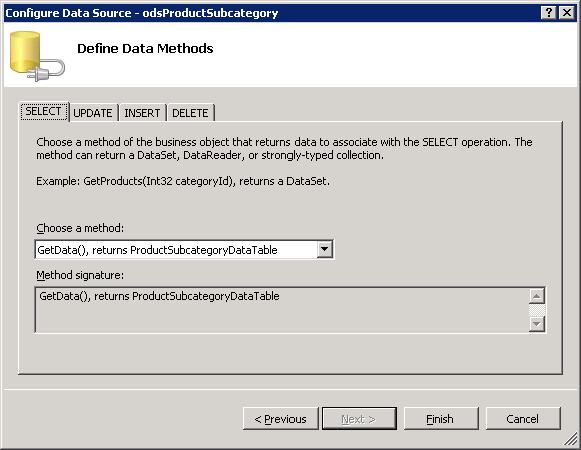
Figure 17
Finally, click on the Finish button. After the wizard is closed, we have returned to the Data Source Configuration Wizard for the DropDownList control. Then select the Name field as the display field and the ProductSubcategoryID as the value field (see Figure 18).
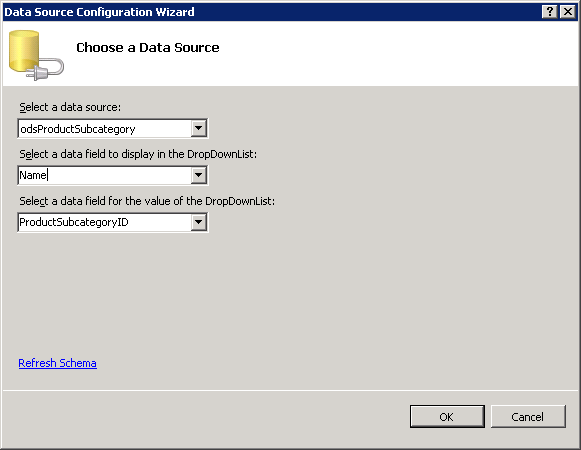
Figure 18
In order to deal with the NULL supported by ProductSubCategoryID field (according to the underlying data schema) and actually the DropDownList control does not include a list item for NULL, you need to manually add another list item for the NULL whose value is associated to an empty string which is automatically converted to NULL and vice-a-versa in ASP.NET 2.0. As well as, you have to set the AppendDataBoundItems property to True.
Go to the source and navigate to the DropDownList control inside the EditItemTemplate node, and add the AppendDataBoundItems="True" attribute as well as the ListItem element whose Value property is set to an empty string (see Listing 3).
<EditItemTemplate>
<asp:DropDownList ID="DropDownList1" runat="server" DataSourceID="odsProductSubcategory"
DataTextField="Name" DataValueField="ProductSubcategoryID" SelectedValue='<%# Bind("ProductSubcategoryID") %>' AppendDataBoundItems="True">
<asp:ListItem Value="">(No value)</asp:ListItem>
</asp:DropDownList><asp:ObjectDataSource ID="odsProductSubcategory" runat="server" OldValuesParameterFormatString="{0}" SelectMethod="GetData"
TypeName="ASPNETDatabindingDACPkg.DSProductionTableAdapters.ProductSubcategoryTableAdapter">
</asp:ObjectDataSource>
</EditItemTemplate>
Listing 3
Now, click on the GridView control's smart tag and click on the End Template Editing option (see Figure 19).
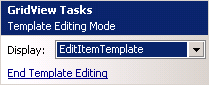
Figure 19
Repeat the same steps for the ItemTemplate for the ProductSubcategoryID field, although you have to set Enable property to False, because ItemTemplate represents the values in report mode for the GridView control, not in the updatable mode.
Conclusion
In this article, I've discussed the main techniques to customize the GridView control using its TemplateFields features in ASP.NET 2.0.