This article has been excerpted from book "Graphics Programming with GDI+".
The Color Structure
You may have notices that we used the Color structure in our previous example. The Color structure represents a GDI+ ARGB (alpha-red-green-blue) color. This class contains a static property for almost every possible color. For example, Color.Black and Color.Red represent black and red respectively. Beside these static properties, this structure has the additional properties defined in Table 2.1.
IsKnownColor, IsNamedColor and IsSystemColor represent members of the KnownColor enumeration, which again defines almost every color as a member.
Table 2.2 describes the methods of the Color structure.
TABLE 2.1 Color properties
|
Property |
Description |
|
Red, Blue, Green, Aqua, Azure, and so on |
A specified color static property for almost every color. |
|
A |
Return the alpha component value in a Color structure. |
|
R |
Returns the red component value in a Color Structure. |
|
G |
Returns the green component value in a Color Structure. |
|
B |
Returns the blue component value in a Color Structure. |
|
IsEmpty |
Indicates whether a Color structure is uninitialized. |
|
IsKnownColor |
Indicate whether a color is predefined. |
|
IsNamedColor |
Indicate whether a color is predefined. |
|
IsSytemColor |
Indicates whether a color is a system color. |
|
Name |
Return the name of the color. |
TABLE 2.2: Color methods
| Method |
Description |
|
FromArgb |
Creates a Color structure from the four 8-bit ARGB component (alpha-red-green-blue) values. |
|
FromKnownColor |
Create a Color structure from the specified predefined color. |
|
FromName |
Creates a Color structure from the specified name of a predefined color. |
|
GetBrightness |
Returns the hue-saturation-brightness (HSB) brightness value of this Color structure. |
|
GetHue |
Returns the HSB he value, in degrees, of this Color structure. |
|
GetSaturation |
Returns the HSB hue value in degrees, of this Color structure. |
|
ToArgb |
Returns the 32-bit ARGB value of this Color structure. |
|
ToKnownColor |
Return the KnownColor value of this Color structure. |
The Point and PointF Structure
In GDI+, the Point structure represents an ordered pair of integer x- and y-coordinates that define a point in a two-dimensional plane. The Point structure's constructor initializes a new instance of the Point structure. The Point constructor has three overloaded forms that allow you to create a Point object from an integer, a size object, or two integers as follows:
public Point (int);
public Point (Size);
public Point (int, int);
The following code snippet creates Point objects using all three forms of the constructor:
Point pt1 = new Point (10);
Point pt2 = new Point (new Size (20, 20));
Point pt3 = new Point (30, 30);
The PointF structure is similar to the Point structure, but it uses floating point values of integers. Unlike the Point structure, PointF has only one constructor, which takes two floating point values as x- and y-coordinates.
PointF pt3 = new PointF(30.0f, 30.0f);
Both the Point and the PointF structures define three properties: IsEmpty, X, and Y. The IsEmpty property returns true if a point is empty, which means that both X and Y values are zero; otherwise it returns false. The X and Y properties return the x- and y-coordinates of a point, respectively. The Empty static field of the Point structure creates a new point with x and y values set to zero.
Listing 2.3 creates a point with zero x and y values using Point. Empty and assigns new coordinates values using the X and Y properties. This example creates a Graphics object using the Graphics.FromHwnd method and returns the graphics surface for a form. The Graphics.FromHwnd method creates a Graphics object from a window handle, which we pass as this.Handle. The DrawLine method draws a line starting from the first point to the second point using the defined pen. You can test this code on a button or a menu click event handler.
LISTING 2.3: Creating Point objects
//Create a new Point object
Point pt = new Point (50, 50);
//Create a new point using Point.Empty
Point newPoint = Point.Empty;
//Set X and Y properties of Point
newPoint.X=100;
newPoint.Y = 200;
//Create a Graphics object from the
//Current form's handle
Graphics g = Graphics.FromHwnd (this.Handle);
//Create a new pen with color blue and width = 4
Pen pn = new Pen (Color.Blue, 4);
//Draw a line from point pt to new point
g.DrawLine (pn, pt, newPoint);
//Dispose of Pen and Graphics objects
pn.Dispose();
g.Dispose();
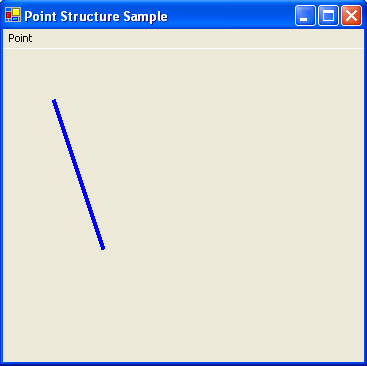
FIGURE 2.10: Using Point to draw a line
Figure 2.10 shows the output of Listing 2.3. This program draws a line from point 1 to point 2. The "Point" text in this figure is a menu item.
Like the Point structure, PointF can also use Empty, x, and y properties, as shown in Listing 2.4. You can test this code on a button or a menu click event handler.
LISTING 2.4: Creating PointF objects
//Create a new PointF object
PointF pt = new PointF (50.0f, 50.0f);
//Create a new point using PointF.Empty
PointF newPoint = PointF.Empty;
//Set x and y properties of PointF
newPoint.X = 100.0f;
newPoint.Y = 200.0f;
//Create a Graphics object from the current form's handle
Graphics g = Graphics.FromHwnd (this.Handle);
//Create a new pen with color blue and width 4
Pen pn = new Pen (Color.Blue, 4);
//Draw a line from point pt to new point
g.DrawLine (pn, pt, newPoint);
//Dispose of Pen and Graphics objects
pn.Dispose();
g.Dispose();
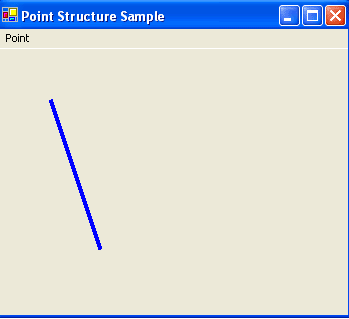
FIGURE 2.11: Using PointF to draw a line
Figure 2.11 shows the output of Listing 2.4. It is identical to Figure 2.10.
The Point structure also defines methods to convert from PointF to Point. The Ceiling method of the Point structure converts a PointF object to a Point object by rounding off the values of the PointF object to the next higher integer values. The Round method converts a PointF object to Point by rounding floating values to the nearest integer values. The Truncate method converts a PointF object to Point by truncating the floating values to integers. Listing 2.5 shows how to use the Ceiling, Round, and Truncate methods. You can test this code on a button or a menu click event handler.
LISTING 2.5 Using the Ceiling, Round, and Truncate methods of Point
//Create three points
PointF pt1 = new PointF(30.6f, 30.8f);
PointF pt2 = new PointF(50.3f, 60.7f);
PointF pt3 = new PointF(110.3f, 80.5f);
//Call Ceiling, round, and Truncate methods and return new points
Point pt4 = Point.Ceiling(pt1);
Point pt5 = Point.Round(pt2);
Point pt6 = Point.Truncate(pt3);
//display results
MessageBox.Show("Value of pt4: " +pt4.ToString());
MessageBox.Show("Value of p5: " +pt5.ToString());
MessageBox.Show("Value of pt6: " +pt6.ToString());
The Point structure also defines additional, equality, inequality, subtraction, Point-to-Size, and Point-to-PointF conversion operators. Listing 2.6 shows how do add and subtract a Size object from a Point object, convert from Point to PointF, and convert from a Point object to a Size object. You can test this code on a button or menu click event handler.
LISTING 2.6: Some Point and PointF conversions
//Create a Size object
Size sz = new Size(12,12);
//Create a Point object
Point pt = new Point (20, 20);
//Add point and size and copy to point
pt = pt+ sz;
MessageBox.Show("Addition : " + pt.ToString());
//Subtract point and size
pt = pt-sz;
MessageBox.Show("subtraction : " + pt.ToString());
//Create a PointF object from Point
PointF ptf = pt;
MessageBox.Show("PointF : " +pt.ToString());
//Convert Point to size
sz = (Size) pt;
MessageBox.Show("Size :" + sz.Width.ToString() + "," + sz.Height.ToString());
The Rectangle and RectangleF Structure
The Rectangle and RectangleF structure represent a rectangle in GDI+. A Rectangle structure stores the top left corner and height and width of a rectangle region. You can create a Rectangle object from Point and Size objects or by using four integer values as starting and ending coordinates of the rectangle.
The Rectangle and RectangleF structure provides properties that can be used to get the height, width, and position of the rectangle. Table 2.3 describes the properties of the Rectangle and RectangleF structures.
LISTING 2.7: Using Rectangle Properties
//Create Point, Size, and Rectangle objects
Point pt= new Point(10,10);
Size sz = new Size (60,40);
Rectangle rect1 = Rectangle.Empty;
Rectangle rect2 = new Rectangle (20, 30, 30, 10);
TABLE 2.3: Rectangle and RectangleF Properties
| Property |
Description |
|
Bottom |
Return the y-coordinate of the bottom edge. |
|
Height |
Represents the rectangle's height. |
|
IsEmpty |
Returns true if all of the rectangle's values (starting point, height, and width) are zero, otherwise returns false. |
|
Left |
Returns the x-coordinates of the left edge. |
|
Location |
Represents the coordinates of the upper left corner. |
|
Right |
Returns the x-coordinate of the right edge. |
|
Size |
Represents the size of a rectangle. |
|
Top |
Return the y-coordinate of the top edge. |
|
Width |
Represents the width of a rectangle. |
|
X |
Represents the width of a rectangle. |
|
Y |
Represents the y-coordinate of the upper left corner. |
//Set Rectangle properties
if (rect1.IsEmpty)
{
rect1.Location = pt;
rect1.Width = sz.Width;
rect1.Height = sz.Height;
}
//Get Rectangle properties
string str = "Location: " + rect1.Location.ToString();
str += ", X: "+ rect1.X.ToString();
str += ", y:"+ rect1.Y.ToString();
str += " Left : " +rect1.Left.ToString();
str += ", Right:" + rect1.Right.ToString();
str += ", Top: " + rect1.Top.ToString();
str += ", Bottom:"+rect1.Bottom.ToString();
MessageBox.Show(str);
Listing 2.8 uses three different methods to create three Rectangle objects. The first method creates a Rectangle object by using a Point and a Size. The second and third methods create a Rectangle by using four integer values as the starting x- and y-coordinates and the width and height of the rectangle. After creating the rectangle, the program creates pen and brush objects using the Pen and SolidBrush classes and calls the fill and draw methods of Graphics to draw and fill the rectangles. Finally, we dispose of the objects. You can test this code on a button or menu click event handler.
LISTING 2.8: Creating Rectangle Objects
//Create a Graphics object
Graphics g = this.CreateGraphics();
int x = 40;
int y = 40;
int height = 120;
int width = 120;
//Create a Point object
Point pt = new Point (80, 80);
//Create a Size object
Size sz = new Size(100, 100);
//Create a rectangle from Point and size
Rectangle rect1 = new Rectangle (pt, sz);
//Create a rectangle from integers
Rectangle rect2 = new Rectangle (x, y, width, height);
//Create a rectangle from direct integers
Rectangle rect3 = new Rectangle(10, 10, 180, 180);
//Create pens and brushes
Pen redPen = new Pen (Color.Red, 2);
SolidBrush greenBrush = new SolidBrush (Color.Blue);
SolidBrush blueBrush = new SolidBrush (Color.Green);
//Draw and fill rectangles
g.DrawRectangle (redPen, rect3);
g.FillRectangle (blueBrush, rect2);
g.FillRectangle (greenBrush, rect1);
//Dispose of the objects
redPen.Dispose();
blueBrush.Dispose();
greenBrush.Dispose();
g.Dispose();
Figure 2.12 shows the output from Listing 2.8: three different rectangles.
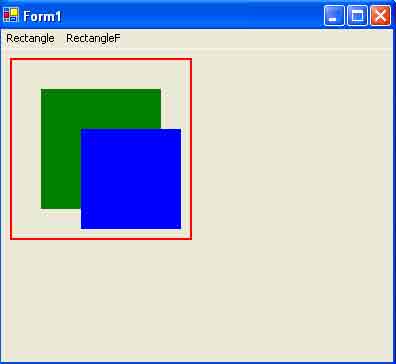
FIGURES 2.12: Using Rectangle to create rectangles
You can create a Rectangle object in a similar way. The only difference is that RectangleF takes floating point arguments instead of integers, SizeF instead of Size, and PointF instead of Point. Listing 2.9 creates RectangleF objects from SizeF, PointF, Size and Point objects. You can test this code on a button or a menu click event handler.
LISTING 2.9: creating RectangleF objects
//Create a Graphics object
Graphics g = this.CreateGraphics();
float x = 40.0f;
float y = 40.0f;
float height = 120.0f;
float width = 120.0f;
//Create a Point object
PointF pt = new PointF (80.0f, 80.0f);
//Create a Size object
SizeF sz = new SizeF(100.0f, 100.0f);
//Create a rectangle from Point and size
RectangleF rect1 = new RectangleF (pt, sz);
//Create a rectangle from integers
RectangleF rect2 = new RectangleF (x, y, width, height);
//Create a rectangle from direct integers
RectangleF rect3 = new RectangleF(10.0f, 10.0f, 180.0f, 180.0f);
//Create pens and brushes
Pen redPen = new Pen (Color.Red, 2);
SolidBrush greenBrush = new SolidBrush (Color.Blue);
SolidBrush blueBrush = new SolidBrush (Color.Green);
//Draw and fill rectangles
g.DrawRectangle (redPen, rect3.X, rect3.Y, rect3.Width, rect3.Height);
g.FillRectangle (blueBrush, rect2);
g.FillRectangle (greenBrush, rect1);
//Dispose of the objects
redPen.Dispose();
blueBrush.Dispose();
greenBrush.Dispose();
g.Dispose();
Figure 2.13 shows the output from Listing 2.9: three different rectangles as in Figure 2.12.
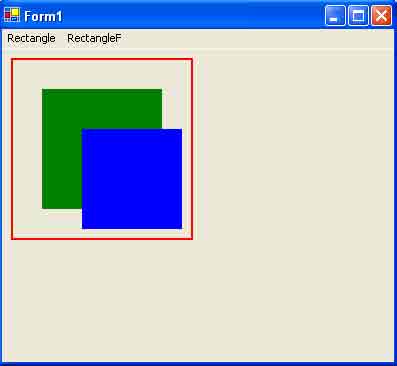
FIGURE 2.13: Using RectangleF to create rectangles
TABLE 2.4: Rectangle and RectangleF methods
| Method |
Description |
|
Ceiling |
Converts a RectangleF object to a Rectangle object by rounding the RectangleF values to the next higher integer values. |
|
Contains |
Determines if the specified point is contained within the rectangular region of a rectangle. |
|
FromLTRB |
Creates a rectangle with the specified edge locations. |
|
Inflate |
Creates and returns an inflated copy of a rectangle. |
|
Intersect |
Replaces a rectangle with the intersection of itself and another rectangle. |
|
IntersectsWith |
Determines it a specified rectangle intersects with rect. |
|
Offset |
Adjust the location of a specified rectangle by the specified amount. |
|
Round |
Converts a RectangleF object to a Rectangle object by rounding the RectangleF values of the nearest integer values. |
|
Truncate |
Converts a RectangleF object to a Rectangle object by truncating the RectangleF values. |
|
Union |
Returns a rectangle that contains the union of two Rectangle structure. |
Like the Point and PointF structures, Rectangle and RectangleF define Ceiling, Round, and Truncate methods. These methods are described in Table 2.4. Listing 2.10 shows how to use these methods.
LISTING 2.10: Using the Round, Truncate, Union, inflate, Ceiling, and Intersect methods of Rectangle
//Create a Graphics object
Graphics g = this.CreateGraphics();
//Create PointF, SizeF, and RectangleF objects
PointF pt = new PointF(30.8f, 20.7f);
SizeF sz = new SizeF(60.0f, 40.0f);
RectangleF rect2 = new RectangleF (40.2f, 40.6f, 100.5f, 100.0f);
RectangleF rect1 = new RectangleF (pt, sz);
Rectangle rect3 = Rectangle.Ceiling(rect1);
Rectangle rect4 = Rectangle.Truncate(rect1);
Rectangle rect5 = Rectangle.Round(rect2);
//Draw rectangles
g.DrawRectangle(Pens.Black, rect3);
g.DrawRectangle(Pens.Red, rect5);
//Insert rectangles
Rectangle isectRect = Rectangle.Intersect (rect3, rect5);
//Fill new rectangle
g.FillRectangle(new SolidBrush(Color.Blue), isectRect);
//Create a Size object
Size inflateSize = new Size (0, 40);
// Inflate rectangle
isectRect.Inflate(inflateSize);
//Draw new rectangle
g.DrawRectangle (Pens.Blue, isectRect);
//Set Rectangle properties
rect4 = Rectangle.Empty;
rect4.Location = new Point (50, 50);
rect4.X = 30;
rect4.Y = 40;
//Union two rectangles
Rectangle unionRect = Rectangle.Union(rect4, rect5);
//Draw new rectangle
g.DrawRectangle (Pens.Green, unionRect);
//Dispose of the Graphics object
g.Dispose();
Figure 2.14 shows the output from listing 2.10
The Size and SizeF Structures
The Size and SizeF structures represent the size of a rectangle area. Like Point/PointF and Rectangle/RectangleF, Size and SizeF also each have an Empty static field, which creates a Size object with zero height and zero width. The only difference between Size and SizeF is that Size uses integer values and SizeF uses floating point values.
You can create Size and SizeF objects by passing the width and height of the Point and PointF objects as constructor arguments, respectively. Listing 2.11 shows different ways to create Size and SizeF objects.
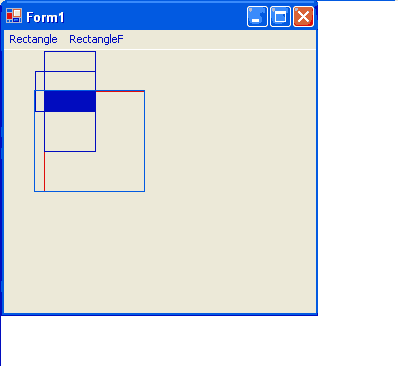
FIGURE 2.14: Using the Round, Truncate, Union, Inflate, Ceiling, and Intersect methods of Rectangle.
LISTING 2.11 Creating Size and SizeF objects
Point pt1 = new Point (20,40);
PointF pt2 = new PointF (50.0f, 80.0f);
Size sz1 = new Size(pt1);
SizeF sz2 = new SizeF(pt2);
Size sz3 = new Size(100,150);
SizeF sz4 = new SizeF(12.5f, 87.6f);
The Height and Width properties represent the height and width respectively, of the area represented by the Size and SizeF structures. The IsEmpty property return true if Size has zero height and zero width; otherwise it returns false.
Like the Point/PointF and Rectangle/RectangleF structures, Size and SizeF have Ceiling, Truncate, and Round static methods. Each method can convert a SizeF object to a Size object: the Ceiling method by rounding the values of the Size structure to the next higher integer values; the Round method, by rounding the values of the Size structures to the nearest integer values; and the Truncate method, by truncating the values to the next lower integer values.
Listing 2.12 shows the use of the Ceiling, Round and Truncate methods. You can test this code on a button or a menu click event handler.
LISTING 2.12: Using the Ceiling, Round, and Truncate methods of Size and SizeF
PointF pt1 = new PointF (20.6f, 30.8f);
PointF pt2 = new PointF (50.3f, 60.7f);
PointF pt3 = new PointF (110.3f, 80.5f);
SizeF sz1 = new SizeF(pt1);
SizeF sz2= new SizeF(pt2);
SizeF sz3 = new SizeF(pt3);
SizeF sz4 = Size.Ceiling(sz1);
SizeF sz5 = Size.Round(sz2);
SizeF sz6 = Size.Truncate(sz3);
Conclusion
Before you write a graphic application, a basic understanding of drawing surfaces and coordinates is a must. This article began with the basic of the drawing surface and the coordinate system, describing how drawing surface and coordinate system are represented in GDI+ and how the GDI+ coordinate system differs from other coordinate systems.
Before using any GDI+ related classes defined in the .NET Framework library, you must reference System.Drawing and its subnamespaces. In this article you learned how to add reference to the GDI+ library and how to import the GDI+ related namespaces into your application. After adding a reference to the GDI+ library and namespaces to the application, the nest step is to get the Graphics object. There are several ways to get a Graphics object in an application. This article discussed three different ways, and then showed how to use the Graphics class methods to draw and fill lines, rectangles, and ellipses. You also learned to dispose of objects when you're finished with them.
Finally, we covered some basic GDI+ structures - including Color, Rectangle, RectangleF, Point, PointF, Size and SizeF-describing their members and how to use them in your application.
You should now be able to write simple graphics applications using GDI+.