Button class in Windows Forms represents a Button control. A Button control is a child control placed on a Form and used to process click event and can be clicked by a mouse click or by pressing ENTER or ESC keys.
Creating a Button
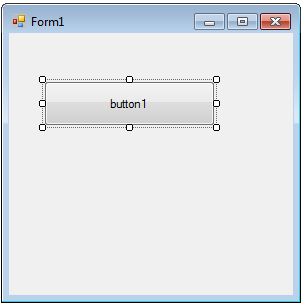
To create a Button control, you simply drag and drop a Button control from Toolbox to Form in Visual Studio. After you drag and drop a Button on a Form, the Button looks like Figure 1. Once a Button is on the Form, you can move it around and resize it using mouse.

Figure 1
Setting Button Properties
After you place a Button control on a Form, the next step is to set button properties.
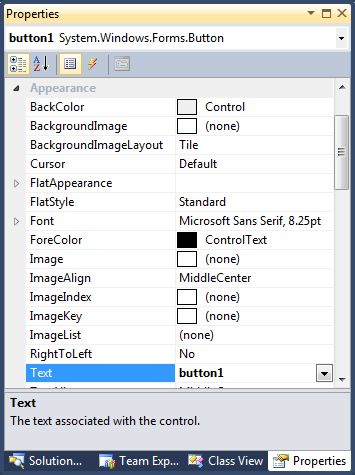
The easiest way to set a Button control properties is by using the Properties Window. You can open Properties window by pressing F4 or right click on a control and select Properties menu item. The Properties window looks like Figure 2.

Figure 2
Background and Foreground
BackColor and ForeColor properties are used to set background and foreground color of a Button respectively. If you click on these properties in Properties window, the Color Dialog pops up.
Alternatively, you can set background and foreground colors at run-time. The following code snippet sets BackColor and ForeColor properties.
// Set background and foreground
dynamicButton.BackColor = Color.Red;
dynamicButton.ForeColor = Color.Blue;
AutoEllipsis
An ellipsis character (...) is used to give an impression that a control has more characters but it could not fit in the current width of the control. Figure 3 shows an example of an ellipsis character.

Figure 3
If AutoEllipsis property is true, it adds ellipsis character to a control if text in control does not fit. You may have to set AutoSize to false to see the ellipses character.
Image in Button
The Image property of a Button control is used to set a button background as an image. The Image property needs an Image object. The Image class has a static method called FromFile that takes an image file name with full path and creates an Image object.
You can also align image and text. The ImageAlign and TextAlign properties of Button are used for this purpose.
The following code snippet sets an image as a button background.
// Assign an image to the button.
dynamicButton.Image = Image.FromFile(@"C:\Images\Dock.jpg");
// Align the image and text on the button.
dynamicButton.ImageAlign = ContentAlignment.MiddleRight;
dynamicButton.TextAlign = ContentAlignment.MiddleLeft;
// Give the button a flat appearance.
dynamicButton.FlatStyle = FlatStyle.Flat;
Text and Font
The Text property of Button represents the contents of a Button. The TextAlign property if used to align text within a Button that is of type ContentAlignment enumeration.
The Font property is used to set font of a Button.
The following code snippet sets Text and Font properties of a Button control.
dynamicButton.Text = "I am Dynamic Button";
dynamicButton.TextAlign = ContentAlignment.MiddleLeft;
dynamicButton.Font = new Font("Georgia", 16);
Button States
Button control has five states - Normal, Flat, Inactive, Pushed, and All. ButtonState enumeration represents a button state.
Unfortunately, Windows Forms does not have a straight-forward way to set a button control state but there is a work around.
Windows Forms has a ControlPaint class with some static methods that can be used to draw various controls at runtime. The DrawButton method is used to draw a Button control and the last parameter of this method is ButtonState enumeration.
The following code snippet sets the button state of button1 using ControlPaint class.
ControlPaint.DrawButton(System.Drawing.Graphics.FromHwnd(button1.Handle), 0, 0, button1.Width, button1.Height, ButtonState.Pushed);
Adding Button Click Event Hander
A Button control is used to process the button click event. We can attach a button click event handler at run-time by setting its Click event to an EventHandler obect. The EventHandler takes a parameter of an event handler. The Click event is attached in the following code snippet.
// Add a Button Click Event handler
dynamicButton.Click += new EventHandler(DynamicButton_Click);
The signature of Button click event handler is listed in the following code snippet.
private void DynamicButton_Click(object sender, EventArgs e)
{ }
Creating a Button Dynamically
Creating a Button control at run-time is merely a work of creating an instance of Button class, set its properties and add Button class to the Form controls.
First step to create a dynamic button is to create an instance of Button class. The following code snippet creates a Button control object.
// Create a Button object
Button dynamicButton = new Button();
Next step, you need to set Button class properties. You need to make sure to specify the Location, Width, Height or Size properties. The default location of Button is left top corner of the Form. The Location property takes a Point that specifies the starting position of the Button on a Form. The Size property specifies the size of the control. We can also use Width and Height property instead of Size property. The following code snippet sets Location, Width, and Height properties of a Button control.
// Set Button properties
dynamicButton.Location = new Point(20, 150);
dynamicButton.Height = 40;
dynamicButton.Width = 300;
In the next step, you may set more properties of the Button control. The following code snippet sets background color, foreground color, Text, Name, and Font properties of a Button.
// Set background and foreground
dynamicButton.BackColor = Color.Red;
dynamicButton.ForeColor = Color.Blue;
dynamicButton.Text = "I am Dynamic Button";
dynamicButton.Name = "DynamicButton";
dynamicButton.Font = new Font("Georgia", 16);
A Button control is used to process the button click event. We can attach a button click event handler at run-time by setting its Click event to an EventHandler obect. The EventHandler takes a parameter of an event handler. The Click event is attached in the following code snippet.
// Add a Button Click Event handler
dynamicButton.Click += new EventHandler(DynamicButton_Click);
The signature of Button click event handler is listed in the following code snippet.
private void DynamicButton_Click(object sender, EventArgs e)
{ }
Now the last step is adding a Button control to the Form. The Form.Controls.Add method is used to add a control to a Form. The following code snippet adds a Button control to the current Form.
Controls.Add(dynamicButton);
The complete code is listed in Listing , where CreateDynamicButton methods creates a Button control to a Form at run-time, attaches a click event handler of the button and adds Button control to the Form by calling Form.Controls.Add() method.
/// <summary>
/// This method creates a Button control at runtime
/// </summary>
private void CreateDynamicButton()
{
// Create a Button object
Button dynamicButton = new Button();
// Set Button properties
dynamicButton.Height = 40;
dynamicButton.Width = 300;
dynamicButton.BackColor = Color.Red;
dynamicButton.ForeColor = Color.Blue;
dynamicButton.Location = new Point(20, 150);
dynamicButton.Text = "I am Dynamic Button";
dynamicButton.Name = "DynamicButton";
dynamicButton.Font = new Font("Georgia", 16);
// Add a Button Click Event handler
dynamicButton.Click += new EventHandler(DynamicButton_Click);
// Add Button to the Form. Placement of the Button
// will be based on the Location and Size of button
Controls.Add(dynamicButton);
}
/// <summary>
/// Button click event handler
/// </summary>
/// <param name="sender"></param>
/// <param name="e"></param>
private void DynamicButton_Click(object sender, EventArgs e)
{
MessageBox.Show("Dynamic button is clicked");
}
You need to make sure to call CreateDynamicButton() method on the Form's constructor just after InitializeComponent() method, listed as following.
public Form1()
{
InitializeComponent();
CreateDynamicButton();
}
Summary
In this article, we saw how to create Button control in Windows Forms using C# at design-time as well as at run-time. We also saw how to set a button properties and a click event handler.