Visual studio (VS) .NET provides design-time support to work with data components. In this article, you'll learn how to use these data components in VS .NET at design-time to create database applications. Using these components is similar to using any windows control. You just drag the component to a form, set its properties and methods and you're up and running.
In this article I'll start with the Server Explorer, a useful tool for database applications. I'll focus on developing database applications quickly, using data components in VS.NET without writing a lot of code. I'll also show you a step-by-step tutorial to help you develop and run a project. After that, I'll discuss data connection, data adapter, data command, dataset, and data view components in more detail. After finishing this article, you'll have a good understanding of data components and how to work with them in VS.NET.
Creating Your ADO.NET Project
Begin your project by launching VS.NET and choosing New > Project from the project menu. Choose visual C# projects from project types and then pick the windows application template. If you like, type an appropriate name into the name field for your first ADO.NET application and click OK (see figure below).
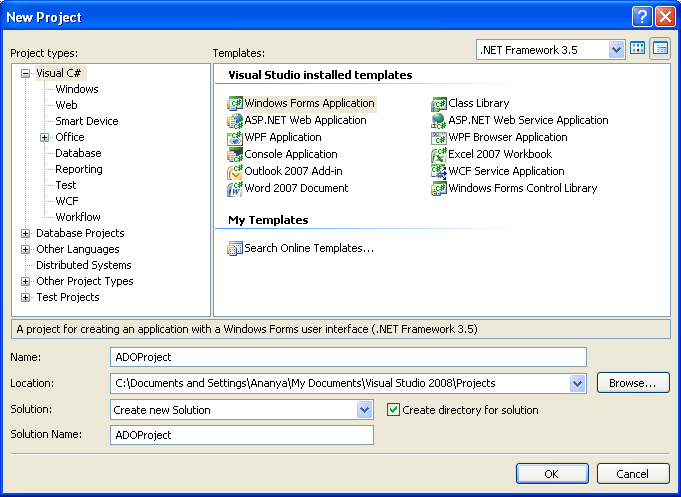
Figure: Creating a new project
Using the Server Explorer
The Server Explorer is new to Visual Studio .NET. You can open the server Explorer by clicking the View > server Explorer menu item, as shown in figure.
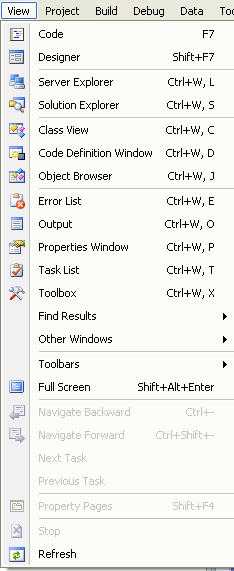
Figure: Opening the server Explorer
The Server Explorer enables you to manage your database servers and connections. If you've ever used ODBC in your applications, then you're probably familiar with the traditional windows ODBC Administration where you created data source names (DSNs) using ODBC drivers for a data source and then connected your application using this DSN.
Well, now you don't have to worry about it. You can use server Explorer to add a new server or a data connection to your list.
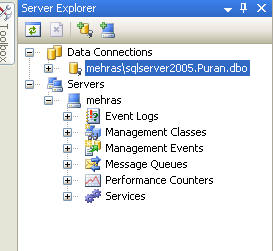
Figure: Adding a server through the server Explorer
As you see in the above figure, the Server Explorer has two root nodes: Data Connections and Severs. By right- clicking on these nodes you can add a new data connection or a new server to your list.
Specifically, to add a new server to the server Explorer, you right-click on the servers node, select the add server menu option, and enter the server name.
Adding a new Connection
Adding a new connection is the next step after adding a server (if you're using a server) to the Server Explorer. You add a new connection to your list by right- clicking on Data Connection tree item and choosing the add connection option.

Figure: Adding a Connection
This brings up a Data Link properties wizard. The first tab of this wizard, provider, Display all the data source providers installed on your machine; this is where you select your database provider. The list could contain any OLE-DB provider, Jet OLD-DB, or other data driver available on your computer. Figure below shows you a list Providers on my machine.
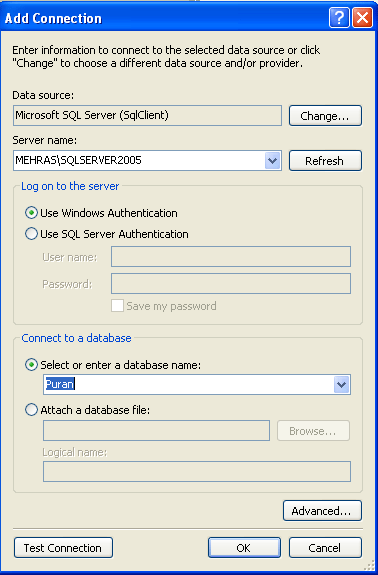
Figure: Choosing a data provider
The other tab of this wizard, Connection, lets you pick your server and corresponding data source. The drop-down list displays all the available servers. My server is a SQL server with the default name local host. After selecting a server, the database drop-down list displays all the available databases on the server. I'll select the Puran database in this example. By clicking the Test Connection button, you can make sure your database connection is working.
Conclusion
Hope this article would have helped you in understanding using the Server Explorer for Adding a new Connection. See my other articles on the website on ADO.NET.