This article has been excerpted from book "Graphics Programming with GDI+".
Sooner or later you will need to print out application data. Perhaps you have created documents or test data and now you want to see them on paper. You may be drawing something and want to print it out. Printing data from a database and printing images are other possibilities. With the .NET Framework you will find it easy to create application that talk your printer's language. This article covers printing functionality in the .NET Framework. The aim is to give you the knowledge to handle basic (and some not so basic) printing needs.
We'll begin with a brief history of printing, followed by an introduction to the printing class available in .NET. Toward the end of the article we will delve deep into printing functionality. After reading this article, you should have a good idea of printing functionality defined in .NET Framework, and how to implement this functionality in your applications. Here are some of the topics we will discuss in this article:
-
A brief history of printing in Microsoft Windows
-
The printing process (i.e., how printing works)
-
Printing in Microsoft .NET
-
The System.Drawing.Printing namespace and its classes
-
Getting and setting page and printer settings
-
The basic framework of printing-enabled applications
-
How to print text, images, and graphics objects
-
How to use various print dialogs and their classes
-
Writing your own custom printing and page setup dialogs
-
Printing multipage documents
-
Understanding the print controller and its related classes
A Brief History of Printing with Microsoft Windows
If you are running Microsoft Windows today, you can more or less print to any available printer, from a $100 bargain-basement inkjet to a $1,000 Tektronix color printer. The versatility is possible only because of software standardization.
When Microsoft DOS was the standard PC desktop operating system, every application had to supply its own printing software or printer driver. If you bought a piece of software from Company X, you had to hope that it supported your printer. Thus, often you had to check which printers your new software supported and buy one of those. Either that, or wait until Company X supported your printer, which, more often than not, never happened.
Companies tended to produce printer drivers for only a select few of the popular printers on the market, such as the HP LaserJet. Even worse, you might have a printer driver for your laser printer when using a drawing package, but if you wanted to use a word processor from a different company, it would not be surprising to find that your printer was not supported!
Hewlett-Packard Chooses Standards
During this time, companies like Hewlett-Packard were driving the printer business and introducing standards that could only make things better. At this point HP had been in the printer business a long time and had introduced many different types of printers and plotters. It had already introduced a standard language (Hewlett-Packard Graphics Language, or HPGL) for drawing graphics on a plotter, which allowed the user to issue draw commands like, "Draw a line from point A to point B."
Hewlett-Packard introduced the LaserJet series of laser printers, which became extremely successful because of their high quality and low cost. These printers were driven by a language called PCL (Printer Control Language). (Even today, printers manufactured by HP and several other companies support PCL). Even if you don't have the exact printer driver you need, if your printer supports PCL you can at least get some output from it.
Moreover, Hewlett-Packard used PCL with all its printers, so if you wrote an application to communicate with the HP LaserJet Series II, you could be pretty certain that the code would work with later printers in the range. Although HP is not the only printer manufacturer, it can certainly be credited with jump-starting the market.
While companies like Hewlett-Packard were making printing easier, the software problems still existed. If you did not have an appropriate printer driver for you application, you would not get anything out of your printer.
When a Printer Has No Driver
Be aware, though, that even today, if you rush out and buy the latest and greatest printer, you may get home and find that the printer has not come supplied with printer driver or the version of Windows you have may not support that particular printer. So what do you do?
In most cases you can just choose a driver from an earlier model in the same line. For instance you could use an HP LaserJet II driver to drive an HP LaserJet 4 printer. This works because Hewlett-Packard uses PCL to control its printers, so even though LaserJet II may use an older version of PCL, the LaserJet 4 still supports it. The message here is that when you're buying your next printer; make sure the operating system you intend to use supports it!
With the release of Microsoft Windows in its various forms, the printing crisis was more or less over. Windows provided a standard graphical user interface, or GUI, and anything that you could draw on-screen could be printed out. Microsoft provided Windows drivers for the most common printers. Over time, as new versions of Windows came out, more and more printers were supported. Now all that the programmers had to do was write code for Windows, and they could use that same code to talk to any printer that Windows supported.
Overview of the Printing Process
Before we write our first printing application, it's important to understand how printing works in Windows and what role GDI+ plays in the process.
GDI+ is an application-level library that allows applications to interact with display devices such as monitors, printers, and scanners through the device drivers. Figure 11.1 illustrates the role of GDI+ in the drawing process. The application passes data to GDI+. GDI+ is responsible for converting the data into graphics format (pixels) with the help of display drivers and sending it to the display driver, which displays the data on a device such as monitor.
The printing process, which is very similar to the drawing process, is shown in Figure 11.2. The application sends data to GDI+, which communicates with printer driver that send data to the printer.

FIGURE 11.1: A simple drawing process

FIGURE 11.2: A simple drawing process
How Is Drawing Different from Printing?
The drawing process involves a surface, which is the container for graphics shapes. In Windows applications, a form works as a drawing surface. Earlier we used the Graphics object associated with a form to access the surface associated with a form.
There are several ways to get the Graphics object associated with a form. The simplest way is to use the form's paint event handler and PaintEventArgs.Graphics property, which returns the Graphics object for the form to which this paint event handler belongs. Another way is to use the CreateGraphics method. Listing 11.1 uses PaintEventArgs.Graphics to get the Graphics object associated with a form. Once you have the drawing surface (Graphics object), you can use draw and fill methods.
LISTING 11.1: Drawing graphics shapes
private void Form1_Paint(object sender, PaintEventArgs e)
{
Graphics g = e.Graphics;
SolidBrush redBrush = new SolidBrush(Color.Red);
Rectangle rect = new Rectangle(150, 80, 200, 140);
g.FillPie(greenBrush, 40, 20, 200, 40, 0.0f, 60.0f);
g.FillRectangle(blueBrush, rect);
}
The printing process is somewhat different from the drawing process. In a printing process, a printer works as a drawing surface. In a drawing process, we already have a form as a drawing surface. To print something on a printer, however, we need the printer object. The basic steps of a printing process are:
-
Specify the printer you want to use.
-
Retrieve the printer's surface, which is a Graphics object.
-
Call the draw and fill methods of the Graphics object.
Conceptual Flow of the Printing Process
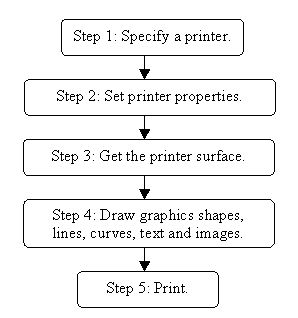
Before we discuss the programmatic flow of a printing process, let's look at the conceptual flow. Every printing process involves five basic steps as illustrated in Figure 11.3.
Step 1: Specify a printer. In this step we select a printer to be used in the printing process. You may want to select a printer from multiple printers available to your application.
Step 2: Set the printer properties. In this step we can set properties such as color, paper tray, paper size, and print quality. This step is optional; if we do not set printer properties, the process uses default settings.
Step 3: Get the printer surface. Unlike the drawing surface (a form), which is available on the form's paint event handler, the printer surface is available only through the print-page event handler. As such, this step requires creating a print-page event handler. One parameter of the event handler is of type PrintPageEventArgs, whose Graphics member represents the printer surface associated with this print-page event handler. In Section 11.2.3 we will see how to implement the print-page event handler programmatically.

FIGURE 11.3: Conceptual flow of the printing process
Step4: Draw graphics shapes, lines, curves, text, and images. Once we have the printer surface, everything works in much the same way as the drawing process. We can call draw and fill methods to draw lines, curves, shapes, text, and images.
Step 5: Print. After we call the draw and fill methods of the Graphics object associated with a printer, the final step is to print the objects.
Programmatic Flow of the Printing Process
The previous section dealt with the conceptual flow of the printing process.
In this section we will examine the programmatic flow.
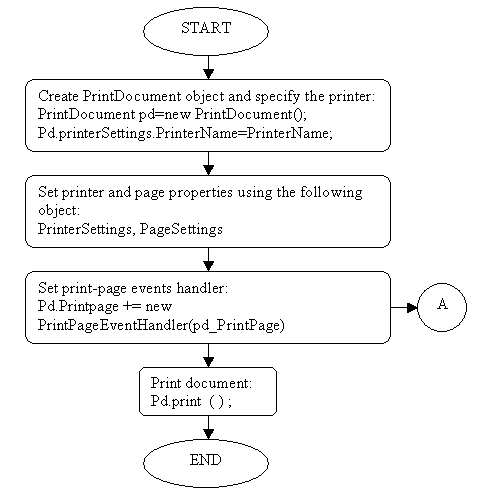
Figure 11.4 is a flowchart displaying the four programmatic steps of the printing process.
Step 1: Create a PrintDocument object and specify the printer. This printer will be used as a surface.
Step 2: Set the printer and page properties. We set the PrinterSettings and PageSettings objects for this optional step. If we don't set these properties, the default settings of the printer will be used. We will cover PrinterSettings and PageSettings in more detail later.
Step 3: Set the print-page event handler. The print-page event handler is responsible for printing. We create a print-page event handler by setting the PrintDocument.PrintPage member. Process A (see Figure 11.5) is called from the print-page event handler, as illustrated in Figure 11.4.
Step 4: Print the document. Finally, we call the PrintDocument. Print method, which sends printing objects to the printer.
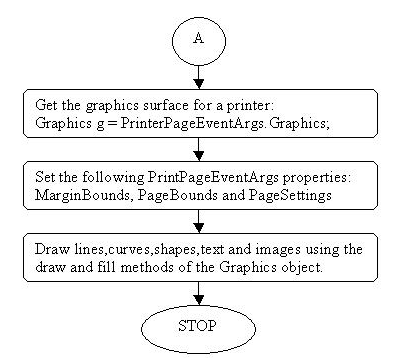
Process A, which is shown in Figure 11.5, describes how and what to send to the printer. This process is defined as the print-page event handler:
public void pd_PrintPage(object sender, PrintPAgeEventArgs ev)

FIGURE 11.4: A flowchart of the printing process
The second parameter, PrintPageEventArgs, provides access to the printer surface through its Graphics member. As Figure 11.5 shows, first we get the Graphics object from PrintPageEventArgs.
The next step is to set the page and paper setting using the MarginBounds, PageBounds, and PageSettings members of the PrintPageEventsArgs enumeration. We will discuss these properties in more detail later.
The final step of this process is to call draw and fill methods of the Graphics object as we used to do in the drawing process. We will see a working example of this process in Section 11.3.
The System.Drawing.Printing Namespace
In the .NET Framework, printing functionality is defined in the System.Drawing.Printing namespace, which resides in the System.

FIGURE 11.5: Process A
Drawing.dll assembly. The reference to this assembly is automatically added to an application when we create a new project using Visual Studio .NET. To use the printing-related classes, we can simply add the following line to the application:
using System.Drawing.Printing;
Alternatively, we can use the System.Drawing.Printing namespace by adding it to the class directly.
Note: Before you use any printer-related classes in your application, a printer must be installed on your machine.
Conclusion
Hope the article would have helped you in understanding Printing in GDI+. Read other articles on GDI+ on the website.
 |
This book teaches .NET developers how to work with GDI+ as they develop applications that include graphics, or that interact with monitors or printers. It begins by explaining the difference between GDI and GDI+, and covering the basic concepts of graphics programming in Windows. |