WrapPanel is similar to StackPanel but it has an additional feature. If elements that are stacked horizontally or vertically don't fit in the row or column they are in, the remaining elements will wrap around in the same sequence.
The WrapPanel element in XAML represents a WrapPanel. The following code snippet creates a WrapPanel and sets its height, width, and background properties at design-time using XAML.
<WrapPanel Width="300" Height="200"
Background="LightBlue" />
The Orientation property is used to wrap child items horizontally or vertically. The ItemHeight and ItemWidth properties of WrapPanel are used to set a fixed uniform height and width of all items that are contained within a WrapPanel. The following code snippet sets Orientation, ItemHeight, and ItemWidth properties of a WrapPanel in XAML. This below code will have every item within a WrapPanel have height and width 100 each.
<WrapPanel Width="300" Height="200"
Background="LightBlue" Orientation="Vertical"
ItemHeight="100" ItemWidth="100" />
Note: If you do not specify ItemHeight and ItemWidth properties of a WrapPanel, the default height and width of child items within a WrapPanel will be child elements height and width.
The code snippet in Listing 1 creates a WrapPanel control and keeps its orientation to horizontal by default.
<WrapPanel >
<Ellipse Width="100" Height="100" Fill="Red" />
<Ellipse Width="wrappanel-in-wpf" Height="wrappanel-in-wpf" Fill="Orange" />
<Ellipse Width="80" Height="80" Fill="Yellow" />
<Ellipse Width="70" Height="70" Fill="LightGreen" />
<Ellipse Width="60" Height="60" Fill="Green" />
<Ellipse Width="50" Height="50" Fill="LightBlue" />
<Ellipse Width="40" Height="40" Fill="Blue" />
<Ellipse Width="30" Height="30" Fill="Black" />
</WrapPanel>
Listing 1
The output looks like Figure 1 where all child controls are wrapped horizontally.
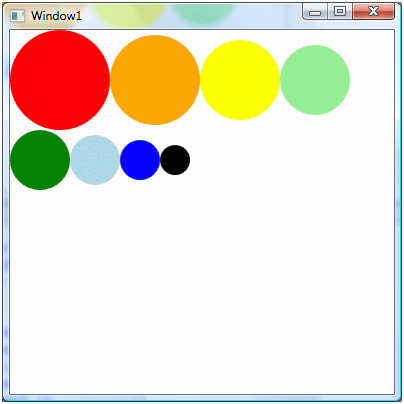
Figure 1
Now if you change orientation to vertical like the following code, the output looks like Figure 2.
<WrapPanel Orientation="Vertical">
As you can see Figure 2, the new controls are aligned vertically.
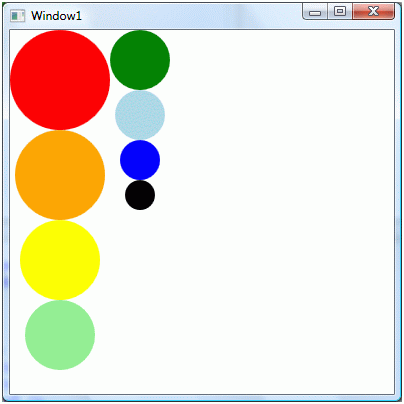
Figure 2
The WrapPanel class in WPF represents a WrapPanel. The code listed in Listing 2 creates a StackPanel dynamically, sets its properties and add five ellipses.
private void CreateDynamicWrapPanel()
{
// Create a WrapPanel and set its properties
WrapPanel dynamicWrapPanel = new WrapPanel();
dynamicWrapPanel.Background = new SolidColorBrush(Colors.LightBlue);
dynamicWrapPanel.Orientation = Orientation.Horizontal;
// Create Ellipses and add to StackPanel
Ellipse redCircle = new Ellipse();
redCircle.Width = 100;
redCircle.Height = 100;
redCircle.Fill = new SolidColorBrush(Colors.Red);
dynamicWrapPanel.Children.Add(redCircle);
Ellipse orangeCircle = new Ellipse();
orangeCircle.Width = 80;
orangeCircle.Height = 80;
orangeCircle.Fill = new SolidColorBrush(Colors.Orange);
dynamicWrapPanel.Children.Add(orangeCircle);
Ellipse yellowCircle = new Ellipse();
yellowCircle.Width = 60;
yellowCircle.Height = 60;
yellowCircle.Fill = new SolidColorBrush(Colors.Yellow);
dynamicWrapPanel.Children.Add(yellowCircle);
Ellipse greenCircle = new Ellipse();
greenCircle.Width = 40;
greenCircle.Height = 40;
greenCircle.Fill = new SolidColorBrush(Colors.Green);
dynamicWrapPanel.Children.Add(greenCircle);
Ellipse blueCircle = new Ellipse();
blueCircle.Width = 20;
blueCircle.Height = 20;
blueCircle.Fill = new SolidColorBrush(Colors.Blue);
dynamicWrapPanel.Children.Add(blueCircle);
// Display WrapPanel into a Window
RootWindow.Content = dynamicWrapPanel;
}
Listing 2