Introduction
The Android Text Control allows you to configure, style, and manipulate the controls in a variety of ways; we have so many useful attributes we can use within the application to change the style, position etc.
The four types of Text Control's in Android are:
- TextView
- EditText
- AutoCompleteTextView
- MultiCompleteTextView
You have already learned about the first two Text Controls in my previous article (Working With Text Controls in Mono for Android). In this article I am going to explain the next two Text Controls AutoCompleteTextView and MultiCompleteTextView.
AutoCompleteTextView
The AutoCompleteTextView is like a text box which can show suggestions based on a list of data that I provide as a source for this field. The list of suggestions is displayed in a drop down menu from which the user can choose an item to replace the content of the edit box with. The drop down can be dismissed at any time by pressing the back key or, if no item is selected in the drop down, by pressing the enter/dpad center key. AutoCompleteTextView has an Android:completionThreshold property, to indicate the minimum number of characters a user must enter before the list filtering begins.
Lets create AutoCompleteTextView
- Start a new project named AutoComplete
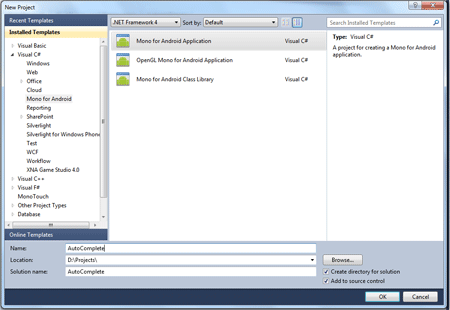
- Go to the Resources\layout\main.xml file and make changes
<?xml version="1.0" encoding="utf-8"?>
<LinearLayout xmlns:android="http://schemas.android.com/apk/res/android"
android:orientation="vertical"
android:layout_width="fill_parent"
android:layout_height="wrap_content"
>
<AutoCompleteTextView android:id="@+id/ACT"
android:layout_width="fill_parent"
android:layout_height="wrap_content"
/>
</LinearLayout>
In the above code you can see I create an simple AutoCompleteTextView.
-
Add a new Android layout inside the project layout folder
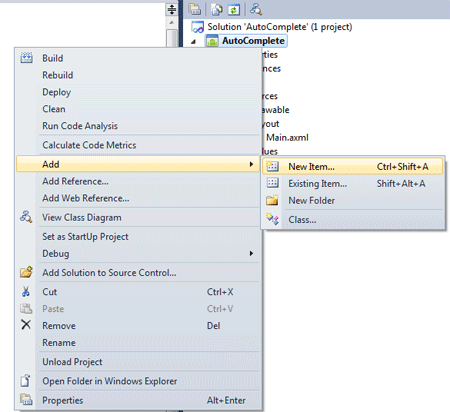
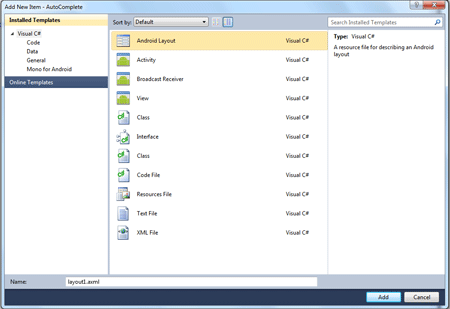
-
Open layout1.axml file and make changes, here we create a simple TextView for the items
<?xml version="1.0" encoding="utf-8"?>
<TextView xmlns:android="http://schemas.android.com/apk/res/android"
android:layout_width="fill_parent"
android:layout_height="fill_parent"
android:textSize="15sp"
android:textColor="#000"
></TextView>
-
Set the Build Action of layout1.axml file to AndroidResource
-
Now go to the Activity1.cs and create an string array inside the Activity1 class named names and insert values for it
static string[] names = new string[] {"Hello" , "He" , "Hell" , "Hewells" , "Heat" , "Henrry" , "House" , "Hole"};
-
At last write the following code below inside the OnCreate() method
AutoCompleteTextView textView = FindViewById<AutoCompleteTextView>(Resource.Id.ACT);
var adapter = new ArrayAdapter<String>(this, Resource.Layout.layout1, names);
textView.Adapter = adapter;
Here is the complete code of Activity.cs
using System;
using Android.App;
using Android.Content;
using Android.Runtime;
using Android.Views;
using Android.Widget;
using Android.OS;
namespace AutoComplete
{
[Activity(Label = "AutoComplete", MainLauncher = true, Icon = "@drawable/icon")]
public class Activity1 : Activity
{
static string[] names = new string[] { "Hello", "He", "Hell", "Hewells", "Heat", "Henrry", "House", "Hole" };
protected override void OnCreate(Bundle bundle)
{
base.OnCreate(bundle);
SetContentView(Resource.Layout.Main);
AutoCompleteTextView textView = FindViewById<AutoCompleteTextView>(Resource.Id.ACT);
var adapter = new ArrayAdapter<String>(this, Resource.Layout.layout1, names);
textView.Adapter = adapter;
}
}
}
-
Run the application, output looks like below
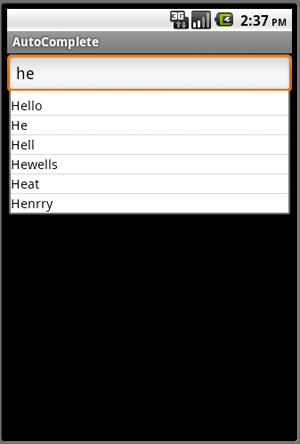
As you see above AutoComplete will populate the list of suggestions like you enter he than all the matching records will come out in the list. And following you see that if you increase the text like he to hel only two matching records will shows.
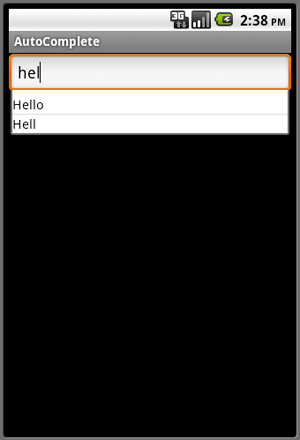
The drawback of using AutoCompleteTextView is that it would try to match the whole sentence not a single word like see the following; in the picture if you type a second word then no suggestions will be shown for the second word.
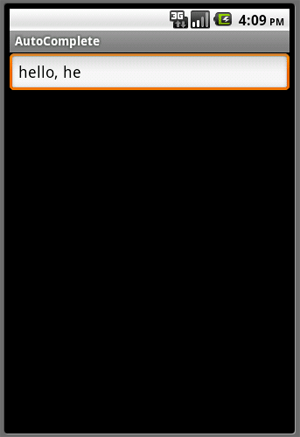
To overcome this drawback we have another TextControl in Android; it is MultiCompleteTextView.
MultiCompleteTextView
MultiAutoCompleteTextView works the same way as the AutoCompleteTextView except you can add a Tokenizer that parses the text and allows you to suggest where to start suggesting words.
Lets create MultiCompleteTextView
Performe all the steps thesame as you did above for AutoCompleteTextView except 2 and 7. So, you need to do following changes in these two steps:
- Step 2: Go to the Resources\layout\main.xml file and make changes
<?xml version="1.0" encoding="utf-8"?>
<LinearLayout xmlns:android="http://schemas.android.com/apk/res/android"
android:orientation="vertical"
android:layout_width="fill_parent"
android:layout_height="wrap_content"
>
<MultiAutoCompleteTextView android:id="@+id/ACT"
android:layout_width="fill_parent"
android:layout_height="wrap_content"
/>
</LinearLayout>
- Step 7: At last write the following code inside the OnCreate() method
MultiAutoCompleteTextView textView = FindViewById<MultiAutoCompleteTextView>(Resource.Id.ACT);
var adapter = new ArrayAdapter<String>(this, Resource.Layout.layout1, names);
textView.Adapter = adapter;
textView.SetTokenizer(new MultiAutoCompleteTextView.CommaTokenizer());
Here is the complete code of Activity.cs for MultiCompleteTextView
using System;
using Android.App;
using Android.Content;
using Android.Runtime;
using Android.Views;
using Android.Widget;
using Android.OS;
namespace MultiAutoComplete
{
[Activity(Label = "AutoComplete", MainLauncher = true, Icon = "@drawable/icon")]
public class Activity1 : Activity
{
static string[] names = new string[] { "Hello", "He", "Hell", "Hewells", "Heat", "Henrry", "House", "Hole" };
protected override void OnCreate(Bundle bundle)
{
base.OnCreate(bundle);
SetContentView(Resource.Layout.Main);
MultiAutoCompleteTextView textView = FindViewById<MultiAutoCompleteTextView>(Resource.Id.ACT);
var adapter = new ArrayAdapter<String>(this, Resource.Layout.layout1, names);
textView.Adapter = adapter;
textView.SetTokenizer(new MultiAutoCompleteTextView.CommaTokenizer());
}
}
}
- Run the application; the output looks like the following; suggestions will be shown for each word
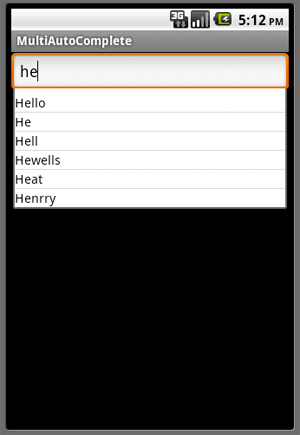
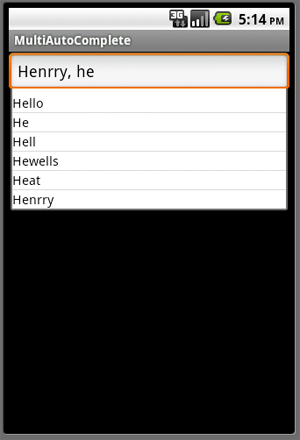
I hope you like this article. Post your comments and feedback so that I can improve myself.
Thank You.......