This article has been excerpted from book "Visual C# Programmer's Guide"
Any programmer, no matter how experienced, cannot create complex programs without any errors on the first attempt! Although syntax errors are reported at the compiler level, the compiler cannot detect and report more complex runtime errors. To determine the bugs of a program at runtime, we use debuggers. The .NET Framework provides two: CorDbg, the command-line runtime debugger, and DbgCLR, the Windows-based debugger. Both debuggers can be used only to debug managed code.
Debugging with CorDbg
The CorDbg debugger runs on the command line. Although CorDbg actually is more suitable for third-party tool developers and expert users, let's briefly explore use of this tool by debugging the code for the JustButton class defined in Listing 4.2.
Listing 4.2: JustButton Class (JustButton.cs)
using System;
using System.Windows.Forms;
public class JustButton : Form
{
private Button oneButton;
public JustButton()
{
oneButton = new Button();
oneButton.Text = "Click Me!";
oneButton.Dock = DockStyle.Bottom;
oneButton.Click += new System.EventHandler(Button_Clicked);
this.Controls.Add(oneButton);
}
protected void Button_Clicked(object sender, EventArgs e)
{
MessageBox.Show("The Button was Clicked!!");
}
[STAThread]
public static void Main()
{
Application.Run(new JustButton());
}
}
JustButton is a simple Windows form application that contains a single button. When you click the Click Me! button in the JustButton form, a message box (shown in Figure 4.9) is displayed.
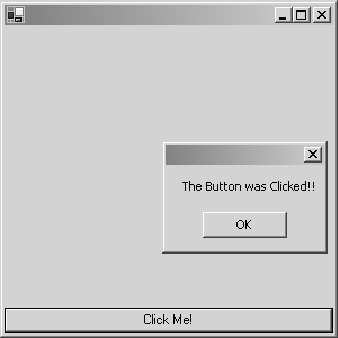
Figure 4.9: JustButton Form Application
Compile this class into a Windows application using the following command-line compilation string:
csc /debug+ /t:winexe JustButton.cs
Be sure use the /debug+ directive because it makes the compiler emit extra debugging information in a file called <filename>.pdb.
Once you compile the file, the next step is to debug this small program. Start up the command prompt window and navigate to the directory where you have compiled the above application. Now start the debugger by running the command CorDbg at the command prompt. This brings up the (CorDbg) command prompt. Use the CorDbg command called run JustButton to start debugging the application and load the debugging information from the *.pdb files. You will encounter errors if you don't have a corresponding *.pdb file for the referenced assemblies, but these errors can be ignored. Figure 4.10 shows a warning that CorDbg couldn't load symbols for mscorlib.dll and few other DLLs. Also shown in the figure is the line of source code where the debugger halted- Application.Run(new JustButton());.
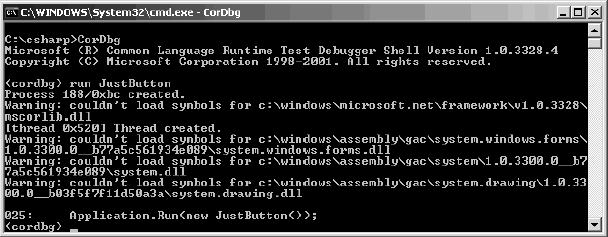
Figure 4.10: CorDbg Debugger
You can use commands such as ap to view the application domains and pro to view the current managed processes running.
To set a breakpoint, use the command b and specify the line number (in this example, the command b 19 sets the breakpoint on the 19th line of the source code). The debugger shows that the breakpoint has been set within the Button_Clicked method. Use the cont command to continue running the application. Once the application shows, click the Click Me! button and switch to the debugger window.
As shown in Figure 4.11, the JustButton application breaks at line 19 and the source code is shown in CorDbg.
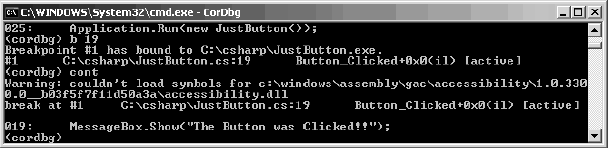
Figure 4.11: Breakpoint for JustButton Application
If you want to view the source code of a particular line, use the sh command and specify the line number (for the JustButton example, type sh 18). The selected line is marked with an asterisk (*), as shown in Figure 4.12.
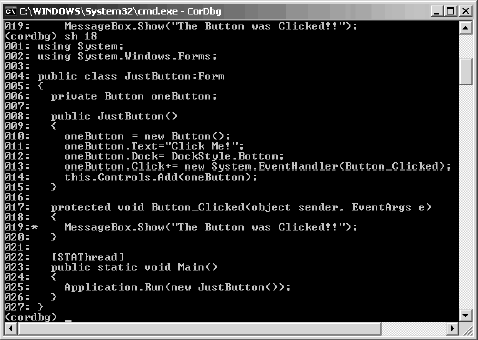
Figure 4.12: Viewing the Source Code with sh
To view the values of any of the variables, you can use the print <variable name> command. For example, to view the button instance, try using the print sender command, which lists the various properties of the button that raised this event (see Figure 4.13).
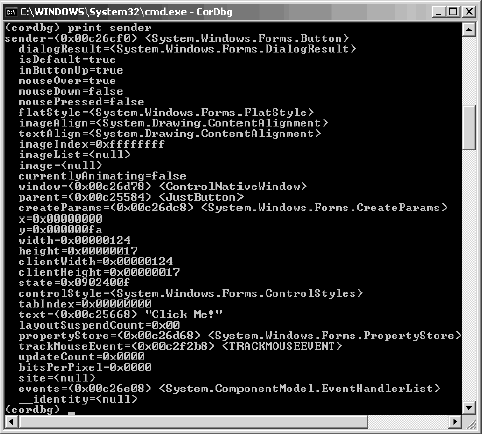
Figure 4.13: List of Property Values of the Button Instance After Using Print
To continue running the application, you can use the cont command, which displays the message box. Now every time you press the Click Me! button, the debugger automatically breaks at line 19. If you want to remove the breakpoint, you may do so in one of two ways. You can use del command to remove all the breakpoints; or, to remove a specific breakpoint, you may first use the break command to list all existing breakpoints along with their ID numbers and then use del <break id>, specifying the ID number of the breakpoint you wish to remove. Finally, to end debugging, use the ex command and exit the debugger.
Debugging with DbgCLR
The DbgCLR graphical user interface debugger is a downgraded version of the Visual Studio .NET debugger. It hosts the same interface and debugging methods but cannot compile applications or be used to write applications, whereas VS.NET can do all of the above and much more. You can find DbgCLR within tcausehe <drive>:\Program Files\Microsoft Visual Studio .NET\FrameworkSDK\GuiDebug directory. Run the tool and select the application to debug from the Debug menu's Program to Debug dialog box. Next, use the Open dialog box from the File menu to open the source code for debugging. Then you can set breakpoints in the source code and finally choose Run from the Debug menu to start debugging.
Because the rest of the debugging process with DbgCLR is identical to debugging with VS.NET, it is covered in the VS.NET debugger discussion that follows.
Using the Visual Studio .NET Debugger
The Visual Studio .NET debugger works best while debugging applications created in VS.NET. If you use it to debug other applications, its functionality is very similar to the DbgCLR tool. With the VS.NET debugger, you can debug all kinds of applications-console applications, library DLLs, Windows forms, Web forms, and Web services.
For a short look at how the debugger works, build the JustButton class in VS.NET, which is similar to the class built in the previous JustButton example. You can find the necessary VS.NET project file for this example in the downloadable code. In VS.NET, choose Open?Project from the File menu and select the JustButton project to open the project. This brings up the screen pictured in Figure 4.14.
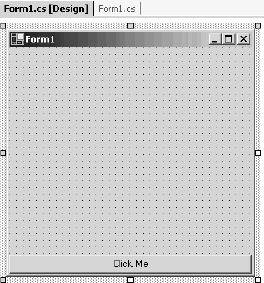
Figure 4.14: JustButton Class in VS.NET
Once you have the class ready, switch to the code view by either pressing the F7 shortcut key or selecting View?Code from the View menu. In code view, you have several ways to add breakpoints. You can click in the left margin alongside the line number; you can position the cursor on the line and press the F9 shortcut key; or you can press Ctrl+B to bring up a dialog box that helps you set advanced breakpoint options. Set a breakpoint on line 92 of the JustButton example, as shown in Figure 4.15.
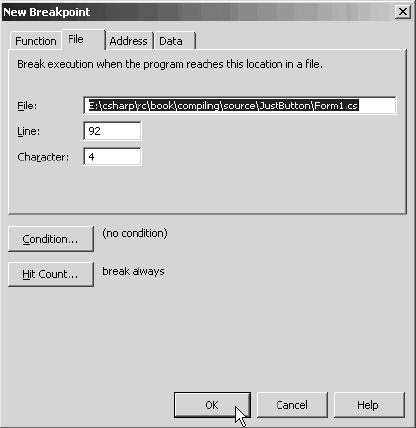
Figure 4.15: New Breakpoint Dialog Box
Once your breakpoints are set, select Start from the Debug menu. VS.NET automatically compiles the application and runs it. As soon as a breakpoint is reached, the application stops and you can view the details of the application in VS.NET. In this example, you must click the Click Me button so VS.NET will show the breakpoint you set on line 92 (Figure 4.16).
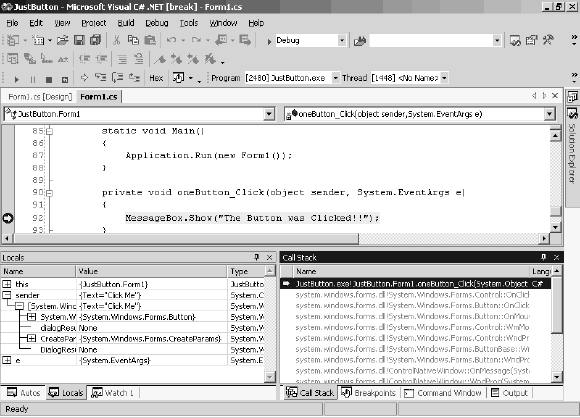
Figure 4.16: Debugging in VS.NET
As the figure shows, the VS.NET brings up a Locals window that lists all the method's variables in the local scope and their values at runtime. It is much easier to examine the values of different variables from the VS.NET debugger than from the CorDbg tool. From the Locals window, if you double-click an entry in the Value column and manually enter a value for a variable, the change is reflected immediately. Also shown in the figure is the Call Stack window, which displays the complete call stack for the application.
To continue running the application, you can choose Debug?Continue. You can also use functions such as Step Into, Step Over, or Step Out from the Debug menu to proceed with debugging line by line, to step over the breakpoint, or to step out of the breakpoint method, respectively. Once you finish debugging your application, select Stop Debugging from the Debug menu.
Conclusion
You may choose from many C# compiler options to compile your applications. ILDASM is a very useful tool that can be used to view the metadata of an assembly and disassemble an assembly into IL code. The ILASM tool can be used to compile MSIL code into a .NET assembly.
The .NET SDK provides a host of tools that support cross-language debugging, including the command-line debugger, CorDbg, and the Windows-based debugger, DbgCLR. The debugger included with Visual Studio .NET is equally powerful and easy to use.
See my other articles on the website on .NET and C#.